Quick and Crispy Home Fries – Or as We Call Them at Home, Fries

It’s a kind of ironic that the only place many people enjoy top-quality home fries is when they eat out at a diner, but sadly that’s the case. Your average home cook’s home fries look great, and we’ll assume taste amazing, but they usually don’t get that nice crispy crust, like the ones at the local greasy spoon.

The reason is simple. There the potatoes are steamed or boiled ahead of time; then cooled, cut, and kept chilled until service. When you pan fry a cold starch, it gets a beautifully crispy surface, which is the secret to the world’s great French fries, polenta sticks, and Korean fried chicken.

To expedite this process, we’re going to microwave the potatoes for a few minutes, until just barely tender. This simulates steaming, which I think is the best way, since boiling can make them waterlogged. Once cool, all you have to do is keep cooking until you’re happy with your crustification. I really hope you give this easy home fry technique  a try soon. Enjoy!


Ingredients for 2 large portions:
 3 large russet potatoes, peeled, quartered
2 tablespoons olive oil
1 tablespoon butter
pinch garlic powder
pinch onion powder
1/4 teaspoon paprika
salt, freshly ground black pepper, cayenne to taste
fresh chives to garnish are nice

Calamari Marinara – Would You Like That In 45 Seconds or 45 Minutes?

Calamari is affordable, delicious, and sustainable, yet many cooks shy away from it, since it has a reputation for being tricky to work with. I should’ve said “unfair reputation,” because while it’s true calamari can end up with a rubbery texture if overcooked, there’s a very simple way to avoid this… by really overcooking it.

When it comes to calamari, it needs to be cooked in either 45 seconds, or 45 minutes, and nothing in between. If you sear it in a pan, or poach it in a sauce for a very brief time, you should get something nice and tender. However, after just a few extra minutes, the squid gets chewy.

Unfortunately, this is how most calamari is served, since it is easy to overcook, even for a professional. But, if we gently simmer for about 45-minutes total, something amazing happens. The calamari loses that rubbery texture, and becomes tender once again.

I also think it takes on more a meaty flavor, which I love, especially when using this to sauce pasta. So, if you’ve wanted to try cooking calamari, but were afraid of over-cooking it, I really hope you give this easy sauce a try soon. Enjoy!


Ingredients for 4 portions:
2 tablespoons olive oil
1  yellow onion, sliced thin
4 garlic cloves, crushed
1 anchovy fillet
1/2 teaspoon red pepper flakes
1 Serrano chili pepper sliced thin
1/2 teaspoons salt, plus more if needed
1/2 cup drinkable white wine
1 cup clam juice
6 cups crushed or puréed Italian plum tomatoes
1/2 teaspoon dried oregano
2 pounds frozen calamari tubes and tentacles, thawed, sliced into half-inch pieces
1/4 cup freshly chopped Italian parsley
freshly grated Parmigiano-Reggiano, optional
1 pound dry pasta

Grilled Fava Beans – Flavor Flav, Indeed

I bet fava beans would be a lot more popular if people knew how to cook them, or even what they were. For many people, these are just those mysterious, semi-scary, oversized green beans that they’re not sure what to do with.

Which is a shame, since they’re not only delicious, and easy to prepare, but also very versatile. Fava beans shine in salads, and pastas, as well as on pizzas.  The also, as I demonstrated the end of the video, make for a wonderful spread.

By the way, the ingredient amounts below are pure guesses, since this is not the kind of recipe we're going to measure stuff for. Let your conscience be your guide, but remember what we're eating is inside that charred pod, so season generously.

Fava beans should be readily available this time of year, especially at farmers markets, where they tend to be much cheaper that your high-end grocery stores. Regardless of where you find them, I really do hope you give this great bean, and even better technique a try soon. Enjoy!


Ingredients for 2 large or 4 small portions:
2 pounds whole fava beans
olive oil, as needed
2 lemons
1 tablespoon kosher salt, divided
3 whole, peeled, bruised garlic cloves
red pepper flakes to taste
2 tablespoons freshly sliced mint leaves

- Grill over high heat for about five minutes per side, or until the pods are soft and charred, and the beans inside are just tender.

WARNING: Some people have an allergy to fava beans. Make sure you don't.

Hilah’s Happy Hour featuring Chef John’s First Podcast

That’s right, I did a podcast! Which, come to find out, is a great way to learn what those are. It’s basically like listening to the radio, only more complicated. Anyway, I appeared on Hilah’s Happy Hour, with the lovely and talented Hilah Johnson.

As you’ll hear, she does most of the heavy lifting in this free-flowing interview, but you'll also get a few behind-the-scenes tidbits from me, as well. I had a lot of fun doing it, and invite you to follow this link to check it out on her blog, as well as check out her highly entertaining recipe videos. Enjoy!

.

Spicy Thai Basil Chicken – My Pad Krapow Gai

I don’t cook Thai food at home often, mostly because there are at least a dozen such restaurants within walking distance, but when I do, there’s nothing I enjoy more than this spicy Thai basil chicken. Thai basil sold separately. 

No, I didn’t use the real “Holy” basil, but even with regular basil, this simple recipe is spectacular. Aromatic basil is the perfect herb for pairing with the slightly sweet, sort of salty, and possibly spicy, chopped meat.

And yes, you really do want to chop, or grind your own chicken. Even if the worst-case scenario I shared in the video isn’t something you’re grocery store would do, it’s still very nice to know exactly what you’re eating, as well as being able to chop it as coarsely as you want.

If you decide to top with an egg, I should mention that they’re usually fried much more aggressively, with the edges getting brown and crispy. I tend to prefer something a little more gently cooked, but either way, or with none at all, I really do hope you give this delicious basil chicken recipe a try soon.  Enjoy!


Ingredients for two large or four smaller portions:
2 tablespoons vegetable oil
1 pound freshly chopped chicken thighs
1/4 cup sliced shallots
4 cloves garlic, minced
2 tablespoons minced Thai chilies, Serrano, or other hot pepper
1/3 cup chicken broth
1 tablespoon soy sauce, or as needed
1 tablespoon oyster sauce
2 teaspoons fish sauce
1 teaspoon white sugar
1 teaspoon brown sugar
1 bunch basil leaves, sliced very thin with a sharp knife (about a cup once sliced)

Hot Cross Buns – Mother Goose Would Love These

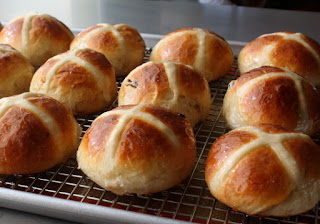
Pretty much all I know about hot cross buns, I learned from the nursery rhyme, but thanks to a recipe I found on Anson Mills, I was still able to make a fairly decent batch. Including real crosses, not to be confused with dinner rolls on which an icing cross has been piped.

In addition to its eye-catching appearance, the dough-based “cross” provides an interesting textual contrast, as it gets sort of chewy, and crispy edged.

Like I said in the video, any sweet dough will work with this easy technique, especially rich, and fragrant examples, like our Italian Easter Bread dough. Times may vary, but regardless of the dough, simply wait for the dough to double in size, and proceed.

If you want to get all your buns the same size, weight your dough in grams before dividing, and then divide by 16. Then, weight each of your dough balls to that exact amount, and boom, your tray of buns will look like the ones you saw on that magazine cover. Or, just eyeball it and take your chances. Either way, I really hope you give this a try soon. Enjoy!


Ingredients for 15 or 16 Hot Cross Buns:
Recipe slightly adapted from this one from Anson Mills
1/4 cup currants, soaked in hot rum for an hour or two
3/4 cup milk warmed to 100 F.
1 package dry active yeast
1 tablespoon each orange and lemon zest
7 tablespoons melted butter
1/4 cup plus 1 tablespoon sugar
1 large egg, beaten
1/2 teaspoon ground cardamom
1/4 teaspoon ground nutmeg
3/4 teaspoon ground cinnamon
1/2 teaspoon fine salt
3 cups bread *flour, plus more if needed

* hold back a little of the flour until you sure you need it. You can always add, but can’t remove!

For the crosses:
1/4 cup water
1/3 cup all-purpose flour, plus more to make a thin, pipe-able dough

- Bake at 425 F. for about 15 minutes

For the glaze:
1/4 cup sugar
3 tablespoons water
- Cook syrup to 225 F., and brush over warm

Fresh Strawberry Jam – Because Man Cannot Live on Clotted Cream Alone

Actually, I don’t think you can live on just clotted cream and fruit preserves either, but regardless, as promised, here’s my preferred method for making strawberry jam. While amazingly delicious, and quite satisfying to make, I’ll have to put this on the same list as homemade ketchup. This is fun to make once in a while, but due to the effort, and time involved, Smuckers has nothing to worry about.

This version features a lot less sugar than many recipes, which is kind of crazy, since we use over two cups, as well as a homemade pectin puree, to help tighten-up the texture. Feel free to use pectin powder or liquid instead, but I think I did a pretty good job explaining why I don’t in the video.

Strawberries should be sweet, and plentiful this time year, so if you’re looking for a fun project, especially if your last fun project was making clotted cream, I really hope you give this delicious, fresh strawberry jam a try soon. Enjoy!


Ingredients for about 3 cups of Strawberry Jam:
For the pectin puree:
3 apples, chopped
1 lemon, chopped
1 cup water
For the jam:
3 pounds strawberries, rinsed, and trimmed
1 1/2 cups (or whatever you got) pectin puree
2 1/4 cups white sugar, added in two additions
1 teaspoon fresh lemon juice

Please Note: To test without a thermometer, wait until the jam starts to reduce and thicken, and spoon some of the mixture on a plate, and place in the freezer for a few minutes, until the jam is cold. If it's jelled, you're done. If it's still runny, keep cooking, and testing. 

Baked Spring Rolls


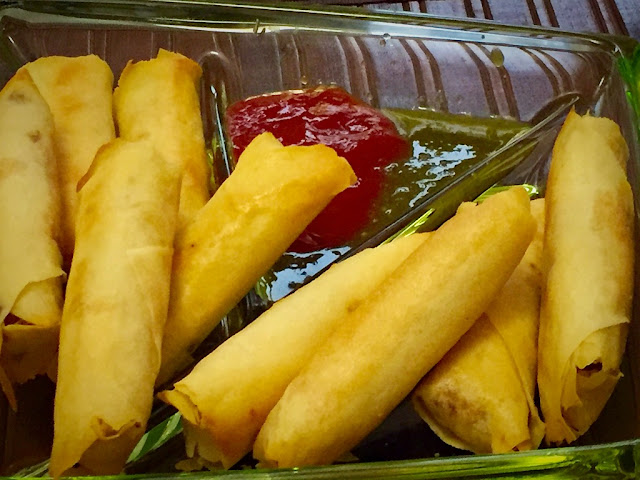
I have always fried spring rolls and have not tried baking them until today. I don't know why I always felt they would not be crispy enough. But this time they were as good as fried ones and my husband could not tell that they were baked  until I told him which kind of left him confused. They were not only crisp and crunchy but also not oily. I smeared them with olive oil and they turned out great. I can eat them without feeling guilty as they are healthy.   


Ingredients: For 12 Spring Rolls

24 Spring Roll Wrappers
1/2 Cup Shredded Chicken (1/2 Chicken breast)
1/2 Tsp Garlic paste
2 Cups Japanese style flat white Cabbage (finely grated)
1/4 Cup Carrot (thinly grated) 
2 Tbs finely chopped spring onions
1 Boiled egg
1/4 Tsp Black Pepper 
1/2 Tsp Hoisin Sauce
2 or 3 drops of Sesame oil
2 Tbs Olive oil
Flour and water paste
Sea Salt as required

Method:

1. Steam the chicken breast in a covered pot with a little water, garlic paste, salt and pepper till completely cooked. Remove and let it cool.

2. Grate the cabbage finely or slice thinly with a sharp knife to get long shreds. Add one tsp salt to the cabbage and mix it well by rubbing it with the salt with your fingers till the salt is dissolved and the cabbage starts oozing out water. Drain the water and repeat working with your fingers this time without the salt. Drain well again. Then wipe the shredded cabbage with paper towels till dry. Set aside.

3. Grate the carrot or make thin juliennes from thinly sliced carrots. Finely chop the spring onions.

4. Grate a hard boiled egg. Shred the steamed chicken with a fork and knife. 

5. Mix together the carrot, cabbage, spring onions, egg and chicken. Sprinkle some salt and black pepper as per taste, then 1/2 tsp hoisin sauce and 2 or 3 drops of sesame oil.

6. Place a portion of the filling in the near corner of the spring roll wrapper and apply the flour and water paste to the far corner away from you. You can also use egg white to seal instead of flour paste. Roll over neatly while tucking the near corner under the filling. When you roll to the centre of the square fold in both the sides then roll again tightly till the end (I used 2 wrappers for each roll coz my filling was a bit moist and I didn't want them to get soggy). For exact instructions please watch this video.

7. Brush the spring rolls with olive oil and place them on a cookie sheet lined with parchment paper. 

8. Bake in an oven preheated at 350 degrees fahrenheit for 30- 35 mins. The timing may differ with other ovens. When you are half way through baking turn them over and then bake till golden or evenly browned. Enjoy with sauces of your choice. 

The Name's Cream...Clotted Cream

If you invented a cream preparation so incredibly delicious that you couldn’t bear the thought of anyone besides you, and the other dairy farmers in the area enjoying it, adding the word “clotted” to the name is a pretty sound strategy.

While the name doesn’t exactly make the mouth water, the flavor and texture are the stuff of legends. The long, slow cooking sort of toasts the cream, which imparts a sweet, nuttiness that I don’t think I’ve tasted in any other preparation.

Most modern ovens go down as low as 175-180 F., which is ideal for this technique. 200 F. will work, but maybe check after 10 hours, and see how things look. The other huge factor here is the cream. Be sure to get the best you can. It should be from grass-fed cows, and have a fat content of between 36-40%.

Avoid anything that says “Ultra-Pasteurized,” since it’s been heat-treated, and you’ll not get the same results. Other than this taking a day or two, the technique could not be easier, and I wasn’t exaggerating when I said it’s one of the most amazing things ever. I really do hope you give this a try soon.  Enjoy!


Ingredients:
4 cups heavy cream
8 x 8-inch glass or ceramic baking dish
- Bake at 175-180 F. for 12 hours. Chill overnight before separating the “clots.” Use the reserved liquid for baking biscuits.