I’ll admit to being pretty underwhelmed the first time I had a chocolate croissant, or “pain au chocolat,”as I’d mispronounce it; but eventually I realized the relatively sparse amount of chocolate wasn’t any kind of stinginess, but rather the true secret behind this amazing pastry.
Properly done, this should ride that line between sweet pastry and a savory bread, so don’t overdo it with the chocolate chunks; otherwise you’ll lose that beautiful balance. Other than that, not much can go wrong. Just be sure to bake them until nicely browned, and let them cool before enjoying.
While this will work with that dough in the tube, I’d like to think you’d make a batch of your own dough using our recently posted croissant recipe. Don’t worry, it only seems like a lot of work. Either way, I really do hope you give these chocolate croissants a try soon. Enjoy!
I don’t remember that much about the lobster thermidor I ate in culinary school in the early eighties, other than not really being able to taste any lobster. Instead of the nice, light sauce I used here, the meat was hidden in a thick, eggy, cheese sludge, which looked great broiled to a bubbly, golden-brown, but wasn’t the best method if you actually wanted to know you were eating lobster.
Lobster is sort of sweet, and rich tasting to begin with, so covering it in a super heavy sauce never made much sense, which is why I like this approach so much more. Our sauce is just heavy enough to coat the chunks of meat, without hiding it, and while we’re not adding handfuls of cheese, or a bunch of egg yolks, we’re still going to enjoy a fairly decadent dish.
Not only is this great for a fancy dinner party because it looks and tastes great, but you can also do all the prep ahead of time, and then just pop them in the oven when you’re ready for service. If you go that route, they’re going to be much colder, so you’ll probably need to give them a few extra minutes in the oven. Remember, everything is already cooked, so just roast until the meat is heated through.
The classic version is made with a whole, split lobster, which admittedly tastes better, but is a hundred times messier, and harder to do, not to mention probably more expensive. Frozen lobster tails can be surprising affordable, and there isn’t any waste. Either way, I really hope you give this a try soon. Enjoy!
Ingredients for 2 large or 4 appetizer size portions:
I wouldn’t describe homemade croissants as an easy recipe, since there are multiple steps, and it does take a least half a day, but it’s really not that hard either; and certainly simpler than flying to Paris, which is the only other way to enjoy these amazing pastries.
Sure, some of you may live near an authentic French bakery, maybe even one of the few that still use pure butter, but for the sake of this post, let’s assume that you don’t. Besides, sitting next to a basket of homemade croissants raises your foodie street cred like few other things.
Despite taking a fair amount to time, this is actually the quick version, in that we’re not leaving the dough to rest overnight, before laminating with the butter. I don’t think there’s a huge difference, but I did want to mention in case you’d prefer to start the dough at night, and do the rest of the work the next day.
The technique is pretty straightforward, but be sure to pay attention to the temperature of your butter.If you’re slab is too soft, it will just blend into the dough, and you won’t get the gorgeous layering seen herein. And if it’s too cold in firm, it won’t spread between the layers of dough like it needs to. It should basically have the firmness of clay.
So, take your time, and when in doubt, pop the dough in the fridge for a few minutes to chill it down as you’re working. You’ll notice I didn’t serve anything on my croissants when I did the final shots, and if you make these, you’ll understand why.I really do hope you give these a try soon. Enjoy!
I’ve wanted to do a Canelés de Bordeaux video forever, but just never got around to buying the specially designed molds that they require. After seeing a picture of them online a few days ago, I decided this would be the week, and headed out to the one store near me I knew carried the necessary hardware.
Since it was actually a hardware store that also carries lots of kitchen equipment, I figured they would have the beeswax, as well. I’ve been in that store at least a hundred times, and I would anyways see the canelé molds beckoning me, but never pulled trigger, since I was usually looking for something else.
So, you can imagine my shock when I walked down that aisle, as I’d done so many times before, only to find they were no longer stocked. Thanks a lot, Amazon. Anyway, purely out of spite, I decided to make them anyway, using a regular muffin pan, and the results were pretty amazing.
As long as you cook them long enough, the muffin tin works great, assuming you don’t care about getting the classic shape. Since this was an experiment, I only did six, but I’ve scaled the recipe below to make 12. I’m not sure how many real canelé molds this recipe will fill, but it’s probably close to that. Either way, I really hope you give these a try soon. Enjoy!
Ingredients for 12 Canelé de Bordeaux:
2 cups whole milk
2 tablespoons plus one teaspoon unsalted butter
1 cup white granulated sugar
1 cup all-purpose flour
4 egg yolks
1/4 teaspoon kosher salt, or 1/8 teaspoon of fine salt
1 teaspoon vanilla extract
1/4 cup rum
For greasing pan:
2 tablespoons butter
2 tablespoons beeswax
- Bake at 450 F. for 10 minutes, then at 375 F. for about 50 minutes more, or until well browned.
-- NOTE: These only stay crispy for about 8 hours. So, fair warning if you plan to make them a day ahead. I've never tried to re-crisp.
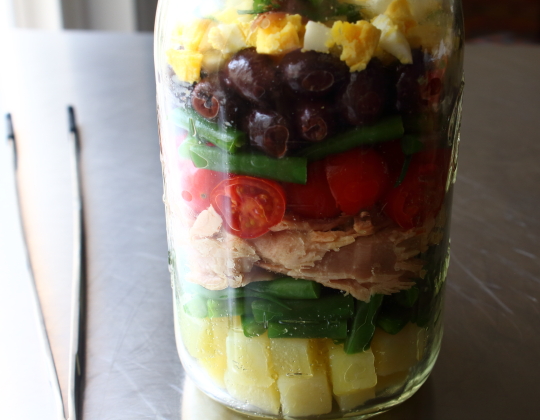
I know I’ve made fun of salads served in Mason jars before, but when I was asked to contribute a layered Nicoise to an Allrecipes Easter feature, I immediately thought of this tragically hip presentation. Also, I didn’t have a straight-sided, see-through glass bowl to do the layered salad in.
I love a good Nicoise, and it’s perfect for layering, especially if you slice/chop up the ingredients first. Not only will your layers be easier to keep straight, but chopped salads are always a pleasure to toss with dressing. Speaking of which, I really enjoyed this avocado spiked French-style vinaigrette, and it paired perfectly with the rich, fatty, olive oil-packed tuna.
Look for something from Spain or Italy, and you will be impressed with how much nicer it is than the stuff Charlie and his buddies are pushing. So, whether you composed this on a plate, in the classic fashion, or follow my lead, and create the world’s trendiest Nicoise, I really hope you give this a try soon. Enjoy!
Every once in a while, I get a food wish that has nothing to do with a specific recipe, but rather it’s a request to post something complicated, and challenging to do. Well, this country-style pâté is about as close as we’re going to get.
Calling this recipe complicated is sort of a stretch; "involved” would probably be more accurate. There are many steps, and the ingredient list isn’t short, but none of the techniques are very difficult, or particularly time-consuming.
Coarsely grinding the meat is probably the most crucial step, but as you saw, if the meat is very cold, the attachment on your stand mixer will do an adequate job. If you don’t have one, you can pulse on and off in a food processor, and as long as your meat was partially frozen, this will work.
Another option is just to place your meat order with a real butcher, and ask them to coarsely grind it all together for you, after which you can simply process the rest of your ingredients, and add them to your already ground meat and fat. Speaking of fat, I used some chopped up bacon, but virtually any kind of pork fat will work.
If you do use bacon, either in the pâté, orto wrap with, I suggest using one that’s lightly smoked, so as not to overpower the rest of the flavors. Anyway,I realize this may seem like quite a production, but if you enjoy charcuterie, this would make for a very fun, beautiful,and quite delicious project. I hope you give this a try soon. Enjoy!
Ingredients for one Pâté de Campagne (16 portions):
6 ounces duck leg meat (meat removed from 2 or 3 legs)
4 ounces fatty bacon, chopped
4 ounces chicken livers, roughly chopped
1 small yellow onion, diced
1 shallot, thinly sliced
4 cloves minced garlic
1/3 cup chopped Italian parsley
25 grams kosher salt (about 5 teaspoons)
1/8 teaspoon “instacure” pink curing salt
3/4 teaspoon *pate spice mix
1 teaspoon freshly ground black pepper
1/4 cup cognac or brandy
1/3 cup plain dry bread crumbs
2 large eggs
1/2 cup heavy cream 1/2 cup dried cherries, optional 1/2 cup pistachios, optional
8-10 sliced of bacon, or a few sheets of caul fat to line the **mold * For the Pâté Spice:
1 teaspoon ground cloves
1 teaspoon ground nutmeg
1 teaspoon ground ginger
1 teaspoon cayenne pepper
** My bread pan was a little smaller than standard, but a regular 9 x 5 inch loaf pan should work perfectly here. -- Cook in water bath at 350 F. until internal temp of 155 F.
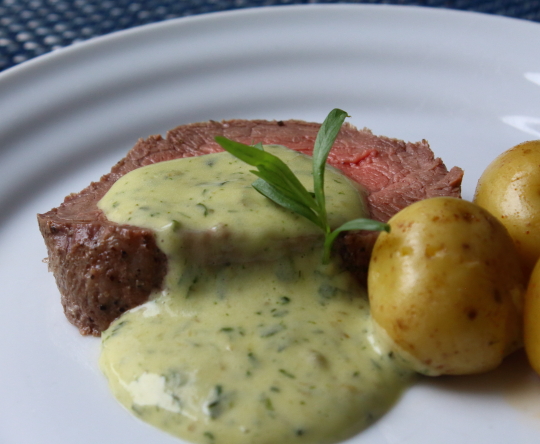
I adore a good hollandaise, and couldn’t survive without mayonnaise, but if I had to pick an all-time favorite ’aise, it might just be béarnaise. This tarragon-spiked, shallot-infused hollandaise is absolutely perfect with any and all steaks or roasts; especially lean ones, like our recent salt-crust beef tenderloin.
A sauce made from 75% butter has some advantages, and elevating lean meat is just one of them. This is also excellent on potatoes, vegetables, as well as just about any seafood I can imagine. And as I mentioned in the video, this can be used to make quite the memorable eggs Benedict.
We’re using the same revolutionary technique here that we featured in our last hollandaise sauce video, with one small tweak.If you’re feeling lucky, try to create your hollandaise over medium heat, instead of low. That’s what I usually use, but I played it safe, and went with low heat in that recipe, even though using medium is much faster.
You’ll have to keep an eye on things, but you should get results similar to what you see in this video. By the way, just like when making regular hollandaise you can adjust the thickness by adding in a little hot water if necessary. So, whether you’re going to enjoy this with salt-crusted beef tenderloin, or something else just as special, I hope you give this béarnaise sauce a try soon. Enjoy!
This mille feuille, which I’m sure I pronounced perfectly in the video, is also referred to as a Napoleon, and is the easiest, “fancy” pastry I know. The technique for creating your “thousand leaves” is very simple, especially if you use frozen dough, which any sensible person should do.
Whether you use frozen or homemade dough, the key is to keep it flat. We do this by “docking” the dough, and pressing with another pan. I used a few layers of foil before placing the pan on top, to make sure it was in contact with the dough, and depending on the size and shape of your pans, you may need to do the same.
Most patisseriers will make these well ahead, and keep them in the fridge, so that the pastry softens a bit, as it absorbs moisture from the filling. This is standard procedure, and they are much easier to eat that way, but I actually prefer to enjoy them right away, so as to fully experience the contrast between the crispy, buttery pastry, and the cold, creamy custard.
Stay tuned for the new and improved pastry cream video heading your way soon. In the meantime, your favorite recipe should work, as well as things like whipped cream, sweetened ricotta/mascarpone, and/or lemon curd. I really hope you give this a try soon. Enjoy!
-- Bake at 400 F. for about 15 minutes “pressed,” and then continue for another 10-15 minutes, uncovered, or until browned and crisp. I turned mine once during that time.
-- To make the icing, simply add enough water or milk to powdered sugar, until the right consistency is reached.For the chocolate one, I started with one part unsweetened cocoa to four parts powdered sugar, and then stirred in the liquid. Check this video if you are confused.
I’m all about simply prepared vegetables, but every once in a while I need to cover them in caramelized pork and cheese, and this stunningly delicious pancetta-wrapped leek gratin was one of those times. I love those times.
This “umami bomb” is so flavorful and satisfying, it almost seems disrespectful to serve it as a side dish. Pair this with a slice of buttered bread, hedge your bets with a glass of Sauvignon Blanc, and enjoy a truly special lunch.
For extra credit, after you finish your meal, call your best French friend and describe what you had. They will love and hate you for it. So, whether you make this for lunch, or use it to upstage a steak or grilled piece of salmon, I hope you give this great leek gratin a try soon. Enjoy!
Ingredients for 2 portions:
3 large leeks
about 4 oz pancetta
2 tsp olive oil
salt, pepper and cayenne to taste
1/4 cup chicken broth
1/4 cup drinkable white wine
1/3 cup heavy cream
finely grated Parmigiano-Reggiano cheese as needed chives to garnish
I don’t think I’ve made Duck “a l'Orange” since culinary school, nor tried to pronounce it, but thanks to a rather enticing photo in a friend’s cookbook, I decided to go full culinary time machine, and I’m so glad I did.
This is one of those classic dishes that somehow became a cliché, and people stopped making it for fear of looking un-cool, which is too bad, since it’s really good. This is traditionally done with a whole roasted duck, but by using breasts we get pretty much the same results, in a lot less time.
My version is very close to Hank’s, except I don’t use orange juice. I prefer the flavor of the sauce with just marmalade, zest, and Grand Marnier. Speaking of the Grand Marnier, other than other orange liquors, I’ll be offering no alternatives. That’s what literally gives the sauce its soul.
By the way, if you want to raise your “game” game, I encourage you to check out Hank's cookbook. I think it’s very well done, and gets basically all 5-star reviews on Amazon. So, check that out, check this out, and as always enjoy!
Coquilles St-Jacques is the kind of unapologetically rich shellfish dish that we used to be able to enjoy, before the book-writing dieticians and celebrity chefs ruined it for everybody.
Fats of all sorts were demonized, and young cooks far and wide were told to never, ever, under any circumstances, cover-up the delicate flavors of seafood with heavy sauces, especially ones containing cheese.
So, an amazing recipe like this went from classic French treat to crime against nature, and it slowly but surely started disappearing from menus. You can still find it in a few of the braver bistros, but to enjoy on any kind of semi-regular basis, you’ll need to master it at home. The good news is that’s very easy to do.
By the way, this is a great recipe for entertaining larger groups during the holidays, since it can be prepped well ahead of time. For this reason, Coquilles St-Jacques has always been a favorite of caterers and banquet chefs, and below the ingredients list, I’ll give some instructions on how they do it.
You can use sea scallops like I did, or the smaller, sweeter bay scallops, which are really nice in this. Of course, if you use bay scallops, you’ll only need a minute in the simmering wine, so be careful. No matter what you use, be sure they haven’t been dipped in a preservative solution. If you buy them frozen, which you should, the label should only say, “Scallops.”
The shells can be easily found online, or at your local restaurant supply store. Otherwise, simply use some small, shallow gratin dishes, which will work exactly the same. Find something, and give this “scallop recipe that time forgot” a try soon. Enjoy!
Ingredients for 4 portions:
2 tbsp unsalted butter
1/2 cup diced shallots 8 oz button mushrooms, sliced
salt and pepper to taste
1 cup white wine
1 pound sea scallops (about 3 scallops per person)
1/2 cup heavy cream 1 egg yolk
cayenne to taste 2 tsp minced tarragon
1 tsp lemon zest
1/4 cup grated Gruyère cheese
Broil on high, about 8-10 inches under the flame, until the scallops are hot, and the cheese is browned and bubbling. Because of the sugars in the wine and cream, the edges will brûlée or burn, but this is not a problem, and actually how it’s supposed to look.
NOTE: You can make these ahead, and refrigerate until needed. Since they will be cold, you’ll need to bring back to temperature before you broil them. Preheat oven to 350 F. and bake for about 12-15 minutes (will depend on how you constructed them), or until the centers are just warm. Switch oven to broil, and broil on high as shown.
I did it. I made macarons. Finally, I can apply for my food blogger merit badge! Hold on, I’m being told I still need to make mini-cupcakes and a quinoa salad to qualify. Oh well, I’ve waited this long.
Anyway, this was my first attempt at macarons, and for not having any clue what I was doing, I was quite happy with the results. They looked fine, and the texture was almost identical to the ones sold at Chantal Guillon, a famous macaron bar here in San Francisco.
So, was it beginners luck? Yes. You would think since I waited three years to make these, I would have done more research, but I did almost none. In fact, I literally used the first chocolate macaron recipe I found, which happened to be from David Lebovitz. He’s an American, but he lives in Paris, so I figured I was okay.
I watched a few videos, read a few articles, had a couple drinks, looked at a few step-by-steps, and off I went. One thing I did notice was every single resource used a different recipe, as well as different times, temperatures, and techniques. So, I figured I would just use my instincts and try the most straightforward method possible.
I didn’t do any high-heat/low-heat tricks; no waiting for the tops to dry; no sugar syrups, etc. I just made the batter, piped it out, baked them off, and as you can see, they were not bad at all. One thing I did figure out all by myself was to use the ugly ones as the bottoms. By the way, there’s a very inappropriate metaphor there, if you’re looking.
So, here’s the deal; if you’ve never made these before, I hope this inspires you to give them a go. Believe me, if I can do these anyone can. However, if you’re an experienced macaron maker, we’d love to have you chime in. I can’t wait for this comment section to fill up with invaluable tips and tricks for what I should have done, and how I should have done it.
I know I piped them wrong. You’re not supposed to make a swirl, but keep the tip pressed in the center as you squeeze. I also heard that I should have cooked one pan at a time, because the bottom pan is more likely to crack. What else? Don’t worry about my feelings…after four years of posting videos on YouTube, I don’t have any left…so let me have it. And, as always, enjoy!
*Weighing the ingredients is critical. Do not make these unless you have a digital kitchen scale!
100 gram powdered sugar
50 grams almond meal aka almond flour (the finer the better)
25 grams unsweetened cocoa powder
2 large room temperature egg whites
65 grams granulated sugar
For chocolate ganache:
1/3 cup hot heavy cream
4 ounces dark chocolate, chopped
pinch of salt
*pour hot cream over chocolate, and stir until smooth. Allow to cool slightly before filling cooled cookies.
Bonus Coverage: For more chocolate macaron information, my friend Denise from ChezUs makes some amazing ones, and knows WAY more about these than I do, so you can bug her with your questions too! ;-)