Tampilkan postingan dengan label Dessert. Tampilkan semua postingan

Nipples of Venus (Capezzoli di Venere) - Keeping Abreast of the Latest in Valentine’s Day Confections

I don’t remember much about the movie, Amadeus, which isn’t surprising, since I don’t remember that much about the early eighties in general, but I do recall the famous “Nipples of Venus” scene. At the time, I wondered if that was actually a real thing, or just something made up for the movie, but since there was no Internet yet, I never found out.

Fast forward thirty-plus years later, and inspired by a viewer’s request, I finally learned that these were in fact real, and very delicious, thanks in part to star of the show, chestnuts. While not a common ingredient, chestnuts aren’t that hard to find, and worth the effort, since they work really well in this.

If you must, another nut like almond, or hazelnut, should work about the same, especially when you consider your guest, or guests, will be fairly distracted by the eye-opening appearance. Speaking of Netflix and chill, you could show Amadeus after dinner, with these served as a sexy snack during the viewing. From there, you’re on your own. Regardless of whether you serve these on Valentine’s Day or not, I still really hope you give them a try soon. Enjoy!


Ingredients for about 24 Nipples of Venus:
5 tablespoons unsalted butter, room temp
1/3 cup white sugar
6 ounces dark chocolate
14 ounces whole chestnuts
pinch of salt
pinch of cayenne
1 teaspoon vanilla extract
1/4 cup brandy
*8 ounces white chocolate, chopped, divided
1/3 cup powdered sugar
enough milk to make a very thick paste
1 or 2 drops red food coloring

*This is more white chocolate than you need for coating, but that's how this stuff works. Just eat the rest. 

Chocolate Croissants – But Just Barely

I’ll admit to being pretty underwhelmed the first time I had a chocolate croissant, or “pain au chocolat,”as I’d mispronounce it; but eventually I realized the relatively sparse amount of chocolate wasn’t any kind of stinginess, but rather the true secret behind this amazing pastry.

Properly done, this should ride that line between sweet pastry and a savory bread, so don’t overdo it with the chocolate chunks; otherwise you’ll lose that beautiful balance. Other than that, not much can go wrong. Just be sure to bake them until nicely browned, and let them cool before enjoying.

While this will work with that dough in the tube, I’d like to think you’d make a batch of your own dough using our recently posted croissant recipe. Don’t worry, it only seems like a lot of work. Either way, I really do hope you give these chocolate croissants a try soon. Enjoy!


Ingredients for 12 Chocolate Croissants:
1 batch of croissant dough from this recipe (split in half for two batches of 6)
about 1 cup roughly chopped chocolate chunks, or chips
1 large egg, plus 1 tablespoon of water for the egg wash
coarsely ground sea salt
- Bake at 400 F. for about 20-25 minutes, or until well-browned

Chocolate Bark – Temper, Temper

In addition to sharing an easy, and beautiful edible holiday gift idea, I wanted to make this chocolate bark so I could test a simplified technique for tempering chocolate without a thermometer. It sounded too good to be true, but worked fairly well, which is the problem. Is fairly good, okay? 

Properly tempered chocolate will snap when broken, and retain that gorgeous glossy sheen. Poorly tempered chocolate is sort of dull grey, and the texture is soft, and waxy. This was somewhere in the middle.

Using this method, you will get close to properly tempered chocolate, and you might get lucky, and actually end up with perfectly tempered chocolate, but in hindsight, since using a thermometer isn’t really hard, and the extra steps required not that strenuous, I’ll probably just do it the right way next time.

In fact, I may do a future chocolate truffle video as an excuse to show you the “professional” method, but in the meantime, check out this great article I found on Allrecipes, as well as this video from Monarch Media that does a good job of explaining the steps. There are also hundreds of other videos online that take you through the procedure. Regardless of which method you go with, quick and imprecise, or deliberate and exact, I stand by my assertion that this would make a great holiday gift. I hope you give it a try soon. Enjoy!


Ingredients for about 36 pieces of Chocolate Bark
1 1/2 pounds dark chocolate (70% cacao)
1 cup toasted walnuts, chopped
1 cup shelled, roasted, salted pistachios
1/2 cup dried gogi berries
about 1/2 teaspoon coarse sea salt

Buttermilk Pie – The Best Pie You’ve Never Heard Of

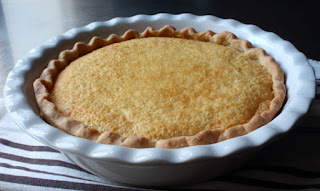
I can understand certain recipes being relatively unknown, but this buttermilk pie is not one of them. Not only is this easy to make, and beautiful to look at, it’s also bursting with the kind of bright, tangy flavor that no other custard-style pie can touch. Like I said in the video, this is sort of like a vanilla custard, meets lemon meringue pie, meets very light cheesecake. Except better.

I’ve never had much trouble finding buttermilk, even in regular, non-fancy grocery stores, but depending on where you live in the world, apparently that’s not the case. There are many “hacks” for making a substitute, usually using milk and lemon juice, or vinegar, and I’ll let you Google those at your leisure, but I’d be more inclined to try some yogurt, thinned out with some milk.

I think that would be closer to the tanginess of buttermilk, but as far as the recipe “working,” one cup of any type of dairy product should yield similar results. Once your pie is made, it can be served “as is,” or topped with seasonal fruit. I went with raspberries, mostly for the pictures, but if you were going to do this for the holidays, some persimmons, and/or pomegranate seeds would also be very nice. Regardless of how you serve it, I really do hope you give this a try soon. Enjoy!


Ingredients for one pie:
Enough pie dough for a 9-inch pie dish
(I used half a recipe of our butter crust dough)
For the filling:
1 1/2 cups white sugar
1/2 cup (1 stick) unsalted butter, room temp
3 tablespoons all-purpose flour
1/4 teaspoon kosher salt
3 large eggs
1 teaspoon vanilla extract
1/8 teaspoon freshly grated nutmeg
zest from one lemon
juice from one lemon juice
1 cup buttermilk

- Prebake crust at 350 F. for 15-20 minutes, let cool, then fill and bake for another 45-55 minutes, or until the filling is golden and “set.”

Canelés de Bordeaux (Crispy Baked French Custards) – Hold the Mold!

I’ve wanted to do a Canelés de Bordeaux video forever, but just never got around to buying the specially designed molds that they require. After seeing a picture of them online a few days ago, I decided this would be the week, and headed out to the one store near me I knew carried the necessary hardware.

Since it was actually a hardware store that also carries lots of kitchen equipment, I figured they would have the beeswax, as well. I’ve been in that store at least a hundred times, and I would anyways see the canelé molds beckoning me, but never pulled trigger, since I was usually looking for something else.

So, you can imagine my shock when I walked down that aisle, as I’d done so many times before, only to find they were no longer stocked. Thanks a lot, Amazon. Anyway, purely out of spite, I decided to make them anyway, using a regular muffin pan, and the results were pretty amazing.

As long as you cook them long enough, the muffin tin works great, assuming you don’t care about getting the classic shape. Since this was an experiment, I only did six, but I’ve scaled the recipe below to make 12. I’m not sure how many real canelé molds this recipe will fill, but it’s probably close to that. Either way, I really hope you give these a try soon. Enjoy!


Ingredients for 12 Canelé de Bordeaux:
2 cups whole milk
2 tablespoons plus one teaspoon unsalted butter
1 cup white granulated sugar
1 cup all-purpose flour
4 egg yolks
1/4 teaspoon kosher salt, or 1/8 teaspoon of fine salt
1 teaspoon vanilla extract
1/4 cup rum

For greasing pan:
2 tablespoons butter
2 tablespoons beeswax

- Bake at 450 F. for 10 minutes, then at 375 F. for about 50 minutes more, or until well browned.

-- NOTE: These only stay crispy for about 8 hours. So, fair warning if you plan to make them a day ahead. I've never tried to re-crisp. 

Baklava – So Good, It’s Nuts!

Assuming you haven’t used up all your homemade filo dough already, as promised, here’s my method for building what I think is a beautiful baklava. Like lasagna, there are as many versions of this, as there are cooks who make it, but regardless of the exact ingredients, or specific number of layers, the technique is the same. 

I tend to enjoy a generous ratio between nuts and pastry, as that makes me feel a little bit better about the copious amounts of sugar in this, but above and beyond that, I think this approach produces the best texture. As I mentioned in the video, you can use as many layers of filo as you want, but be careful, since too many may not cook through, and the only way to mess this up is to undercook the dough. The top and bottom layers need to dry out, and thoroughly crisp up, otherwise, once the syrup gets ladled over, you’ll have a soggy mess.

I would start peeking at it after about 45 minutes, but it’s probably going to need closer to an hour, or even more, depending on how much “stuff” you used. Once done, and finished with the syrup, you need to let this cool down to room temp, which is incredibly hard to do. But, your patience will be rewarded with one of the most delicious things known to man. I really hope you give this a try soon. Enjoy!


Makes one 9-inch round Baklava:
*Note: I don’t know how this translate to different size pans, but I’m sure you’ll figure that out.

Ingredients:
16 sheets homemade filo/phyllo dough (or 1 package frozen filo/phyllo dough, defrosted)
1 stick (1/2-cup) melted unsalted butter
- For the syrup:
1 1/2 cups sugar
3/4 cup water
1/4 cup honey
3 whole cloves
1/4 teaspoon vanilla
1 1/2 teaspoons orange blossom water (or sub some orange and lemon peel)
- For the nut mixture:
2 1/2 cups walnut halves
1 cup shelled pistachios
1 1/2 teaspoons cinnamon

- Bake at 350 F. for about 1 hour, let rest for 5 minutes, and apply syrup

Homemade Phyllo aka Filo Dough – One Step Away from Baklava

At long last, we’re finally going to post a baklava video, which I decided to make a lot harder, by making the filo dough from scratch. 

While not using the incredibly convenient, and significantly faster frozen filo dough does make this a lengthier project, it also makes it much more interesting, and way more fun.

Fair warning, I’ve only done filo a handful of times, so I’m no expert at making this, or baklava, for that matter; but the good news is, despite that, I still managed to achieve some fairly excellent results, and suspect you will as well. I’m sure with a little practice I could probably do more than five at a time, but once you get rolling, the batches go pretty quick, and each one seems to get a little better than the last.

I'll post the baklava video next week, but if you want to practice, you could make a batch, and then do search on Allrecipes for recipes that use filo. There's no shortage of amazingly delicious things to do with this paper thin dough. Stay tuned for baklava, but in the meantime, I hope you give this a try soon. Enjoy!


Makes enough for about twenty (10 to 12 inch round) sheets of filo:
2 cups all-purpose flour, plus more for kneading
5 teaspoons olive oil
1/2 teaspoon fine salt
2 teaspoons white wine vinegar
3/4 cups warm water (about 110 F.)
For the starch mixture:
1/2 cup cornstarch
2 tablespoons all-purpose flour

Crisp Peach Cobbler – Crispier than a Crisp, Which is Really Just a Crumble

Since we already posted a peach cobbler, I decided to do a peach crisp instead, but I wanted to do a really crispy crisp, and not the same old crumble style. 

I looked at dozens of recipes online, and came across one from the critically acclaimed, “A Boat, a Whale, & a Walrus,” by Renee Erickson. I did change it up a bit, and tweaked the procedure, but that’s where the inspiration is from.

I didn’t mention it in the video, but make sure you put a pan underneath your cobbler as it bakes. I like the heat getting underneath my dish, so I placed the pan on the rack below, but this would probably be fine if you just placed the dish directly on the pan.

This technique should work with any, and all, cobbler-approved fruits, and no matter what you use, it would make a welcomed addition to anyone’s picnic or cookout. Of course, make sure you have plenty of vanilla ice cream around, preferably homemade. So, the next time you’re in possession of some perfectly ripe peaches, I really do hope you give this a try soon. Enjoy!


Ingredients for 8 portions:
6 large peaches, cut into 8ths
zest and juice from 1 lemon
- Placed in a buttered baking dish (about 2-inches deep is perfect)
- Mine dish was 10-inches across, and holds 2 quarts

For the batter:
1/2 cup (1 stick) unsalted butter, room temp
1 1/4 cup granulated white sugar
1 1/3 cups self-rising flour (or all-purpose flour plus 2 teaspoons baking powder and 1/2 teaspoon fine salt)
1/3 cup rolled oats
2/3 cup whole milk
For the top:
1/4 cup granulated white sugar
cold water spritzed generously over the top

- Bake at 375 F for about 45 minutes, or until browned and crispy.

Ice Cream Cones – Because Egg White Omelets Shouldn’t Be a Thing

When you make homemade ice cream, you always end up with spare egg whites, which just happen to be one of the main ingredients in homemade ice cream cones – and if you think that’s merely an accident, you don’t fully understand how the food Gods operate.

They obviously want you to make homemade ice cream cones, since there’s no other good explanation. These are surprisingly easy, and as long as you can wad-up some foil into a cone, there isn’t any special equipment, or tools required. Actually, you really do need to use a silpat to line the baking sheet, but you need one of those anyway.

Like I suggest in the video, please test your batter with the first few cones, to make sure they’re tough enough to handle a scoop of ice cream. Even spread thin, this stuff is fairly sturdy, but by adding more flour to the batter, you get a thicker layer on the pan, and that means a stronger, tougher cone.

You can also roll these into cigar-shaped cookies, or press over a ramekin to form an edible bowl. Regardless of the shape, I hope you make some homemade ice cream, and then sacrifice a few egg whites to the heavens, and make these crispy cones soon. Enjoy!


Ingredients for 8-10 cones:
2 large egg whites
½ cup white sugar
2 tablespoons whole milk
1/4 teaspoon vanilla extract
2 tablespoons melted butter
1 tablespoon cold water, or as needed
1/2 packed cup all purpose flour, plus more if needed
1/8 teaspoon kosher salt
- bake at 400 F. for about 8 minutes, or until browned around the outside few inches

Frozen Vanilla Custard – Western NY for French Vanilla Ice Cream

If you’re thinking that I’ve already posted a video recipe for vanilla ice cream, I have, but for what I consider a “real” vanilla ice cream, which means no eggs. That’s called an American-style ice cream, and features a cleaner, more pronounced vanilla flavor.

The French weren’t into that. They froze their famously delicious custard, and the rest is history. While I prefer the later, I have to admit they won, since it is the style that dominates the freezer case.

I like to use pure vanilla extract over the whole bean, mostly because it’s easier, cheaper, and always consistent. Having said that, it’s hard to argue against the whole bean, so feel free to go full foodie. Speaking of which, if you don’t have an ice cream maker, there are plenty of “hacks” online that work fairly well.

I would have called this French vanilla ice cream, but where I grew up, this is called frozen custard. It’s traditionally served soft, in cones, but I prefer to freeze it firm. That way, I get French vanilla ice cream, and as it melts, I also get soft-serve frozen custard. Now that’s a win-win. Anyway, stay tuned for homemade cones, and in the meantime, I really hope you give this a try. Enjoy!


Ingredients for 1 quart of Frozen Vanilla Custard aka French Vanilla Ice Cream
5 large egg yolks
pinch of salt
2/3 cup white sugar
1 cup whole milk
2 cups heavy cream
2 1/2 teaspoons pure vanilla extract (or one split/scraped whole vanilla bean)

Fresh Strawberry Tart – Now with 100% Less Tart Pan

There shouldn’t be a lot of stress involved in making this free-form strawberry tart, since once it’s topped with fresh berries, and thickly glazed, it will look like something from a Paris pastry shop. And, I did say, “look like,” not “taste like,” but that’s not our fault. They have better cream cheese.

If you have a tart pan, go ahead and use it, but going free-form is always kind of fun, and even though we’re going to handle the dough a bit more, that’s not a problem with our almost foolproof buttercrust pastry. Just be sure to build up enough around the outside before you crimp, so that your tart is deep enough to hold the filling.

I joked about this being so beautiful that nobody will care what it tastes like, but of course, that’s ridiculous. Do not attempt this unless you can find some perfectly ripe, sweet strawberries. And when you do, I really hope you give this a try soon. Enjoy!


Ingredients for 6 portions:
1/2 of our buttercrust pastry dough recipe
1 pound fresh strawberries
For the sweet cheese mixture:
8 ounces cream cheese or *fromage blanc
2 tablespoons crème fraiche
2 tablespoons white sugar
1 large egg yolk
1/4 teaspoon salt
1/4 teaspoon vanilla extract
1/2 teaspoon lemon zest, or to taste
For the glaze:
1/4 cup apricot jam (the clearer, the better), plus 2 teaspoons water, heated until brushable. Let cool a bit before applying.

*Note: my cream cheese was suspiciously thin, so your mixture will probably be thicker, and a little easier to work with.

- Bake tart shell at 375 F. for 20-25 minutes, until golden-brown, fill with cheese mixture, and finish baking for another 20 minutes, or until the pastry is browned, and the filling is set.

Classic Rice Pudding – Word on the Street Is

It’s not every day you find yourself walking next to someone on the street, who’s eating from a ridiculously large tub of rice pudding. Well, that’s exactly what happened to me the other day, and it served as a reminder for what a great, and comforting dessert rice pudding really is. 

For whatever reason, it’s usually not near the top when people list their favorite desserts, but despite that, it’s a proven crowd-pleaser, and quite easy to make, especially using this simplified, one-pot method.

Most recipes have you make the pudding in a clean pot, since, I’m assuming, they’re afraid the starch at the bottom of the pan used to cook the rice will burn. And, it probably would, unless you deglaze the bottom with cold milk before turning the heat back on. Not only will this simple step prevent the pudding from scorching, but also I think we get a little bit of extra toasted rice flavor. I also prefer an egg yolk to a whole egg, but regardless, be sure to whisk it in fast and furious, or they might scramble.

If you’re scared, you can temper the egg by mixing in a few spoons of the hot rice mixture, before blending in, but as I’ve said before, there’s nothing wrong with a little adrenalin-inducing danger in the kitchen. So, no matter what you garnish it with, or whether you eat it inside, or crossing Dolores Street, I really hope you give this a try soon.  Enjoy!  
   

Makes 4 Portions Rice Puddings:
1/2 cup uncooked white long-grain rice
1/4 teaspoon kosher salt
1 cup water
1/4 cup white sugar
1 1/3 cups milk
1/8 teaspoon cinnamon
1/2 teaspoon vanilla extract
1 large egg yolk
1 tablespoon cold butter
2 tablespoons dried cherries, chopped

Chocolate Soufflé – Perfect for Your Valentine (Unless I’m Your Valentine)

With everybody’s favorite made-up holiday right around the corner, I thought I would finally post a chocolate soufflé. I’m not sure what took so long, other than the fact that soufflés have never been my favorite delivery system for chocolate.

Sure, they’re visually impressive, which is key for a special occasion dessert, but the chocolate does get a bit diluted by all those air bubbles. Also, I’ve always been much more of a cold, or room-temp chocolate dessert guy, and never gone nuts for things like lava cakes, and baked puddings.

Having said that, I’m sure I’m in the minority, and you and your special someone will enjoy these just fine. I developed this recipe for two, since that makes a lot of sense, but it should scale up without issue. If you want to add some type of liquor to this, you can add it to the milk and flour mixture after you turn off the heat.

Rum works beautiful, as does coffee, orange, or raspberry liqueur.  Above and beyond that, if you really want to impress your date, you could also whip up a sauce to serve along side. I’m thinking either a berry puree, or maybe a coffee crème anglaise would pair perfectly. Either way, sauced or not, I really hope you give this a try soon, and it gets you lots of compliments. Enjoy!


Chocolate soufflé for two 5-oz ramekins):
melted butter and sugar to prep ramekins
1 tablespoon butter  
1 tablespoon flour
1/4 cup plus 1 teaspoon cold milk
pinch salt
pinch cayenne
2 ounces dark chocolate (I like something around 70%)
1 large egg yolk
2 large egg whites
pinch cream of tartar (you can use a few drops of lemon juice or vinegar instead)
1 tablespoon white sugar, added in 3 additions