Tampilkan postingan dengan label Cookies. Tampilkan semua postingan

Canelés de Bordeaux (Crispy Baked French Custards) – Hold the Mold!

I’ve wanted to do a Canelés de Bordeaux video forever, but just never got around to buying the specially designed molds that they require. After seeing a picture of them online a few days ago, I decided this would be the week, and headed out to the one store near me I knew carried the necessary hardware.

Since it was actually a hardware store that also carries lots of kitchen equipment, I figured they would have the beeswax, as well. I’ve been in that store at least a hundred times, and I would anyways see the canelé molds beckoning me, but never pulled trigger, since I was usually looking for something else.

So, you can imagine my shock when I walked down that aisle, as I’d done so many times before, only to find they were no longer stocked. Thanks a lot, Amazon. Anyway, purely out of spite, I decided to make them anyway, using a regular muffin pan, and the results were pretty amazing.

As long as you cook them long enough, the muffin tin works great, assuming you don’t care about getting the classic shape. Since this was an experiment, I only did six, but I’ve scaled the recipe below to make 12. I’m not sure how many real canelé molds this recipe will fill, but it’s probably close to that. Either way, I really hope you give these a try soon. Enjoy!


Ingredients for 12 Canelé de Bordeaux:
2 cups whole milk
2 tablespoons plus one teaspoon unsalted butter
1 cup white granulated sugar
1 cup all-purpose flour
4 egg yolks
1/4 teaspoon kosher salt, or 1/8 teaspoon of fine salt
1 teaspoon vanilla extract
1/4 cup rum

For greasing pan:
2 tablespoons butter
2 tablespoons beeswax

- Bake at 450 F. for 10 minutes, then at 375 F. for about 50 minutes more, or until well browned.

-- NOTE: These only stay crispy for about 8 hours. So, fair warning if you plan to make them a day ahead. I've never tried to re-crisp. 

Almond Biscotti – Because Winter is Coming

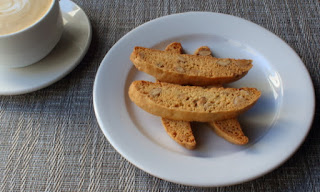
This biscotti video is another installment in our long-running series, “Recipes I Can’t Believe I Haven’t Posted Yet.” But, while I took my sweet time recording this classic Italian dipping cookie, at least I picked a good time to finally feature it, since winter is coming, and with it, plenty of cookie-appropriate occasions.

I decided to go with a very straightforward version, since that’s my personal favorite, but that doesn’t mean you can’t jazz these up in any number of ways.  Different nuts, like hazelnut and/or pistachio work beautifully in these, as does any type of dried fruit. And of course, dipping these in dark chocolate is never a bad idea.

By the way, don’t let that cup of sugar fool you. These are not particularly sweet cookies, and there’s a good reason for that. Traditionally, these are served to dip into sweet dessert wines, like Vin Santo, which is why we don’t want them too sugary to begin with. That’s also the reason why we really do want these crunchy all the way through.

I was pretty noncommittal with the cooking time once these are sliced and put back in the oven, since depending on the size and shape, your baking times will vary greatly. The best plan is to keep peaking at them once they get close, and wait for that perfect golden brown. So, with my apologies for bringing up the holidays so early, I’ll finish by saying I really do hope you give these almond biscotti a try soon. Enjoy!


Ingredients for about 28-30 cookies:
2 cups all-purpose flour
1 teaspoon baking powder
1/4 teaspoon fine salt (1/2 teaspoon kosher)
3 tablespoons room temperature unsalted butter
1 cup plus 1 tablespoon white granulated sugar
1 tablespoon olive oil
2 large eggs
1/4 teaspoon vanilla extract
3/4 teaspoon almond extract
1/2 cup roasted whole almonds
1/2 cup roasted chopped almonds
- Bake loaves at 350 F., let cool 15 minutes before slicing, and then finish at 325 F. until golden brown, and crunchy

Persian Love Cookies


Persian sweets and desserts are so visually appealing as well as delicious in taste that I could not help devouring these Pistachio Rose Persian Love Cookies as soon as they were done. I have long been eyeing these cookies on this blog: and at last gathered all the ingredients to make them.

So attractive to behold, soft, chewy and delicious in taste with the fragrance of rose petals that fills your senses as you bite into them. And with the first bite you begin to wonder if you have already fallen head over heals in love with them.  You cannot stop craving for more....... No wonder they are called Love Cookies!!

I followed the recipe almost exactly except for the fact that I didn't have enough almonds that day so combined it with pistachios and the taste was divine. Next time I make them I want to try without almonds and use only pistachios.

Also I did not have pomegranate juice so substituted with berry juice which was sweet and tangy like the pomegranate flavour.


Recipe adapted from heneedsfood.com

Ingredients: 
100 gm Almond meal
50 gm Pistachios ground
110 gm Icing Sugar sifted
80 gm Pistachios finely sliced
1/2 Tsp Nutmeg
1 Tsp Green Cardamoms ground
1/3 Cup Dried Rose Petals
1 Egg White
1 Tsp Rose Water


Icing 
1 Tbs Berry Juice (blue berry and raspberry)
6 Tbs Icing sugar


    Method:

    1. Preheat oven to 335 degrees Fahrenheit. Line a cookie sheet with parchment paper.

    2. Grind the almonds and pistachios separately and mix together. Add the sifted icing sugar, nutmeg, green cardamom powder, rose petals and mix well.

    3. Blanch the 80 gm pistachios (soak them in warm water and remove their skins) and slice them.

    4. Now add the egg white and rose water to the dry ingredients (step 2) till the mixture comes together.


    5. Shape into balls and roll them in the pistachio slices, place them on the lined cookie sheet and bake in the oven for 20 minutes. Remove and leave them to cool on a wire wrack.


    6. Mix together the icing sugar with the berry juice until you get a smooth flowy texture. When the cookies are completely cooled, drizzle the icing on top in a zig zag motion with a fork.

    7. Once the icing is completely set, decorate them with rose petals and dust lightly with icing sugar before serving. Enjoy!

    Merry Christmas Cookie Update

    Just a quick note to say I followed a viewer's tip, and rolled the chocolate snowcap cookie dough in white granulated sugar first, before coating in the powdered sugar. I was told this would prevent the white tops from fading in brightness, and as you can see, that's exactly what happened (don't let the bad cell phone picture fool you). Thanks, anonymous YouTuber! Enjoy!


    Chocolate Snowcaps – There’s Snow on Them There Cookies

    I don’t think I’ve ever been involved in a holiday cookies swap (apparently you need to have like-minded friends), but if I were, I’d bring these chocolate snowcap cookies. They just look so wintry, with their powdery-white tops, contrasted against those deep, dark cracks.

    They’re so captivating, that I find myself daydreaming about tiny Christmas elves skiing down them when no one is looking. I really should see someone about that. Anyway, the point is, if you’re looking for a holiday cookie so seasonally appropriate it hurts, this is the one for you.

    As I stated in the video, the only way to mess these up is to not use enough powdered sugar. The first batch I made looked like they had plenty, but that little bit I shook off before placing them on the pan made all the difference. You want to coat them, roll them, coat them again, and then, coat them again. You can’t put too much on.

    Also, the batch I made after letting the dough sit overnight didn’t spread out as much, which I thought looked better, and much more mini mountain-like. As far as baking time goes, mine took about 12 minutes, but that depends on exactly how large you roll your dough balls.

    To be safe, you should probably do five or six practice batches to get this time dialed in [wink]. Once you do, you’ll be rewarded with a classic Christmas cookie that tastes as good as it looks. I think I speak for tiny, imaginary elves everywhere, when I say we hope you give these a try soon. Enjoy!


    Ingredients for about 2 dozen Chocolate Snowcap Cookies:
    Recipe found here on Foodess.com
    6 ounces dark chocolate, broken in small pieces, melted over hot water
    3/4 cup AP flour
    1/3 cup cocoa (I used Guittard’s Cocoa Rouge)
    1 1/2 tsp baking powder
    1/4 tsp fine salt
    1/2 cup room temp butter
    1 cup packed brown sugar
    2 large eggs
    1 cup powdered sugar, or as needed

    *Bake at 350 degrees F.  for about 12 minutes, depending on size

    Maamoul Cookies

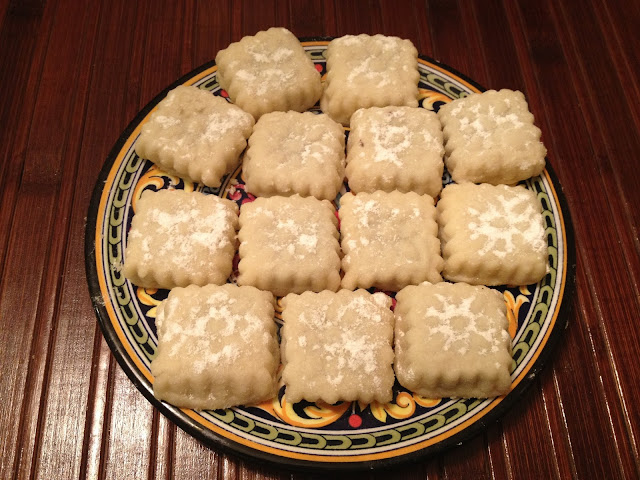
    Maamouls are what I would call, cookies from Heaven!! They melt in the mouth and make you feel like you are in the seventh heaven. These little goodies, packed with rich nuts, scented with orange blossom water and sweetened with honey are so addicting that you would never want to stop eating them.


    Here's the recipe.

    Ingredients:
    White flour - 4 cups - 6 cups
    Unsalted butter - 1lb chilled
    Sugar - 1/2 cup
    Salt - 1/4 tsp
    Chilled water - 1/4 cup
    Orange blossom water - 2 tbs
    Maamoul mold

    Method:
    1. Cut the chilled butter into cubes.

    2. Place the flour, salt and sugar in the food processor and pulse 2 or 3 times.

    3. Add the butter and pulse again  3 or 4 times, till the mixture resembles coarse bread crumbs.

    4. At this stage add the orange blossom water followed by chilled water little by little with each pulse till it forms into a soft dough. Squeeze the dough to check. It should  be soft but not sticky.

    5. Pound the nuts coarsely. You can use different fillings with mixed nuts (almonds, pistachios and walnuts) or just pistachios or just almonds in combination with honey/icing sugar and orange blossom water. You can also use just date paste mixed with orange blossom water. Or dates and mixed nuts with orange blossom water. For the maamoul fillings recipe click here.

    6. Make small round balls of the dough. Make slightly bigger balls of the filling. You can use different moulds for different fillings.

    7. Make a depression in the small rounds of the dough then shape them like a bowl by swirling around with your fingers . Place the ball of the filling in the bowl, close the circle over the filling and smoothen it like a ball. Please note that there should be a considerably thin layer of dough around the filling (not so thin that the filling comes out on baking and not so thick that there's hardly any filling inside). Keep a paper towel handy to wipe your hands each time you touch the filling otherwise the dough would get discolored with your sticky fingers and it would be hard to give shape.


    8. Roll the filled rounds in the flour, dust the mold too with a little flour then overturn it and tap to shake off the excess flour.

    9. Place the filled maamoul in the selected shape in the maamoul mold and press it with your palm.

    10. Line a cookie sheet with parchment paper.

    11. Now tap the mold on the edge of the cookie sheet so that the maamoul stuck in the mould falls off on to the cookie sheet. Repeat with the rest of the maamouls.

    12. Pre-heat the oven to 350 degrees fahrenheit. Bake the maamouls for around 10 -12 minutes till the base of the maamoul is lightly golden brown. After 12 mins take a flat thin spatula and lift the base of a maamoul to see if it is done. Switch off the oven and leave them inside for 3-4 minutes.  Remove when they look firm at the top and lightly golden brown at the base.


    13. Cool on wire wrack for one hour. Dust them with icing sugar after they cool down completely and enjoy.

    Tips: 

    Do not store these cookies in the fridge. Store them in a cool dry place in an air tight container or cookie jar. They stay fresh outside for 2 - 4 weeks. You may freeze them if you want to store for longer periods of time. But bring them to room temperature before serving them.


    Dark Chocolate Macarons – Better Three Years Late Than Never

    I did it. I made macarons. Finally, I can apply for my food blogger merit badge! Hold on, I’m being told I still need to make mini-cupcakes and a quinoa salad to qualify. Oh well, I’ve waited this long.

    Anyway, this was my first attempt at macarons, and for not having any clue what I was doing, I was quite happy with the results. They looked fine, and the texture was almost identical to the ones sold at Chantal Guillon, a famous macaron bar here in San Francisco.

    So, was it beginners luck? Yes. You would think since I waited three years to make these, I would have done more research, but I did almost none. In fact, I literally used the first chocolate macaron recipe I found, which happened to be from David Lebovitz. He’s an American, but he lives in Paris, so I figured I was okay.

    I watched a few videos, read a few articles, had a couple drinks, looked at a few step-by-steps, and off I went.  One thing I did notice was every single resource used a different recipe, as well as different times, temperatures, and techniques. So, I figured I would just use my instincts and try the most straightforward method possible.

    I didn’t do any high-heat/low-heat tricks; no waiting for the tops to dry; no sugar syrups, etc. I just made the batter, piped it out, baked them off, and as you can see, they were not bad at all. One thing I did figure out all by myself was to use the ugly ones as the bottoms. By the way, there’s a very inappropriate metaphor there, if you’re looking.

    So, here’s the deal; if you’ve never made these before, I hope this inspires you to give them a go. Believe me, if I can do these anyone can. However, if you’re an experienced macaron maker, we’d love to have you chime in. I can’t wait for this comment section to fill up with invaluable tips and tricks for what I should have done, and how I should have done it.

    I know I piped them wrong. You’re not supposed to make a swirl, but keep the tip pressed in the center as you squeeze. I also heard that I should have cooked one pan at a time, because the bottom pan is more likely to crack. What else? Don’t worry about my feelings…after four years of posting videos on YouTube, I don’t have any left…so let me have it. And, as always, enjoy!


    Basic Chocolate Macaron Batter (I found this recipe on davidlebovitz.com):
    Makes about 18 finished cookies
    *Weighing the ingredients is critical. Do not make these unless you have a digital kitchen scale!
    100 gram powdered sugar
    50 grams almond meal aka almond flour (the finer the better)
    25 grams unsweetened cocoa powder
    2 large room temperature egg whites
    65 grams granulated sugar

    For chocolate ganache:
    1/3 cup hot heavy cream
    4 ounces dark chocolate, chopped
    pinch of salt
    *pour hot cream over chocolate, and stir until smooth. Allow to cool slightly before filling cooled cookies.

    Bonus Coverage: For more chocolate macaron information, my friend Denise from ChezUs makes some amazing ones, and knows WAY more about these than I do, so you can bug her with your questions too! ;-)

    Classic Peanut Butter Cookies – These are to Chocolate Chips as Turkeys are to Eagles

    This classic peanut butter cookie recipe has me thinking about something I saw on the history channel a few months ago, about how the bald eagle became our national bird, instead of the wild turkey.

    While the regal eagle was the popular choice, many, including Benjamin Franklin, argued that the lesser attractive turkey was more deserving. Not only was it truly indigenous, but they also argued it was more courageous, and unlike the eagle, was not a lowly scavenger. Of course, we all know how that one turned out.

    Now, I don’t think America has an official national cookie designation, but if it did, I bet you a Benjamin (see what I did there?) that the ever-popular chocolate chip would beat out peanut butter cookies for the honor. It would be eagle vs. turkey all over again.

    Sure the chocolate chip is always popular, and more visually enticing, but when you compare the relative historical significance to American culture, the peanut far eclipses the chocolate chip. I mean, come on, is there even a “Mr. Chocolate Chip?” I don’t think so.

    By the way, let me go ahead and answer the obvious question that’s probably on many of your minds right now… no, I don’t have anything more important to worry about. I hope you give this peanut butter cookie, America’s cookie, a try soon. Enjoy!


    Ingredients (makes about 24):
    1/2 cup unsalted butter
    1/2 cup creamy peanut butter
    1/2 cup white sugar
    1/2 cup packed brown sugar
    1 egg
    1 1/4 cups all-purpose flour
    1/2 teaspoon baking powder
    1/2 teaspoon kosher salt (or 1/4 tsp fine table salt)
    1/2 teaspoons baking soda
    *Bake at 375 degrees F. for 10 minutes

    Chocolate Mint Brownies – Behold, The Tree of Disappointment

    I loved everything about these brownies, except the flavor. I love mint, I love chocolate, and I love chocolate mints, but for whatever reason, I don’t like chocolate mint brownies. It’s quite a personal mystery.

    My wife Michele’s theory is that since we love the pure chocolately goodness of classic plain brownies, the addition of that extra layer of flavor, especially one as distinctive as mint, just throws everything off. That could be.

    Also, I don’t like the combination of nuts and mint, and so these didn’t contain walnuts or pecans like they usually would. Maybe it’s nut denial that has me in this anti-mint mood. Anyway, enough about my problems, if you like chocolate mint brownies, which based upon all the requests I got, many of you do; you’ll probably love these.

    I’ve used a very stripped-down method here that requires almost zero technique, and uses only cocoa powder to achieve a dense, chewy, very chocolatey brownie. I hope you give these a try, and if you don’t enjoy mint either, just leave them un-iced, or add another flavoring like vanilla, orange, or rum extract. Enjoy!


    Ingredients:
    1/2 cup (1 stick) unsalted butter
    1 1/8 cups sugar
    3/4 cup unsweetened cocoa powder
    1/4 teaspoon salt
    1/2 teaspoon vanilla extract
    2 large eggs
    2/3 cup all-purpose flour
    For the icing:
    1 cup powdered sugar
    1/4 tsp mint extract, or to taste
    2 tbsp milk

    Let’s Get Ready to Rum Ball!

    I want to thank a Twitter follower of mine, RookieKoo, for giving me the idea for today’s Michael Buffer-inspired post title. Of course, if you’re not familiar with the iconic boxing ring announcer’s catchphrase, then none of this will make any sense, and you’ll just have to trust me when I tell you it was an amusing reference.

    There are hundreds of ways to make rum balls, but this one’s my favorite method. It’s very easy, especially if you have stale brownies lying around. I know, that never happens, which is why I’m linking to an all-purpose brownie recipe below the post. This will also work nicely with store-bought brownies, but stay away from anything that’s frosted. We don’t want to add any additional fat into the recipe, since that will hinder the absorption of the rum.

    The amount of rum you add depends on how cakey and/or dry your brownies are, but for a half-pound, you’ll probably need between 1/4 and 1/3 of a cup to soak the crumbs sufficiently. A proper rum ball should be a fire hazard. By the way, I’m not responding to any comments asking about how to make these without using rum. In my humble opinion, you can’t.

    The other issue I'm not going to be a big help with is altering the type of chocolate. I used a quality dark chocolate (70% cocoa), which worked beautifully for this, and hope you do the same. I don't have a lot of experience working with chocolate, so I'm not sure what will happen if you want to use white, milk, or other kinds of chocolate for the coating.

    I realize these are more of a candy, than a cookie, but after about a half-dozen rum balls, culinary semantics will be the furthest thing from your mind. I hope you give them a try on your holiday dessert table. Enjoy!


    Ingredients for about 20 small rum balls:
    8 ounces stale chocolate brownies, crumbled
    1/4 to 1/3 cup dark rum, or as needed
    4 oz dark chocolate (I used Lindt Dark Chocolate 70% Cocoa)

    NOTE: For a quick and easy brownie that will work well for these rum balls, check out this recipe from Allrecipes.com. I recommend checking out the comments on that recipe page before starting.