Tampilkan postingan dengan label Breakfast. Tampilkan semua postingan

Chocolate Croissants – But Just Barely

I’ll admit to being pretty underwhelmed the first time I had a chocolate croissant, or “pain au chocolat,”as I’d mispronounce it; but eventually I realized the relatively sparse amount of chocolate wasn’t any kind of stinginess, but rather the true secret behind this amazing pastry.

Properly done, this should ride that line between sweet pastry and a savory bread, so don’t overdo it with the chocolate chunks; otherwise you’ll lose that beautiful balance. Other than that, not much can go wrong. Just be sure to bake them until nicely browned, and let them cool before enjoying.

While this will work with that dough in the tube, I’d like to think you’d make a batch of your own dough using our recently posted croissant recipe. Don’t worry, it only seems like a lot of work. Either way, I really do hope you give these chocolate croissants a try soon. Enjoy!


Ingredients for 12 Chocolate Croissants:
1 batch of croissant dough from this recipe (split in half for two batches of 6)
about 1 cup roughly chopped chocolate chunks, or chips
1 large egg, plus 1 tablespoon of water for the egg wash
coarsely ground sea salt
- Bake at 400 F. for about 20-25 minutes, or until well-browned

The Denver Omelet – Denver, Colorado, Not Denver, France

This Denver omelet was one of the first things I learned how to make professionally, during my brief, but exciting career as a short order cook in high school. So, it was a little disconcerting to learn when I arrived at culinary school that everything I had done was totally wrong.

According to the chefs teaching me how to make a classic French omelet, my Denver omelet was overcooked, over-browned, and included too many ingredients.  It was made very clear that if I made that for my exam, I would fail, which was confusing since I thought they were really good, and the people at the diner where I’d worked seemed to agree.

Over the years, I’ve come to appreciate both styles of omelet, and understand they really are two entirely different things. I’m not sure exactly why, but I seem to prefer the softer French version for breakfast, and this heartier American-style for lunch, or dinner. Maybe it’s the browning, or denser texture, but it really does make for a great “can’t figure out what to have for dinner” idea.

As with all omelets, feel free to toss in anything you want, but just be sure to cook it long enough before adding the eggs.  To me there’s nothing worse than an omelet with crunchy, undercooked vegetables in it, and that’s really the only way to screw this up. But, no matter what you use, or when you enjoy this, I really do hope you give this a try soon. Enjoy!


Ingredients for one Denver omelet:
1 tablespoon butter
3 large eggs
1/3 cup grated cheddar cheese
1/4 cup diced smoked ham
2 tablespoon finely diced onion
2 tablespoon finely green bell pepper
salt and freshly ground black pepper to taste
pinch of cayenne

Ben Franklin Breakfast Bowl – One Founding Father’s Alternative to Fast Food

I much prefer teaching to preaching, but this time I’m attempting to do both, with the hope that you might introduce this delicious breakfast bowl into your morning routine. I’m not sure if an apple a day really does keep the doctor away, but I do know that being in the drive-thru line every morning, doesn’t.

We’ve all heard that breakfast is the most important meal of the day, which may or may not be true, but I’ve always found it to be the most difficult meal of the day.  There never seems to be enough time, and so it’s easy to get into a rut, resorting to questionable choices such as sugary cereal and milk, or fast-food breakfast sandwiches.

As far as specific ingredient choices go, I like to use chilled Honey Crisp, or Fuji apples, and, as I mentioned in the clip, sheep’s milk is my preferred yogurt. Some say it’s easier to digest, and it contains higher amounts of linoleic acid, which apparently helps with fat loss, but I simply prefer the taste. Just be sure to use a plain yogurt, since many flavored varieties contain a shocking amount of sugar.

So, whether you try this to help with that New Year’s resolution, or you’re just looking to add some variety into the morning routine, I really do hope you give this Ben Franklin breakfast bowl a try soon. Enjoy!


Ingredients for one portion:
1 cold, raw apple, cubed
6 ounces plain sheep’s milk yogurt
2 heaping tablespoons granola (click here for our recipe)
chopped nuts and/or additional seasonal fruit to garnish

Canelés de Bordeaux (Crispy Baked French Custards) – Hold the Mold!

I’ve wanted to do a Canelés de Bordeaux video forever, but just never got around to buying the specially designed molds that they require. After seeing a picture of them online a few days ago, I decided this would be the week, and headed out to the one store near me I knew carried the necessary hardware.

Since it was actually a hardware store that also carries lots of kitchen equipment, I figured they would have the beeswax, as well. I’ve been in that store at least a hundred times, and I would anyways see the canelé molds beckoning me, but never pulled trigger, since I was usually looking for something else.

So, you can imagine my shock when I walked down that aisle, as I’d done so many times before, only to find they were no longer stocked. Thanks a lot, Amazon. Anyway, purely out of spite, I decided to make them anyway, using a regular muffin pan, and the results were pretty amazing.

As long as you cook them long enough, the muffin tin works great, assuming you don’t care about getting the classic shape. Since this was an experiment, I only did six, but I’ve scaled the recipe below to make 12. I’m not sure how many real canelé molds this recipe will fill, but it’s probably close to that. Either way, I really hope you give these a try soon. Enjoy!


Ingredients for 12 Canelé de Bordeaux:
2 cups whole milk
2 tablespoons plus one teaspoon unsalted butter
1 cup white granulated sugar
1 cup all-purpose flour
4 egg yolks
1/4 teaspoon kosher salt, or 1/8 teaspoon of fine salt
1 teaspoon vanilla extract
1/4 cup rum

For greasing pan:
2 tablespoons butter
2 tablespoons beeswax

- Bake at 450 F. for 10 minutes, then at 375 F. for about 50 minutes more, or until well browned.

-- NOTE: These only stay crispy for about 8 hours. So, fair warning if you plan to make them a day ahead. I've never tried to re-crisp. 

Apple Turnovers


You could have these apple turnovers for breakfast or tea time, they are just so enjoyable. If you have some puff pastry ready at home you could quickly prep them up in no time using any fruit or savoury fillings of your choice with meat, chicken or vegetables. They are so easy to make that you would wonder why you haven't been making them before.
Ingredients:

1 Pack of Puff pastry dough 

4Large Apples (cored and peeled) 
1/2 Cup Brown Sugar 
1/2 TSP Cinnamon (ground)
1/2 TSP Vanilla Essence
1 TBS Unsalted Butter


Method:
1. Thaw the puff pastry if frozen and unfold it on a lightly floured pastry board. Cut into 4x4inch squares if it is a thin long sheet. Otherwise if it is a big thick square, cut it into smaller squares and roll into 4×4 inch square
2. For the apple filling, peel, core and slice the apples. Add a blob of butter to the sauce pan followed by the apple slices, brown sugar, cinnamon and vanilla essence. Combine well and cook till the apples caramelize and are no longer runny. Remove to cool and set aside.


3. Place one or two teaspoons of filling in the centre of each pastry square, brush the edges with egg white and fold into a triangle. Then press the edges using your fingers.


4. You could be a bit creative to make a design on the edges with the fork or cookie cutter. This not only makes them look pretty but helps to seal them well.You could also make square shaped hand pies by using 2 pastry squares one on top of the other with the filling inside.


5. Prick with the fork in the centre to let the air out before putting them in the oven. This prevents the pastry from bubbling while baking. Glaze them with egg white and place them on a cookie sheet lined with parchment paper. It is better to keep them chilled in the fridge for sometime before placing them in the oven.


6. Bake in the oven preheated at 375 degrees fahrenheit for 30 – 35 minutes till golden brown.


7. Cool them on a wire rack and enjoy with tea or vanilla ice cream.

Chicken Foccaccia


Ingredients:

For the dough:
3 cups All Purpose Flour 
1tbs Active Dry Yeast                  
1 tsp Salt                    
1 tbs Olive Oil            
1cup Water


Toppings:
1/4 Cup Green Olives
1 Cup Shredded Chicken
1 Sliced Onion
1 Diced Tomato
1 TSP Dried Basil
1 TSP Dried Oregano
Red Cayenne Pepper flakes (optional)

Yield: Makes two 12 inch Focaccias or one big Focaccia.

   
Method: 

1. Heat 1 cup of water for 35 seconds in the microwave. It should feel lukewarm on your wrist. Mix 1 tbs active dry yeast and 1 tsp granulated sugar. If the yeast is active within 3 - 4 minutes it would become frothy and begin to rise to the surface, otherwise it will be flat which means it is stale so should not be used for baking. 

2. In a food processor pulse to combine 3 cups of sifted all purpose flour and salt. Pour the yeast solution through the feed tube and pulse 3 or 4 times until well incorporated and the whole mixture forms a ball. Add 1 tbs olive oil and pulse for 2 - 3 seconds till the dough becomes springy and starts to spin which means it is kneaded enough.

3. Remove the dough from the food processor bowl and with greased hands shape it into a ball by gathering towards the bottom and pinching to close, then place it in a greased bowl, cover with a lid or plastic wrap and leave it in a warm dry place on the counter to rise - 45 minutes to an hour till it is double in size. But yes, you have to check to see if your dough passed the window pane test. Donna Currie in her article on Serious Eats describes how to test "if the gluten has developed well enough for it to hold the bubbles while it rises, and stretch even more as the gases expand from the heat."

4. Place the puffed up dough in the centre of a greased pizza pan and slowly start spreading the dough  outward by pressing gently and evenly with the tip of your fingers greased with olive oil till it covers  the entire circumference of the pizza pan and is shaped into a 12 - 14 inch circle as big as the pizza  pan. Alternatively you could just press the dough on a lightly floured surface and start working on it with your fingers using the same technique till you stretch it to form a 12 - 14 inch circle. Transfer to a pizza pan or stone. 


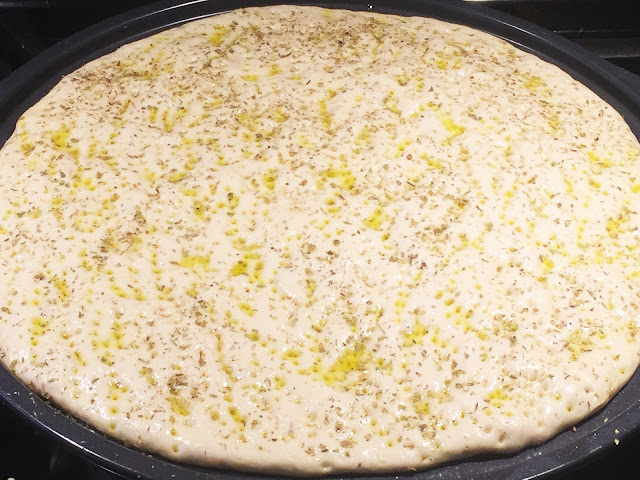
5. Drizzle olive oil generously on the surface of the crust, then with the help of a fork prick everywhere. Alternatively you could use your fingers to make depressions all over. This is done to prevent the bubbles from popping up while baking.


6. Sprinkle dried oregano and basil on the crust.  Then use toppings of your choice. Below are pictures of focaccia with different toppings.


7. The focaccia in the above picture has shredded chicken, diced fresh tomatoes, onions, green olives as toppings. 

8. Focaccia with Mushrooms, Black Olives and Mozzarella Cheese. 

9. Sun Dried Tomatoes and Onions focaccia.

10. Portobello Mushrooms and Cheddar Cheese Focaccia. Enjoy!

Quick and Crispy Home Fries – Or as We Call Them at Home, Fries

It’s a kind of ironic that the only place many people enjoy top-quality home fries is when they eat out at a diner, but sadly that’s the case. Your average home cook’s home fries look great, and we’ll assume taste amazing, but they usually don’t get that nice crispy crust, like the ones at the local greasy spoon.

The reason is simple. There the potatoes are steamed or boiled ahead of time; then cooled, cut, and kept chilled until service. When you pan fry a cold starch, it gets a beautifully crispy surface, which is the secret to the world’s great French fries, polenta sticks, and Korean fried chicken.

To expedite this process, we’re going to microwave the potatoes for a few minutes, until just barely tender. This simulates steaming, which I think is the best way, since boiling can make them waterlogged. Once cool, all you have to do is keep cooking until you’re happy with your crustification. I really hope you give this easy home fry technique  a try soon. Enjoy!


Ingredients for 2 large portions:
 3 large russet potatoes, peeled, quartered
2 tablespoons olive oil
1 tablespoon butter
pinch garlic powder
pinch onion powder
1/4 teaspoon paprika
salt, freshly ground black pepper, cayenne to taste
fresh chives to garnish are nice

Hot Cross Buns – Mother Goose Would Love These

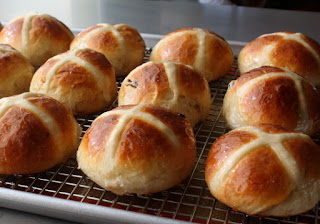
Pretty much all I know about hot cross buns, I learned from the nursery rhyme, but thanks to a recipe I found on Anson Mills, I was still able to make a fairly decent batch. Including real crosses, not to be confused with dinner rolls on which an icing cross has been piped.

In addition to its eye-catching appearance, the dough-based “cross” provides an interesting textual contrast, as it gets sort of chewy, and crispy edged.

Like I said in the video, any sweet dough will work with this easy technique, especially rich, and fragrant examples, like our Italian Easter Bread dough. Times may vary, but regardless of the dough, simply wait for the dough to double in size, and proceed.

If you want to get all your buns the same size, weight your dough in grams before dividing, and then divide by 16. Then, weight each of your dough balls to that exact amount, and boom, your tray of buns will look like the ones you saw on that magazine cover. Or, just eyeball it and take your chances. Either way, I really hope you give this a try soon. Enjoy!


Ingredients for 15 or 16 Hot Cross Buns:
Recipe slightly adapted from this one from Anson Mills
1/4 cup currants, soaked in hot rum for an hour or two
3/4 cup milk warmed to 100 F.
1 package dry active yeast
1 tablespoon each orange and lemon zest
7 tablespoons melted butter
1/4 cup plus 1 tablespoon sugar
1 large egg, beaten
1/2 teaspoon ground cardamom
1/4 teaspoon ground nutmeg
3/4 teaspoon ground cinnamon
1/2 teaspoon fine salt
3 cups bread *flour, plus more if needed

* hold back a little of the flour until you sure you need it. You can always add, but can’t remove!

For the crosses:
1/4 cup water
1/3 cup all-purpose flour, plus more to make a thin, pipe-able dough

- Bake at 425 F. for about 15 minutes

For the glaze:
1/4 cup sugar
3 tablespoons water
- Cook syrup to 225 F., and brush over warm

Fresh Strawberry Jam – Because Man Cannot Live on Clotted Cream Alone

Actually, I don’t think you can live on just clotted cream and fruit preserves either, but regardless, as promised, here’s my preferred method for making strawberry jam. While amazingly delicious, and quite satisfying to make, I’ll have to put this on the same list as homemade ketchup. This is fun to make once in a while, but due to the effort, and time involved, Smuckers has nothing to worry about.

This version features a lot less sugar than many recipes, which is kind of crazy, since we use over two cups, as well as a homemade pectin puree, to help tighten-up the texture. Feel free to use pectin powder or liquid instead, but I think I did a pretty good job explaining why I don’t in the video.

Strawberries should be sweet, and plentiful this time year, so if you’re looking for a fun project, especially if your last fun project was making clotted cream, I really hope you give this delicious, fresh strawberry jam a try soon. Enjoy!


Ingredients for about 3 cups of Strawberry Jam:
For the pectin puree:
3 apples, chopped
1 lemon, chopped
1 cup water
For the jam:
3 pounds strawberries, rinsed, and trimmed
1 1/2 cups (or whatever you got) pectin puree
2 1/4 cups white sugar, added in two additions
1 teaspoon fresh lemon juice

Please Note: To test without a thermometer, wait until the jam starts to reduce and thicken, and spoon some of the mixture on a plate, and place in the freezer for a few minutes, until the jam is cold. If it's jelled, you're done. If it's still runny, keep cooking, and testing. 

The Name's Cream...Clotted Cream

If you invented a cream preparation so incredibly delicious that you couldn’t bear the thought of anyone besides you, and the other dairy farmers in the area enjoying it, adding the word “clotted” to the name is a pretty sound strategy.

While the name doesn’t exactly make the mouth water, the flavor and texture are the stuff of legends. The long, slow cooking sort of toasts the cream, which imparts a sweet, nuttiness that I don’t think I’ve tasted in any other preparation.

Most modern ovens go down as low as 175-180 F., which is ideal for this technique. 200 F. will work, but maybe check after 10 hours, and see how things look. The other huge factor here is the cream. Be sure to get the best you can. It should be from grass-fed cows, and have a fat content of between 36-40%.

Avoid anything that says “Ultra-Pasteurized,” since it’s been heat-treated, and you’ll not get the same results. Other than this taking a day or two, the technique could not be easier, and I wasn’t exaggerating when I said it’s one of the most amazing things ever. I really do hope you give this a try soon.  Enjoy!


Ingredients:
4 cups heavy cream
8 x 8-inch glass or ceramic baking dish
- Bake at 175-180 F. for 12 hours. Chill overnight before separating the “clots.” Use the reserved liquid for baking biscuits.

Lemon Ricotta Pancakes, Again?

When Food Wishes was first getting started, and funds were scarce, I did some freelance video production for various outlets, and apparently lemon ricotta pancakes was one such recipe. I know this because I got a request for ricotta pancakes recently, and when I tried to refer them to the blog link, I realized there wasn’t one.

I’m looking at you, About.com. Anyway, as it turns out, this is a new and possibly improved recipe, featuring…water? Yes, I tried this recipe once, with water instead of milk, and I actually liked it more. Or I thought I did, which is really all that matters.

Most lemon ricotta pancake recipes call for the eggs to be separated, and the whites whipped to give the pancakes more “lift.” Feel free, but if these pancakes were any lighter, they’d float off the plate. Speaking of lightness, I prefer using self-rising flour for this, but if you can’t, I’ve explained below how to make your own. Either way, I really do hope you give these delicious lemon ricotta pancakes a try soon. Enjoy!


Makes 2 large or 4 small portions:
3/4 cold water, or milk
1/2 teaspoon baking soda
1/2 cup ricotta cheese
1 tablespoon lemon zest (just the yellow part of the skin)
1 tablespoon vegetable oil
1/8 teaspoon vanilla extract
1 tablespoon sugar
1 large egg
2 tablespoon melted butter
1 tablespoon lemon juice
1 cup plus 2 tablespoons *self-rising flour, or as needed to achieve very thick batter

* To make your own self-rising flour (2 cups worth): Sift together 2 cups all-purpose flour, with 2 teaspoons baking powder, and 1 teaspoon fine salt.

Coconut Cream French Toast – It Only Sounds Like Pie

I try not to do recipe names that sound way better than they taste, but I went with coconut cream French toast anyway. I didn’t think “coconut French toast” did this justice, and while certainly not pie-like, the flavor profile was kind of close, and I was very pleased with the results.

I was debating whether to coat the soaked bread with raw coconut, and toast it while the slices were frying in the butter, but decided it would be smarter to do it separately. That way we get perfect golden-brown flakes, without having to risk it getting too dark in the pan.

By the way, I can’ t stress how important it is to not use fresh bread. The drier the bread, the better the French toast, since you’ll be absorbing the maximum amount of our creamy coconut batter. So, the next time you have half a loaf of bread leftover from a dinner, slice it up, and leave it out overnight to dry.

If you want to cheat, you can lightly toast fresh bread beforehand, which, after cooling, will sort of simulate stale bread. Either way, I really hope you give this coconut cream French toast recipe a try soon. Enjoy!


Ingredients for two portions of 3 half-slices of bread:
3 thick slices very stale French or Italian bread (cut in half to make 6 pieces)
1 large egg
1 large egg yolk
1/3 cup coconut milk (do not use low-fat)
1 teaspoon sugar
1/4 teaspoon pure vanilla extract
pinch freshly grated nutmeg
3 tablespoons butter for frying
2 tablespoons toasted coconut flakes
maple syrup, fresh mango, and lime to garnish

Layered Idly Sandwich


When ever we eat Idli we dip a piece of it in a chutney and then try another bite with a different one - it is always one chutney at a time. And if you dip the same piece in all the chutneys it becomes messy. So I thought why not build an idli layer by layer like a cake and fill each layer with a different chutney, like icing. I had been toying with this idea so much to the extent of checking with manufacturers if they could make a square idli mould for me. That seemed like a lengthy process for which I had no time. But I had to satisfy my craving to taste the idli and my favourite chutneys together - all in one bite. There was a shortcut which was tempting enough. I used the round steel plates from my Dhokla maker (I could have used a cake pan too) to steam my idli rounds and voila made my idli sandwich with different chutney layers. I had chutney powder (mologai podi), coconut and mint chutney which I used for each layer. It tasted just yummy as I had expected. Plus it looked so beautiful!


Here's the recipe:

Ingredients: 
Idli batter
Mint chutney 
Coconut Chutney
Chutney Powder (Mologai Podi)
Clarified butter 
Round cake dish or Dhokla Maker plates
Parchment Paper


Method: 
1. Grease the cake pan/plate and line it with parchment paper cut in a circle, the same size as the base.  Pour in the Idli batter to your desired thickness. I keep it 1/2 " thick.

2. Place the cake pan in a steamer and steam for exactly 10 minutes. Remove and keep aside to cool.

3. When cooled, pass a knife around the sides of the pan/plate then overturn the plate carefully after topping it with another plate to unmould the idli cake. 

4. Cut the idli round into 4 quarters. Take one quarter and spread coconut chutney on it, then top it with another and spread with mint chutney, then alternate again with coconut chutney.  I had made only 2 chutneys this time so I had to repeat the layer. But you could use another different chutney instead. Then for the topmost layer I sprinkled with MTR's chutney powder and a few droplets of melted ghee (clarified butter) and brushed it evenly to coat. You could use as many layers as you want with different chutneys of your choice.  Enjoy!


Notes:

1. You can get ready made refrigerated idli batter from indian stores. The other option is to make your own. I will be soon posting a recipe for making traditional recipes.

2. The chutney powder is available in indian stores as well, but MTR is a good brand.