Boozy Strawberry Blueberry Cheesecake Popsicles and the Pursuit of Happiness

Is there any better way to celebrate the birth of our great nation than with these red, white, and sort of blue popsicles? Before you answer, I should mention they’re actually strawberry and blueberry cheesecake ice pops, and also spiked with booze.

Like much of our country, these are very simple, and get a little more interesting when you add a few shots of alcohol. I used vodka for its neutral flavor, but my scientist friends tell me any liquor will work just the same. However, be sure to measure carefully, since too much or too little alcohol and/or sugar syrup will adversely affect the frozen texture.

I didn’t want anything too icy, and it’s the alcohol and sugar that keeps this from freezing rock solid. If you leave out the booze, you’ll get a firmer ice pop, so you’ve been warned. I’m not sure how to adjust to compensate, so you may want to grab a regular fruit ice pop recipe on Allrecipes.com and use it instead.

I joked about our Founding Fathers being proud of this particular pursuit of happiness, but the more I think about it, I bet they would have been; especially that Ben Franklin guy. Dude liked to party. So, whether you make these on the 4th of July, or not, I really hope you give them a try soon. Enjoy!


Ingredients for 6 Boozy Strawberry Blueberry Cheesecake Popsicles:

For the simple syrup:
3/4 cup sugar
1/2 cup water
(This makes extra. Use it for lemonade and ice tea)

For the strawberry layer:
1 1/3 cup trimmed and quartered strawberries
1 1/2 tablespoon simple syrup
1 1/2 tablespoon vodka

For the cheesecake layer:
4 ounces (1/2 cup) room temp cream cheese
1 1/2 tablespoon simple syrup
1 tbsp vodka

For the blueberry layer:
1 1/3 cup trimmed and quartered blueberries
1 1/2 tablespoon simple syrup
1 1/2 tablespoon vodka

Next Up: Red, White & Booze


Pickle Brine Chicken – I Need to Give You Props

The chicken breasts seen herein started off as nothing more than a couple of props for our recently posted “How to Make a Brick Grill” video, but they came out so well, I decided to show you what I think is a pretty neat trick.

And let’s face it; there aren’t a lot of great uses for leftover pickle juice. I did hear recently that some people like to drink this stuff after jogging, which I found to be quite shocking, since I had no idea people still jogged.  

As you’ll see, I only let mine brine for about 2 hours which seemed to be enough. I’ve heard that you really only need about one hour per inch thickness of meat, and that rule of thumb seems to work for me. These breasts were tender, juicy, and flavorful.

Speaking of flavor, you can probably just go with the straight pickle juice as a brine, but I hedged my bets with a little extra salt, sugar, and pepper. Like most brined recipes, the payoff is in the texture and moisture content, and not necessarily in the taste, but having said that, these did have a nice little twang.

So, the next time you have nothing left in the pickle jar but the juice, you now know what to do, and I don’t mean take up jogging. I hope you give this a try soon. Enjoy!


Ingredients for 2 breasts:
2 large boneless skinless chicken breast
olive oil to coat
salt and pepper to taste

For the brine:
1 tbsp brown sugar
2 tsp kosher salt
1 tsp freshly ground black pepper
pinch of cayenne
1 1/2 to 2 cups dill pickle juice

Blackberry Almond Buckle – You May Want to Loosen Your Belt

First things first; this type of rustic dessert is called a buckle because of how the fruit sinks into the buttery batter as it bakes, and “buckles” the surface with its juicy weight. 

I believe you’ll find my completely made-up explanation in the video a little more interesting, but regardless of the etymology, this blackberry buckle is no joke.

I added a handful of almond meal, since I had it around, and I think almonds and blackberries have a thing for one another. It seemed to work out nicely, although it did make things a little denser; which in this kind of thing isn’t necessarily a bad thing. 

Same goes for the toasted nuts on top. Leave them off it you want, but I liked the crunch. I was going to tell you to use any berry you want, but I changed my mind. This really needs to be done with blackberries. Raspberries are a little too delicate; as are strawberries, and blueberries are barely berries to begin with. For me, it’s blackberries or bust. I really hope you give this a try soon. Enjoy!


Ingredients for 8 Portions Blackberry Buckle

3 cups fresh blackberries
2 tbsp white sugar if your berries are sweet, 3 if they need some help
1 tsp vanilla extract

For the batter:
1 1/4 cups all purpose flour
3/4 cup white sugar
1/2 cup almond meal
2 tsp baking powder
1/4 tsp salt
pinch of cinnamon
1 cup milk
8 x 12 baking dish with 6 tbsp hot melted butter poured in.

- Bake at 350 degrees F. for about 1 hour

Next Up: Blackberry Buckle


This is Only a Test

Please pardon this little experiment as we slowly doggy-paddle towards full 1080 HD video. I hear it's great, and all the cool kids are using it, so I figured what the hell. By the way, this is the Pacific Ocean, where it crashes into the ruins of the mysterious Sutro Baths. We think it may have been a sacred site for some long forgotten race of wealthy San Franciscans, but no one really knows for sure. Enjoy, and remember, this is only a test.

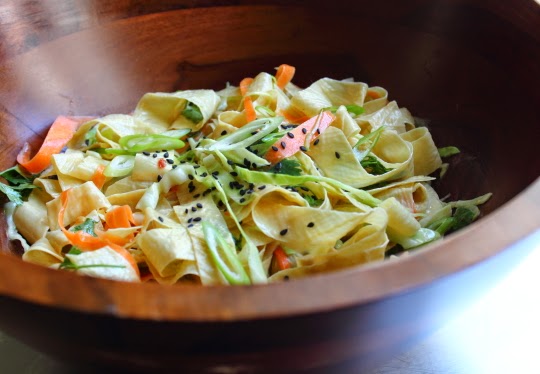
Yuba Noodle Salad – Do You Believe in Miracles?

So many things are touted as “miracle foods” these days, but invariably you find out the claims were false, the benefits exaggerated, and that Dr. Oz was full of crap again. I sure hope that doesn’t turn out to be the case with these grain-free, gluten-free, dairy-free, low-carb, low-cal, and quite delicious, yuba noodles.

You can use any dressings/garnishes you like, but I prefer these flavors, since texturally this closely resembles those wide, flat, Asian-style noodles we’ve all picked up from the neighborhood take-out place. Of course, those come loaded with massive amounts of bad carbs, a million calories, and enough MSG to choke a panda.

Occasionally, I have no problem with that, especially if I’ve been drinking, but generally this is a smarter option. Believe it or not, one giant portion of these noodles (not counting your dressing or sauce) only has 150 calories, just 7 grams of carbs, and almost no fat. So what’s the catch? It’s tofu.

But like pasta and noodles, tofu skin is very bland, so it’s really more about the texture, and being a “starchy” base for other ingredients, including non-vegan things like grilled chicken or shrimp. If you keep that in mind, I think you’ll really enjoy experimenting with this incredibly cool product. I hope you try this soon. Enjoy!


For 2 large portions Yuba Noodle Salad:
5 oz package yuba tofu skins, sliced into noodles
handful of carrot shavings
handful of thinly sliced cabbage
1/2 cup freshly torn cilantro leaves
1/4 sliced green onions
black sesame seeds

For the dressing (makes about 1 cup, about enough for 2 large salads):
2 tbsp smooth peanut butter
1 tbsp honey
1 tbsp fresh, finely grated ginger
1 tsp sambal chili sauce (or any hot ground chili sauce)
1/3 cup warm rice wine vinegar
1/2 cup vegetable oil
1 tsp soy sauce
1/2 tsp toasted sesame oil

Next Up: Yuba


How to Make Your Own Temporary Brick Grill

Whenever I post a video involving my grill – a common occurrence this time of year – I get a bunch of emails asking what kind of grill I’m using, and the reply is always the same. It’s a charcoal-version of the Weber “Q,” and you can’t buy one because they stopped making them. Sorry, but I think I have an idea.

With just a few dollars worth of bricks, and a cast iron grate, you can reproduce the same basic grill I’m using. Besides, yours is going to look a hell of a lot cooler, and you can tell your hipster friends it was made from “reclaimed bricks.” Just be sure to use plain clay bricks. You certainly don’t want anything that’s been treated with chemicals and/or will explode. If you get these at a home improvement store, be sure to ask the guy. In fact, ask that guy’s boss.

As far as the grate goes, if you want to splurge, order the porcelain-coated, cast iron versions that the major brands use. They all sell replacement grates, but just about anything will work, since you can change your brick layout to make it fit. If you want to save a few bucks, check the online auctions, as well as outdoorsy stores, and flea markets.

Besides working beautifully, it’s temporary state is perfect for people who only grill two or three times a summer. Just set it this up in some back corner of the yard, and break it down when the weather turns. I hope you give this fun DIY project a try soon. Enjoy!

UPDATE: Apparently you don't want the ash from charcoal briquettes in your garden. However, the ash from natural wood charcoal is desirable, so there you go.

Phil Nails the Skewer Genome

A viewer named Phil shared this with me today. I hope you enjoy it as much as I did. Thanks, Phil!


Ingredients for 6 portions:
1 tbsp olive oil, plus more as needed
3 cups chopped leeks (2 large leeks, about 1 cup sautéed)
3 cloves garlic, minced
2 cups cooked rice
1 1/2 cups finely chopped cooked spinach, squeezed very dry
2 large eggs, beaten
3/4 cup finely grated Parmigiano-Reggiano cheese, or other delicious cheese, plus more to dust pan and top
1 generous teaspoon fine salt, or to taste
1/2 tsp freshly ground black pepper
pinch cayenne
pinch nutmeg
- 350 degrees F. for 35 - 40 minutes

Next Up: Torta di Riso


Grilled Sausage-Stuffed Calamari – Squid Pro Quo

I usually go out of my way to simplify the recipes we post here, but for some things, like this Spanish-inspired, sausage-stuffed calamari recipe, there just are no acceptable shortcuts to take. However, your efforts will be rewarded with something that tastes every bit the effort it took to make…as long as they don’t explode in your face.

If you overstuff these, like I do every single time, they can burst open, sometimes violently. As you’ll see, the final results will still look great, and you do get to sneak a few tastes of the stuffing as you grill. So, be careful not to fill these too much, and/or wear your sunglasses while grilling these beauties.

As far as grilling time goes, you really should use a thermometer, and cook until you have an internal temp of 155 F. Especially since you’ll have squid of various sizes on the grill at the same time. If that’s not an option, look for when the juices and fat from the sausage starts bubbling out.

I was so hungry when I finally finished this batch I forgot to serve these with lemon wedges, which adds a nice, bright note to the smoky, spicy meat. A few platters of these, some ice cold beer (provided by friends you just taught what quid pro quo means), and you’re basically summering in Spain. I hope you give these a try soon. Enjoy!


Ingredients for 16 to 18 stuffed squid:
1 1/2 pounds cleaned calamari (tell the fish guy to give you mostly tubes)
For the stuffing:
1 tbsp olive oil
1/2 cup diced onion
1/2 cup diced red pepper
salt and pepper to taste
6 oz Italian or other spicy, garlicky sausage
1 large egg
1/4 cup chopped Italian parsley
1/8 tsp smoked paprika
4 ounces chopped tentacles (grilled the rest separately and eat!)
- serve with lemon wedges
*Note: grill these over a medium-hot coals, or close your cover to keep the heat down

Next Up: Grilled Stuffed Calamari


Spicy Coconut & Cashew Tuna Tartare – Big "Willi's" Style

Don’t worry; this delicious coconut and cashew tuna tartare recipe has nothing to do with Will Smith, although now that I think about it, the Fresh Prince of Bel-Air would have loved this. I’m actually referring to Willi’s Seafood in Healdsburg, where I lifted this version.

I tried to stay as close to the recipe as possible, with the one exception. They use lots of thinly sliced jalapeños, but I wanted a little more heat, I so went with minced Serrano chilies instead. While they are hotter, I missed the texture and flavor of the milder rings, so I recommend using those instead. I also will recommend that you toast the cashews, which will make them even sweeter and richer tasting.

Feel free to tweak this any way you want, including adding more coconut milk. Michele is on record as preferring twice as much as I used here, which will give you a looser, but much more luxurious mixture. This also needs a good amount of salt to bring the flavors together, so taste and adjust carefully. You could certainly use other salty seasonings like soy and/or fish sauce, but you already knew that.

Regarding the tuna, I used a frozen piece of  “Sushi Grade” yellowfin (aka Ahi). It may surprise you to learn that virtually all the sushi you eat, including that sashimi you love so much, has been sliced from recently thawed fish. Not only does this ensure freshness, as the fish is frozen just after being caught, but this also kills potentially dangerous parasites.

It’s the irrational fear of having one’s brain eaten alive that prevents many from enjoying this tasty raw treat, but if you use the tuna we’re recommending, you should be fine. Also, for maximum enjoyment, be sure to keep everything ice cold, and only toss right before serving. This is not something to make ahead and let sit in the fridge. I hope you give this unique tuna tartare recipe a try soon. Enjoy!


Ingredients for 4 portions:
8 oz frozen "Sushi Grade" Yellowfin tuna (aka Ahi), diced, kept ice cold)
2 tbsp chopped cashews
2 tbsp sliced red onions
2 tsp grated fresh ginger
1 lime, juiced, plus more to taste
salt to taste
2 tbsp thinly sliced fresh jalapeño rings or 1 tbsp minced serrano pepper
1/4 cup coconut milk, or more to taste
1 tbsp torn cilantro leaves
dried red chili flakes to garnish
Taro chip, optional (you can also use fried wonton chips, or sweet potato chips)

Next Up: Tuna Tartare


Coconut Oil Coffee?

My friends at Allrecipes.com posted this very intriguing video for what they’re calling “Coconut Oil Coffee.” As some of you may know, I’ve recently admitted to having a coconut oil and coconut milk obsession, so I really want to try this, but before I do, I thought I’d find out if any of you have tried this strange brew yet. Well, have you? If so, I’d love to hear what you thought. I’ll probably try it anyway, but thought it’d be fun get some of your opinions first. Thanks in advance!

Mancakes! A Father’s Day Brunch Classic

This amazing bacon, green onion, and cheddar corn pancakes recipe was originally planned as a “breakfast for dinner” post, but when I tasted how incredible they came out, I decided to do them as a Father’s Day brunch special instead. 

I realize Father’s Day Brunch isn’t actually a thing, but just in case it becomes a great tradition someday, I figured I’d get this into the search engines nice and early. Plus, I really wanted to call them “mancakes.”

Sweet/savory hybrids can be tricky sometimes, but I think this worked beautifully. We are talking about bacon, cheese, and onions after all, so it wasn't that big a shock. And the way the chipotle-spiced maple syrup brought everything together was a risk well rewarded.

As far as the texture goes, these were surprisingly tender, and fairly light for corn pancakes. My only regret is not cooking extra bacon to top these with. So, why not surprise the man in your life, and whip up a batch of these soon? Enjoy!


Ingredients for about 12 Mancakes:
8 oz bacon
1/2 cup thinly sliced green onions
1 1/4 cups all-purpose flour
3/4 cup cornmeal
1 tbsp baking powder
pinch freshly ground black pepper
pinch cayenne
3/4 tsp salt
2 large eggs, beaten
2 tbsp melted butter
1 tablespoon sugar
1 1/3 cups milk
2 oz grated sharp cheddar (about 1/2 cup)
serve with warm maple syrup spiked with chipotle to taste

Savory Ricotta Tart – Thin to Win

I got a food wish for a ricotta cheesecake recently, which sounded fantastic, but with bikini season rapidly approaching, my love handles and I thought we’d compromise and do a savory, sugar-free version instead.

I love the simple combination of really good ricotta and fresh herbs, baked with just enough eggs to hold things together. I was in the mood for some heat, but things like pepper and cayenne are totally optional. 

As I alluded to in the video, I usually do this as a pie, which comes out about twice as thick, but I wanted to try it in tart-form and the pan I used was clearly too large. Next time I’ll simply double the ingredients, and add about 10 or 15 minutes to the cooking time, and I recommend you do the same.

Keep this humble pie in mind when the “way too many vegetables” part of summer rolls around. This could be a great base for using up leftover veggies in a very fritatta-like way. I hope you give it a try soon. Enjoy!


Ingredients for 6 thin portions:
1/2 cup panko breadcrumbs, toasted in some olive oil
olive oil to coat pan
2 large eggs
1/2 tsp salt
1/4 tsp freshly ground black pepper
cayenne or other hot peppers to taste
1/4 cup fresh chopped or torn basil
1 tbsp chopped Italian parsley
tiny pinch nutmeg
1 1/2 cups ricotta cheese
1 oz finely greated Parmigiano-Reggiano cheese (about 1/2 cup if the real stuff, otherwise 1/4 cup packed of the fake “stuff”)
*Bake at 325 for about 20 to 25 minutes, or until set.

Chorizo & Chicken Skewers – Make Some For Your Buddy

At some point this summer, you’ll get tired of grilled chicken. Any grilled chicken. No matter the marinade, or the delivery system, you will have simply reached your limit, and that’s when you need to reach for the chorizo. 

Impale a few slices of this famously delicious, Spanish sausage in between your chunks of chicken, and as it grills, it will splatter its spicy, smoky fat all over its much blander skewermate, and once again, you and grilled chicken will be good buddies...just like Eddie Murphy and Nick Nolte.

That reference will make a lot more sense once you watch the beginning of the video. Anyway, this is nothing more than a suggestion to help cure grilled chicken fatigue, and as usual, I expect you to tailor this concept to your own strange and exotic tastes. I hope you give this a try soon. Enjoy!


Ingredients for 4 Skewers:
8 oz chorizo sausage, cut in 16 pieces
2 large chicken breasts, cut in 10 pieces each
1/2 red onion
1 red bell pepper
salt and pepper to taste
1 tsp smoked paprika
cayenne to taste
1 tbsp sherry vinegar
1 tbsp olive oil
2 tsp minced fresh oregano

Next Up: Chorizo Chicken Skewers