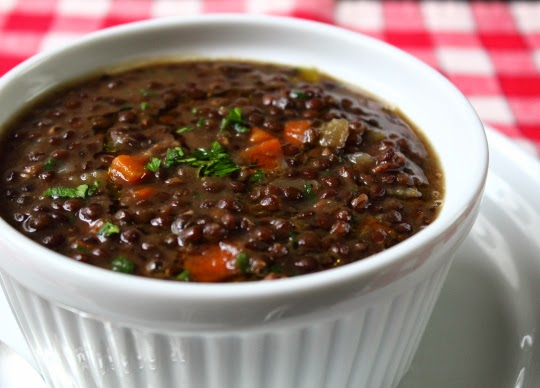
Black Lentil Soup – Always Bet on Black

There’s absolutely nothing wrong with green lentil soup, but once you start making it with black “beluga” lentils, you’ll have a hard time going back. These black beauties cook up melt-in-your-mouth tender, but still retain their structural integrity, which gives the soup both a thick, satisfying body, and a light, non-starchy mouthfeel.

The flavor is wonderfully meaty, especially when you toss in a handful of bacon, and they require absolutely no finesse to prepare perfectly. Just simmer until you have achieved lentil tenderness, adding broth as needed. That’s pretty much it.

I’m told black lentils are really good for you, which is weird, since I’ve never asked anybody. Nevertheless, this is a soup you can feel good about putting into your body, unlike that “Bacon Jalapeño Popper Chowder” recipe you got off Pinterest. We’re still right in the middle of soup season, so the next time you feel like a hot bowl, I hope you give this black lentil soup a try. Enjoy!


Ingredients for 4 large portions:
2 tsp vegetable oil
4 oz bacon
1 cup yellow onion, large dice
1 cup carrots, large dice
1 cup celery, large dice
1/2 tsp cumin
1/4 tsp dried thyme
salt and pepper to taste
cayenne to taste
1 1/4 cup black lentils
5 to 6 cups chicken broth, or as needed
1 bay leaf
1/4 cup chopped Italian parsley
1 tsp extra good extra virgin olive oil

Next Up: Black Lentil Soup


Chicken and Olives – Shaken and Stirred

As I mention in the video, I’ve done almost 1,000 videos, and yet can’t remember ever featuring chicken and olives in one before. Considering how brilliant a combination they are, this is nothing short of astounding. I think there are a few in our famous arroz con pollo recipe, but as far as full co-star billing, this is the first time.

Hopefully, it was worth the wait. For that to be the case, you should probably really like, if not love, olives. Their sharp, briny bite is the dominant flavor here, which is why it pairs so well with chicken breast. This one of those dishes where if you tasted the chicken and sauce separately, you probably wouldn’t be very impressed, but together – magic.

Any pitted olives will work, but the Kalamata and Castelvetrano varieties are highly recommended. Luckily, most every large grocery now has an olive bar somewhere, so you shouldn’t have too much trouble finding them. Speaking of finding products, you may actually have a harder time locating the Herbs De Provence.

We haven’t used this Mediterranean dried-herb blend in a while, and if you can find it, it’s worth picking up a bottle. Trust me, you’ll use the rest this grilling season. If you can’t find any, you can always make your own, and I’ve listed the ingredients below. Anyway, if you’ve been looking for a new chicken recipe, especially one with olives in it, then I hope you give this a try soon. Enjoy!


Ingredients:
4 boneless, skin-on chicken breasts
salt, pepper, and cayenne to taste
2 tsp Herbs De Provence (the brand I used contained dried chervil, basil, rosemary, tarragon, garlic, lavender, marjoram, savory, thyme, and parsley)
2 tbsp olive oil
1/4 cup sliced shallots
1 cup sliced olives
1 cup chicken broth
1 lemon, juiced
2 tbsp reserved Kalamata olive brine
1/2 tsp cumin
zest from one lemon
2 tbsp Italian parsley
2 tbsp cold butter, cut in 4 pieces

Chicken and Olives – Shaken and Stirred

As I mention in the video, I’ve done almost 1,000 videos, and yet can’t remember ever featuring chicken and olives in one before. Considering how brilliant a combination they are, this is nothing short of astounding. I think there are a few in our famous arroz con pollo recipe, but as far as full co-star billing, this is the first time.

Hopefully, it was worth the wait. For that to be the case, you should probably really like, if not love, olives. Their sharp, briny bite is the dominant flavor here, which is why it pairs so well with chicken breast. This one of those dishes where if you tasted the chicken and sauce separately, you probably wouldn’t be very impressed, but together – magic.

Any pitted olives will work, but the Kalamata and Castelvetrano varieties are highly recommended. Luckily, most every large grocery now has an olive bar somewhere, so you shouldn’t have too much trouble finding them. Speaking of finding products, you may actually have a harder time locating the Herbs De Provence.

We haven’t used this Mediterranean dried-herb blend in a while, and if you can find it, it’s worth picking up a bottle. Trust me, you’ll use the rest this grilling season. If you can’t find any, you can always make your own, and I’ve listed the ingredients below. Anyway, if you’ve been looking for a new chicken recipe, especially one with olives in it, then I hope you give this a try soon. Enjoy!


Ingredients:
4 boneless, skin-on chicken breasts
salt, pepper, and cayenne to taste
2 tsp Herbs De Provence (the brand I used contained dried chervil, basil, rosemary, tarragon, garlic, lavender, marjoram, savory, thyme, and parsley)
2 tbsp olive oil
1/4 cup sliced shallots
1 cup sliced olives
1 cup chicken broth
1 lemon, juiced
2 tbsp reserved Kalamata olive brine
1/2 tsp cumin
zest from one lemon
2 tbsp Italian parsley
2 tbsp cold butter, cut in 4 pieces

Simple Asparagus Tart – Sorry, Mom!

I don’t often buy puff pastry to make asparagus tarts, but when I find a piece in the back of the freezer, it’s one of my all-time favorite things to do. My only real regret with this video, was not finishing it with a poached egg, and calling it a Mother’s Day brunch special. As great as this was, it would have been even more so accessorized with a runny egg.

As long as you’re pretty good at making rectangles, and trimming things to the right length, this recipe is a breeze. By the way, I’ll give the specific ingredient amounts I used here, but this really depends on how much asparagus you have, and how long you want your tart to be.

The width of your tart is always going to be a little wider than the asparagus are long, as you see above; but the length is up to you, and you can use as many spears as will fit across your pan. If you’re not quite clear on what I’m saying, simply Google “asparagus tart” and you’ll see what I mean. They’re like snowflakes.

While we got a surprisingly positive response on our raw asparagus salad recipe (I really should have more faith in you), I did want to do a more classic, hot preparation as well. Asparagus is bountiful and beautiful right now, and I really hope you pick some up, possibly along with some eggs, and give this a try soon. Enjoy!


Ingredients:
6 x 9 inch rectangle of puff pasty, thawed
6 asparagus spears, blanched in well-salted wated
2 tsp melted butter
grated Parmigiano-Reggiano as needed
For the mustard sauce:
1 tbsp Dijon mustard
freshly ground black pepper and cayenne to taste
- Bake puff pastry shell at 400 F. for 10-12 minutes, or until puffed and golden-brown.
- Fill and bake another 10-12 minutes or until the pastry is browned and asparagus are tender (but not mushy!).

A Summer Stew for Spring

I was trying to think of a spring recipe to repost today that would highlight a seasonal vegetable, but instead decided to use a summer recipe that could highlight all of them. 

That’s right, this summery sausage stew is absolutely perfect for enjoying any and all of those spring veggies you’ll be seeing at the farmers market. Baby carrots, English peas, new potatoes, and other tender, green offerings will shine alongside your favorite sausage in this easy stew. Click here to read the original post. Enjoy!

Pan Sauce "Bordelaise" – She Sears Strip Scraps by the Seashore

Say that five times fast! As promised, here’s the pan sauce you saw me dragging those perfectly trimmed chunks of NY strip through in our Manhattan filet video. As I say in the intro, this isn’t truly a bordelaise, but it’s close enough for YouTube, and absolutely delicious.

Of course, one could argue it would be smarter to use the strip scraps for something like pasta sauce or chili, and you’d get no argument from me; but if you want to put your Manhattan filet experience over the top, this is a more than a worthwhile sacrifice.

I used chicken broth, but if you can find veal stock (check your more expensive grocery stores) that makes this already gorgeous sauce even better. Just be careful with the salt if you’re using broth from a carton. Because we are reducing (and reducing again), an overly salty stock could become inedible. Since I know someone one will ask, I’ll tell you right now; I threw out the meat scraps after they were strained. Why? I don’t have a dog.

Once those tiny pieces of meat are simmered for that long, they're completely tasteless, and certainly not good eats. But hey, you guys are the Bobby Flays of your faux "Bordelaise," so suit yourself (didn't think of this one until after the audio was done). Also, if you don’t have, or can’t have red wine, don’t make this sauce. If you do, and you give our Manhattan filets a go, I hope you give this great pan sauce a try as well. Enjoy!


Ingredients for 2 generous or 4 smaller portions of sauce:
8 ounces trimmed beef scraps, chopped fine
1/4 cup sliced shallots
pinch of salt
1/2 cup red wine (something from Bordeaux would be nice)
2 cups rich chicken broth (unsalted or low-sodium) or veal stock
salt and pepper to taste
1 tbsp cold butter

The Manhattan Filet Project – This New Steak Cut is the Bomb

While I’m thrilled to be bringing you this “Manhattan Filet” demo, I should start by apologizing for waiting so long. I learned this great technique a few years ago on a foodie field trip to Las Vegas, and have been keeping it to myself ever since. 

Of course, waiting three years to publicly share things you did in Vegas is always a prudent strategy, but that wasn’t the case here.

Regardless, this simple technique not only provides you with a NY Strip steak that eats like a filet mignon, but as you’ll see soon, the trimmings are going to be used to make a world-class pan sauce. Even if a faux-bordelaise isn’t your cup of tea, you can always save the scraps for a Sunday sauce, or meatballs, and so this method still makes sense no matter.

The overnight “dry-aging” step is optional, but does add a little something extra to the final product. In addition to some nominal flavor concentration, the leathery surface will crust up marvelously. Anyway, stay tuned for the companion sauce video coming up next, and if you want to play along at home, go out and grab some nice fat NY strips, and start your own Manhattan filet project. Enjoy!

Please note: I recommend using at least 12-14 ounce NY Strip steaks! 

Shaved Asparagus Salad with Fried Pastrami and Mustard Dressing – Keeping it Raw

This shaved asparagus salad actually started out as an asparagus wrapped with pastrami recipe, but when that didn’t work out, my wife Michele saved the day, and convinced me to go raw – and I do mean convince.

I really dislike under-cooked asparagus, and in virtually every video I’ve used it, I’ve pleaded with the audience to make sure the spears get to the sweet and tender stage. I’ve always felt that the main reason most people who don’t like asparagus, is that they grew up eating it crunchy, barely warm, and bitter.

However, when you shave it thin with a peeler, and give it a quick curing/pickling in the dressing, those harsh attributes mellow out substantially, and the sweet, grassy flavor comes through. In fact, it was so delicious that I contemplated serving it without the fried meat.  Happily, that passed.

Thanks to the pastrami’s aromatic spices, subtle smokiness, and peppery finish, it was a perfect match. Of course, you can substitute with bacon or ham; but the cured beef brisket was a nice change of pace to those much more common, pork-based choices.

Just be sure to not dress your raw asparagus until you’re ready to eat. The couple minutes it takes to fry the meat is all the marination time you’ll need. Anyway, peak asparagus season is almost upon us, and if you’re looking for a new way to enjoy it, I hope you give this shaved asparagus salad a try soon. Enjoy!


Ingredients for 4 portions:
24 large asparagus spears (save bottoms for soup)
salt, pepper, and cayenne to taste
4 oz pastrami, sliced thin
For the dressing:
1 tbsp Dijon mustard
2 tbsp seasoned rice vinegar (or regular rice vinegar with a pinch of salt and sugar)
3-4 tbsp olive oil, or to taste

Next Up: Asparagus Salad


Happy National Potato Chip Day!

In honor of National Potato Chip Day, I'm posting the closest thing I have. This "see-through” herb and potato crisp recipe was done almost seven years ago, and it looks/sounds like it. By the way, have I really been doing this for seven years? 

Anyway, if you have some time to kill, and want to make something not exactly like potato chips, but close enough for the Internet, then I hope you give these a try. Click here to see the original post. Enjoy!

Syracuse Salt Potatoes – Lot's Wife Would Have Loved These

Not only is this Syracuse salt potatoes recipe one of the most delicious ways to cook baby spuds, it’s also one of the most interesting. I generally don’t like when people watch me cook their food, you know, in case anything gets dropped (#5secondrule), but these are kind of fun to do in front of guests; just to see that look of shock in their eyes, as you dump in all that salt. Amazingly, only a small amount of salt gets inside the potatoes, and by “small amount,” I mean “perfect amount.” 

This recipe really takes the guesswork out of seasoning. Of course, I could go into all the science behind why these don’t absorb too much salt, but that would mean having to learn it first, and then figure out how to explain it, which sounds like an awful lot of work. Instead, I’ll let my intrepid readers take wild guesses.

I mention in the video that these were invented by Irish salt miners, which is true, except I don’t think they used actual mines, but salt pools instead. Apparently digging is a lot harder than waiting for water to evaporate. Regardless, they used this abundant supply of salt to boil less-than-perfect quality new potatoes, and the rest is culinary history.

Regarding the amount of salt, I used a ratio of 1 cup of kosher salt to 5 cups of water. Believe it or not, this is actually less than traditionally used. Hey, we all don’t have salt factories in our backyards. A cup of the brand I use weighs about 6 ounces, which means if you’re using regular, fine table salt, you’ll need just over a half-cup to get the same amount of salt.

Anyway, other than having to sponge-up some salt speckles from the stovetop, this recipe is fast, easy, and truly unique. So, if you want to serve something this St. Paddy’s Day that truly celebrates Irish-American heritage, then I hope you give these salt potatoes a try. Enjoy!


Ingredients for 6 servings:
2 pounds of small new potatoes, scrubbed
5 cups of water
1 cup Kosher salt
melted butter

Next Up: Syracuse Salt Potatoes


Irish Pork Stew with Baby Cabbage – What We Should Be Eating on St. Patrick’s Day

I’m sure you’ve heard by now that corned beef and cabbage is not authentic St. Patrick’s Day food. It wasn’t until Irish immigrants, fleeing the great potato famine, arrived in New York, and started hanging out in delicatessens that brisket became the cabbage-adjacent meat of choice.

I assume it was the potato knishes’ siren song that initially drew them in, but eventually they got hooked on the corned beef, and the rest is history. So, I decided to do a little mash-up (and mash-under), and this Irish pork stew with baby cabbage was the result. By the way, “baby cabbage” can be a little hard to find, but you can use Brussels sprouts, and no one will know the difference…mostly because there isn’t one.

You can cook them in the stew if you want, but the timing can be tricky, and trust me, you don’t want to eat “baby cabbage” that’s been cooked too long; no one does, So, I highly recommend blanching them first, and warming through at the end.

Since we are using Guinness, I will admit this isn’t a beginner’s stew. The stout gives a ton of flavor, but also a slightly bitter note, which some people do not enjoy. I balanced it with the balsamic vinegar and caraway seed, and it was absolutely wonderful, but I think it’s worth mentioning.

You can leave it out, use a lighter beer, or just splash in some extra stock. Anyway, if you’re looking for beautiful alternative to that traditional “authentic” St. Patrick’s Day meal, then I hope you give this a try. Enjoy!


Ingredients for 6 portions Irish Pork Stew:
2 1/2 pounds boneless pork shoulder, cut into 2-inch cubes
salt and pepper to taste
1 tbsp vegetable oil
1 tbsp butter
1 large onion, chopped
2 garlic clove, minced
2 generous tbsp flour
1 bay leaf
3/4 teaspoon caraway seed
1 (12-ounce) bottle Guinness Draft or other dark beer
3 carrots, cut into 1 inch pieces
2 ribs celery, cut into 1 inch pieces
2 cups chicken broth, more as needed
3 tablespoons balsamic vinegar
1/4 cup chopped Italian parsley
12 Brussels sprouts, halved, blanched
mashed potatoes to serve over

Thai One on This Saint Patrick's Day

Sorry to partially ruin the surprise, but I’ll be posting a St. Paddy’s Day recipe soon, and it’s not a new corned beef and cabbage recipe. Of course, chances are you’ve been successfully boiling corned beef for years without my help, but if you’re in the mood for a spicy chance of pace, I’m re-posting this delicious coconut milk version for your consideration. You can read the original post here. Enjoy!

Crab-Stuffed Sole – Rolling in Excitement

There is nothing exciting about sole. It’s cheap, easy to find, has a mild, unremarkable flavor, and…that’s about it. It’s the Pabst Blue Ribbon of seafood. Which means it’s the perfect candidate for jazzing up by stuffing with crab.

The sole filets I used here were a little smaller than I would have liked, and I probably over-stuffed them a bit, which will increase the chances they will split along the natural seams in the flesh, especially if you roll too tight. As you can see, it’s not a big deal, and doesn’t alter the taste, but I did want to point it out.

As far as the trick I mentioned for covering cracks; all you need to do is save a little of your lemon-mayo mixture, and near the end of the cooking time (when the seams begin to split), pipe it into any unsightly crevices. Then, turn on the broiler, and give the top a quick browning to hide the evidence. I think these looked fine as is, and for a regular dinner I wouldn’t bother, but for those fancier parties, it’s not a bad idea.

I hope it’s pretty obvious that this technique would work for hundreds of other filling, as well as with any thin, white, roll-able fish. These are also great since you can make them well ahead of time, and then just sauce and bake when you’re ready to party. I hope you give these delicious crab-stuffed sole filets a try soon. Enjoy!


Ingredients for 2 portions:
6 sole filets (12 ounces)
salt to taste
For the filling:
4 oz crabmeat
2 tsp minced green onion
1 tbsp finely diced poblano pepper
salt and pepper to taste
1/2 tsp lemon juice
1 tbsp panko breadcrumbs
For the sauce:
1/3 cup mayonnaise
2 tsp finely grated lemon zest
cayenne to taste
- Bake at 400 F. for 15-20 minutes, or until cooked through

Next Up: Stuffed Sole


Whole Wheat Ciabatta – Not Bad, Which is Great!

I’ve never had much of a taste for whole wheat bread, which is not surprising if you grew up during the Wonder Bread years. Whole wheat flour is significantly stronger tasting, and its earthy, bitter aftertaste is the reason white flour is the much preferred choice for, well, everything.

Besides the taste, it’s also a little harder to work with, and fairly easy to turn out something with a density that would make a brick blush. But, thanks to many years of requests, I decided to give the old no-knead ciabatta a higher-fiber makeover. Since I don’t have much whole wheat baking experience, I did what any good chef would do…I didn’t do any research, and just tried to figure it out.

I was quite happy with the taste and texture, and going 50/50 with the all-purpose flour provided just enough of that crusty, chewy “normal” bread experience, and we still get a decent amount of whole grain.

The procedure is straightforward, but as I point out in the video, pay attention to when you start. I recommend doing the sponge in the afternoon, mixing the dough at night, and baking it in the morning. Speaking of which, be sure to dust your dough with flour before covering. I didn’t, and had a little sticking problem.

I know many of you have made and enjoyed the traditional ciabatta bread we posted, so I’m looking forward to hearing from those of you who give this whole wheat version a try. Please let me know, and as always, enjoy!


Ingredients:
For the sponge:
1 cup tepid water
1/4 tsp dry active yeast
1 oz (1/4 cup) rye flour (you can sub wheat flour)
2.25 oz (about 1/2 cup) all-purpose flour
2.25 oz (about 1/2 cup) whole wheat flour
let sit until very bubbly, about 5 hours

Then add:
1/2 cup room temp water
1 3/4 tsp fine salt
1 1/2 tsp honey
1 tbsp polenta
1 tbsp ground flax seed
2 tbsp shelled sunflower seeds
4.5 oz (about 1 cup) all-purpose flour
4.5 oz (about 1 cup) whole wheat flour
-Bake at 450 F. for 30-35 minutes

Best Use of Video?

As you may have heard from a few magnanimous readers, nominations are now open for Saveur's 2014 Best Food Blog Awards, and they have a category for “Best Use of Video” this year. So, if you’re looking for a great way to kill a few seconds, why not head over to the nominations page, and represent! It’s been a while since we added any new “pieces of flair” to the sidebar. Thank you! 
.

Spaghetti Al Tonno – Nothing Fishy About This “Meat” Sauce

Spaghetti al tonno is one of my all-time favorite "go to" pasta dishes, and I hope this re-make of an old video helps make it one of yours. I did a very similar spaghetti with spicy tuna sauce for About.com a long time ago, but never got around to doing an official Food Wishes version.

Having said that, there really is no “official” recipe, as this is the type of dish that gets made a little differently every time. Not different on purpose, mind you, but different since that’s what happens when you cook without written recipes, which by the way, is the recommended method. 

I love a classic meat sauce as much as the next half-Italian, but when I want something quick and easy for a weeknight meal, I reach for the tuna. By the time you bring a pot of water to a boil, choose a wine, and cook your pasta, the sauce should be done. What if all that sounds great, but you don’t like fish? Then, this is perfect.

As I say in the video, the taste and texture is really closer to a veal sauce, than one made with fish. Above and beyond the non-fishy flavor, this is also lower in fat and calories, in case you’re into that kind of thing. So, the next time you’re in the mood for a quick spaghetti with “meat” sauce, I hope you give this delicious pasta sauce a try. Enjoy!


Ingredients for 4 Portions Spaghetti Al Tonno:
2 tbsp olive oil
1 anchovy filet
2 tablespoons capers
3 cloves minced garlic
1/2 cup white wine (Note: if you can’t use wine, don’t. Use a splash of stock)
3 cups crushed San Marzano tomatoes
red pepper flakes, to taste
1/4 tsp dried oregano
salt, pepper, and cayenne to taste
7 ounces oil-packed tuna, drained (reserve and use oil!)
1/4 cup chopped Italian parsley
12 ounces dry spaghetti
Parmigiano-Reggiano for top