Spanish Octopus – Now 100% Trick Free

I’ve never been to Spain, so to what extent this is actually Spanish octopus, I can’t really say, but after having enjoyed this underrated seafood in more Spanish restaurants than I can remember, it has to be pretty close.

Above and beyond the ingredients, the cooking method, or should I say methods, couldn’t be easier. As long as you braise it gently on low heat, until just tender, and then give it a nice sear before serving, you should be in great shape. Which is why I’ve never understood all the crazy tips and tricks, for achieving the perfect texture.

Some say to beat it on rocks before braising, while others insist a few wine corks are the way to go. If you have one of these magical techniques, I’d love to hear about it, especially if it sounds extra nutty, but I have to admit, I am a skeptic.

You should be able to find frozen Spanish octopus at your finer markets, which is the only kind I’ve ever used, so I can’t say how much better it is fresh, but one day I would love to find out, preferably in Spain. Fresh or frozen, I really do hope you give this a try soon. Enjoy!


Ingredients for two portions:
1 pound piece Spanish octopus
2 tablespoons olive oil
3 cloves garlic
1 large or 2 small bay leaves
1 1/2 teaspoon Spanish paprika
1 1/2 teaspoon kosher salt
1/2 cup white wine
- Serve with crusty roasted potatoes

For the sauce:
About 1/3 cup reserve braising liquid (boiled, strained)
1 tablespoon fresh lemon juice
1 tablespoon freshly chopped Italian parsley
salt to taste
cayenne to taste

Allrecipe’s Epic Grilling Giveaway on Amazon Alexa!

I don’t do a lot of giveaways, or any giveaways, but I’m not above promoting one, especially when I’m part of the prize! Sure, my Summer Grilling Guide is a consolation prize for those who don't win a new Char Broil grill, but technically, it’s still a prize. Here is the link to enter. Good luck!
.

Baklava – So Good, It’s Nuts!

Assuming you haven’t used up all your homemade filo dough already, as promised, here’s my method for building what I think is a beautiful baklava. Like lasagna, there are as many versions of this, as there are cooks who make it, but regardless of the exact ingredients, or specific number of layers, the technique is the same. 

I tend to enjoy a generous ratio between nuts and pastry, as that makes me feel a little bit better about the copious amounts of sugar in this, but above and beyond that, I think this approach produces the best texture. As I mentioned in the video, you can use as many layers of filo as you want, but be careful, since too many may not cook through, and the only way to mess this up is to undercook the dough. The top and bottom layers need to dry out, and thoroughly crisp up, otherwise, once the syrup gets ladled over, you’ll have a soggy mess.

I would start peeking at it after about 45 minutes, but it’s probably going to need closer to an hour, or even more, depending on how much “stuff” you used. Once done, and finished with the syrup, you need to let this cool down to room temp, which is incredibly hard to do. But, your patience will be rewarded with one of the most delicious things known to man. I really hope you give this a try soon. Enjoy!


Makes one 9-inch round Baklava:
*Note: I don’t know how this translate to different size pans, but I’m sure you’ll figure that out.

Ingredients:
16 sheets homemade filo/phyllo dough (or 1 package frozen filo/phyllo dough, defrosted)
1 stick (1/2-cup) melted unsalted butter
- For the syrup:
1 1/2 cups sugar
3/4 cup water
1/4 cup honey
3 whole cloves
1/4 teaspoon vanilla
1 1/2 teaspoons orange blossom water (or sub some orange and lemon peel)
- For the nut mixture:
2 1/2 cups walnut halves
1 cup shelled pistachios
1 1/2 teaspoons cinnamon

- Bake at 350 F. for about 1 hour, let rest for 5 minutes, and apply syrup

Homemade Phyllo aka Filo Dough – One Step Away from Baklava

At long last, we’re finally going to post a baklava video, which I decided to make a lot harder, by making the filo dough from scratch. 

While not using the incredibly convenient, and significantly faster frozen filo dough does make this a lengthier project, it also makes it much more interesting, and way more fun.

Fair warning, I’ve only done filo a handful of times, so I’m no expert at making this, or baklava, for that matter; but the good news is, despite that, I still managed to achieve some fairly excellent results, and suspect you will as well. I’m sure with a little practice I could probably do more than five at a time, but once you get rolling, the batches go pretty quick, and each one seems to get a little better than the last.

I'll post the baklava video next week, but if you want to practice, you could make a batch, and then do search on Allrecipes for recipes that use filo. There's no shortage of amazingly delicious things to do with this paper thin dough. Stay tuned for baklava, but in the meantime, I hope you give this a try soon. Enjoy!


Makes enough for about twenty (10 to 12 inch round) sheets of filo:
2 cups all-purpose flour, plus more for kneading
5 teaspoons olive oil
1/2 teaspoon fine salt
2 teaspoons white wine vinegar
3/4 cups warm water (about 110 F.)
For the starch mixture:
1/2 cup cornstarch
2 tablespoons all-purpose flour

Spicy Chicken Noodles – It’s The Rice That Makes It Nice

The only downside to this beautiful, spicy chicken noodles recipe is that I’m now going to get even more requests for Pad Thai that I usually do. Which is understandable, since no matter what recipe they’re used in, rice noodles are a proven crowd-pleaser.

By the way, I’ll post a recipe for pad Thai just as soon as my version comes out at least as well as the worst restaurant example in town. I’m not quite there yet. In the meantime, we can all practice our rice noodle soaking technique. As I mentioned, check the package of noodles you buy, as the time will vary depending on the size of the noodle.

I think this dish is perfect for using up leftover chicken, assuming it wasn’t horribly overcooked in the first place. If you did want to use raw chicken, go ahead and chop it up, and stir-fry it for a minute or two, before adding your vegetables. Either way, I really hope you give this spicy chicken noodles recipe a try soon. Enjoy!


Ingredients for 2 large or 4 small portions:
8 ounces dry rice noodles, soaked in 6 cups of boiling, lightly salted water (drain and rinse before using)
8 ounces cooked chicken breast, torn
1 tablespoon sesame oil
For the sauce:
3 tablespoons hoisin
1 tablespoon soy sauce, plus more to taste
1 tablespoon ketchup
1 tablespoon brown sugar
1 or 2 tablespoons Sriracha, or other hot sauce
1 teaspoon hot chili flakes
1/4 cup seasoned rice vinegar
1/2 cup chicken broth
For the vegetables:
1 large carrot, finely sliced or shredded
1 red bell pepper, thinly sliced
2 jalapeno peppers, thinly sliced
2 cups finely sliced green cabbage
1/2 cup chopped green onions
3 cloves garlic, finely crushed
1/2 cup freshly chopped cilantro

Grilled “Tandoori” Lamb – Hold the Tandoor

Since I didn’t cook this marvelous meat in a tandoor oven, it’s not actually tandoori lamb, which will save some of you the time letting me know all the other ways it isn’t the real deal. Accepting that, these days “tandoori” simply refers to the yogurt based, aromatically spiced marinade, whether you grill, broil, or bake the meat.

As usual, please adjust the spice amounts to your tastes, since you know you much better than I do. These should get you close to your friendly neighborhood Indian joint, but still, play around. If you want to add some veggies between the pieces of meat, go ahead, but I have more success cooking them separately.

I really like lamb sirloin, and see it in the stores more often these days, but like I said in the video, leg of lamb, or a shoulder roast, are also very nice for this. If you feel like splurging, you can do lamb chops, but for those, 4 to 6 hours is plenty of time in the marinade. But, no matter which cut you use, or animal for that matter, I really do hope you give this a try soon. Enjoy!


Marinade Ingredients for 2 to 3 pounds of lamb
2 to 3 pounds lamb sirloin, cut into about 1 1/2 to 2-inch chunks
1 cup plain yogurt
2 teaspoons kosher salt, plus more pre-grilling
1 big juicy lemon, juiced
1/4 cup grated or very finely minced onion
2 cloves crushed garlic
1 tablespoon grated ginger
2 generous teaspoons garam masala (click here to make your own)
1/2 teaspoon cayenne pepper
1 teaspoon cumin powder
1/2 teaspoon turmeric powder
2 teaspoon paprika
1 tablespoon vegetable oil
chopped cilantro
fresh lemon
grilled onions
flatbread or rice
spicy cilantro chutney (I don’t have a recipe, but here’s one)

Lebanese Mountain Bread – A Peak Flatbread Experience

As promised, here is my take on Lebanese Mountain Bread. There are so many reasons why I love this simple bread. There’s the unique texture, gorgeous appearance, and fun-to-make technique, but discovering this also helped me solve a culinary mystery from my childhood.

I used to spend a lot of time at my grandmothers house as a toddler, and every once an a while she would give me something called “Syrian bread,” which was made by a neighbor across the street. It was one of my earliest food memories, and at the time, probably my favorite thing to eat. It was just so much different than the sliced white bread, or crusty Italian bread I was used to eating.

However, the Syrian lady across the street must have been the only person in the area that knew how to make it, since, once she was gone, so was the bread. Over the years, I tried many versions, but I never did come across that exact same experience, and assumed it was lost to history, until I saw something online called Lebanese Mountain Bread, which looked remarkably similar.

After a few (dozen) experiments, I finally nailed it down, and was suddenly transported back to grandma’s kitchen. By the way, this might be as close to a time machine as we ever get. Fair warning, it may take a little practice stretching the dough over the bowl (or Lebanese mountain bread pillow), but your efforts will be richly rewarded, so I really do hope you give this a try soon. Enjoy!


Ingredients for about 8 portions Lebanese Mountain Bread:
1/2 cup bread flour
1 teaspoon dry active yeast
1 teaspoon sugar
1/2 cup warm water
then add:
3/4 teaspoon kosher salt (or 1/2 teaspoon fine salt)
1 tablespoon olive oil
1 cup bread flour, plus more as needed

Happy 5th of July!

I hope you had a great holiday, and that your food was just as impressive as the fireworks show, or visa versa. We’re going to take a few days off, so there won’t be any new videos this week, but that’ll give you time to catch up on the ones you’ve missed, as well as continue to build suspense for the upcoming Lebanese Mountain Bread video.

In related news, I’m also experimenting with a few new/old things to serve with the aforementioned, and thoroughly teased flatbread. So, stay tuned for all that, and, as always, enjoy!

.

Chicken Foccaccia


Ingredients:

For the dough:
3 cups All Purpose Flour 
1tbs Active Dry Yeast                  
1 tsp Salt                    
1 tbs Olive Oil            
1cup Water


Toppings:
1/4 Cup Green Olives
1 Cup Shredded Chicken
1 Sliced Onion
1 Diced Tomato
1 TSP Dried Basil
1 TSP Dried Oregano
Red Cayenne Pepper flakes (optional)

Yield: Makes two 12 inch Focaccias or one big Focaccia.

   
Method: 

1. Heat 1 cup of water for 35 seconds in the microwave. It should feel lukewarm on your wrist. Mix 1 tbs active dry yeast and 1 tsp granulated sugar. If the yeast is active within 3 - 4 minutes it would become frothy and begin to rise to the surface, otherwise it will be flat which means it is stale so should not be used for baking. 

2. In a food processor pulse to combine 3 cups of sifted all purpose flour and salt. Pour the yeast solution through the feed tube and pulse 3 or 4 times until well incorporated and the whole mixture forms a ball. Add 1 tbs olive oil and pulse for 2 - 3 seconds till the dough becomes springy and starts to spin which means it is kneaded enough.

3. Remove the dough from the food processor bowl and with greased hands shape it into a ball by gathering towards the bottom and pinching to close, then place it in a greased bowl, cover with a lid or plastic wrap and leave it in a warm dry place on the counter to rise - 45 minutes to an hour till it is double in size. But yes, you have to check to see if your dough passed the window pane test. Donna Currie in her article on Serious Eats describes how to test "if the gluten has developed well enough for it to hold the bubbles while it rises, and stretch even more as the gases expand from the heat."

4. Place the puffed up dough in the centre of a greased pizza pan and slowly start spreading the dough  outward by pressing gently and evenly with the tip of your fingers greased with olive oil till it covers  the entire circumference of the pizza pan and is shaped into a 12 - 14 inch circle as big as the pizza  pan. Alternatively you could just press the dough on a lightly floured surface and start working on it with your fingers using the same technique till you stretch it to form a 12 - 14 inch circle. Transfer to a pizza pan or stone. 


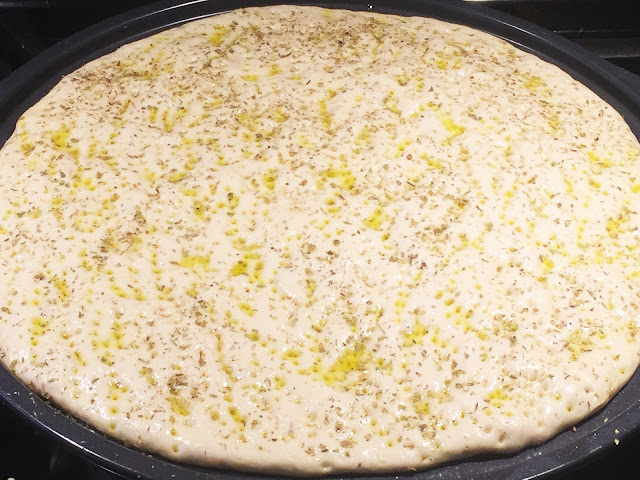
5. Drizzle olive oil generously on the surface of the crust, then with the help of a fork prick everywhere. Alternatively you could use your fingers to make depressions all over. This is done to prevent the bubbles from popping up while baking.


6. Sprinkle dried oregano and basil on the crust.  Then use toppings of your choice. Below are pictures of focaccia with different toppings.


7. The focaccia in the above picture has shredded chicken, diced fresh tomatoes, onions, green olives as toppings. 

8. Focaccia with Mushrooms, Black Olives and Mozzarella Cheese. 

9. Sun Dried Tomatoes and Onions focaccia.

10. Portobello Mushrooms and Cheddar Cheese Focaccia. Enjoy!

Gongkura Lamb Curry


Gongkura greens are edible Sorrel leaves most popularly used in South Indian Cuisine especially in the states of Andra Pradesh and Tamil Nadu in India. It has a distinctive tangy taste and is one of the main ingredients of Andhra Cuisine. It is also a wonderful source of vitamins, minerals and antioxidants that are beneficial to your overall health. 

I grew up eating a variety of dishes made with gongkura and I still cherish those memories. Here in Canada finding gongkura is like finding a lost treasure. When you find it you consider yourself lucky so you grab it at once with out thinking. I love all the dishes made with gongkura and I intend to post all the recipes here as and when I keep making them from time to time. I want to grow them in my backyard so I can cook them whenever I want to atleast during the summer months. 

The Gongkura lamb curry is made with lamb meat and bones. Using lamb meat from the rib area (sar seena) makes the best tasting Gongkura curry indeed! I was lucky to find the gonkura leaves in a store in Toronto and got to make it and enjoy it after so many years - with steamed rice it was insanely delicious!!

I made this in my instant pot and it was so convenient and quick. 

Here's the Recipe:

l lb Lamb bones with meat (from the rib cage and neck)
2 bunches  Sorrel leaves 
1 tbs  Channa dal 
1 tbs Ginger garlic paste 
3 - 4 Garlic cloves 
2 large onions
1 medium ripe tomato
2 tsp Turmeric 
1 tsp Kashmiri chilli pepper 
1 tsp Coriander powder 
1 tsp Garam Masala Powder 
4 - 6 Green chillies 
1small dried red chilli deseeded
2 tbs Oil 
Ghee - 1 tbs
1/2 tsp Cumin seeds 
1/2 tsp Mustard seeds 
 Fresh Curry leaves -  a few 

Method: 

1. Clean and wash the lamb rib & neck pieces with the bones and keep aside. 

2. Peel and thinly slice the onions. Wash the channa dal. Pluck the gongkura leaves only (no stems), wash, drain, chop them and set aside. 

3. Add 2 tbs of oil to the instant pot in the sauté mode on high followed by half of the sliced onions and fry them till soft and translucent. 

4. Add 1 heaped tbs ginger garlic paste, 1 tsp turmeric powder, 1/2 tsp kashmiri chilli powder and 1 tsp coriander powder, give it a stir then add the lamb pieces and roast them well in the onion masala. Add 3 whole green chillies, 1 tbs channa dal and 1/2 cup water then close the lid. Cancel the sauté mode and pressure cook on high for 15 minutes till tender. The valve should be turned to sealing position after closing the lid. When done let the steam vent out on its own. 

5. When all the steam is released on its own, switch off the instant pot, open the lid and empty the contents of the instant pot in a dish. Lightly rinse the pot inside with a little water which you can add to the lamb curry. Set aside.

6. Switch the instant pot on high in the sauté mode again.  Heat one tbs of oil and ghee, sprinkle the mustard seeds and let them crackle, add the deseeded dried red chilli, cumin seeds, then crushed garlic cloves with their peel and curry leaves followed immediately by the chopped gongkura leaves. Fry them well then add 1/2 cup water and simmer for 5 minutes.

7. Blend the gongkura with the other ingredients using an electric hand blender. Now throw in the remaining 3 whole green chillies and simmer on low sauté mode for 5 minutes. If we added them before the curry would be really spicy when blended.


8. Finally add the cooked lamb curry to the instant pot with the gongkura curry, sprinkle some garam masala powder, chopped cilantro, a little water and simmer on low for 5 minutes. The gongkura lamb curry is now ready to enjoy with steamed jasmine rice and ghee. So yummy and delicious!