Tampilkan postingan dengan label Chocolate. Tampilkan semua postingan

Nipples of Venus (Capezzoli di Venere) - Keeping Abreast of the Latest in Valentine’s Day Confections

I don’t remember much about the movie, Amadeus, which isn’t surprising, since I don’t remember that much about the early eighties in general, but I do recall the famous “Nipples of Venus” scene. At the time, I wondered if that was actually a real thing, or just something made up for the movie, but since there was no Internet yet, I never found out.

Fast forward thirty-plus years later, and inspired by a viewer’s request, I finally learned that these were in fact real, and very delicious, thanks in part to star of the show, chestnuts. While not a common ingredient, chestnuts aren’t that hard to find, and worth the effort, since they work really well in this.

If you must, another nut like almond, or hazelnut, should work about the same, especially when you consider your guest, or guests, will be fairly distracted by the eye-opening appearance. Speaking of Netflix and chill, you could show Amadeus after dinner, with these served as a sexy snack during the viewing. From there, you’re on your own. Regardless of whether you serve these on Valentine’s Day or not, I still really hope you give them a try soon. Enjoy!


Ingredients for about 24 Nipples of Venus:
5 tablespoons unsalted butter, room temp
1/3 cup white sugar
6 ounces dark chocolate
14 ounces whole chestnuts
pinch of salt
pinch of cayenne
1 teaspoon vanilla extract
1/4 cup brandy
*8 ounces white chocolate, chopped, divided
1/3 cup powdered sugar
enough milk to make a very thick paste
1 or 2 drops red food coloring

*This is more white chocolate than you need for coating, but that's how this stuff works. Just eat the rest. 

Chocolate Croissants – But Just Barely

I’ll admit to being pretty underwhelmed the first time I had a chocolate croissant, or “pain au chocolat,”as I’d mispronounce it; but eventually I realized the relatively sparse amount of chocolate wasn’t any kind of stinginess, but rather the true secret behind this amazing pastry.

Properly done, this should ride that line between sweet pastry and a savory bread, so don’t overdo it with the chocolate chunks; otherwise you’ll lose that beautiful balance. Other than that, not much can go wrong. Just be sure to bake them until nicely browned, and let them cool before enjoying.

While this will work with that dough in the tube, I’d like to think you’d make a batch of your own dough using our recently posted croissant recipe. Don’t worry, it only seems like a lot of work. Either way, I really do hope you give these chocolate croissants a try soon. Enjoy!


Ingredients for 12 Chocolate Croissants:
1 batch of croissant dough from this recipe (split in half for two batches of 6)
about 1 cup roughly chopped chocolate chunks, or chips
1 large egg, plus 1 tablespoon of water for the egg wash
coarsely ground sea salt
- Bake at 400 F. for about 20-25 minutes, or until well-browned

Chocolate Bark – Temper, Temper

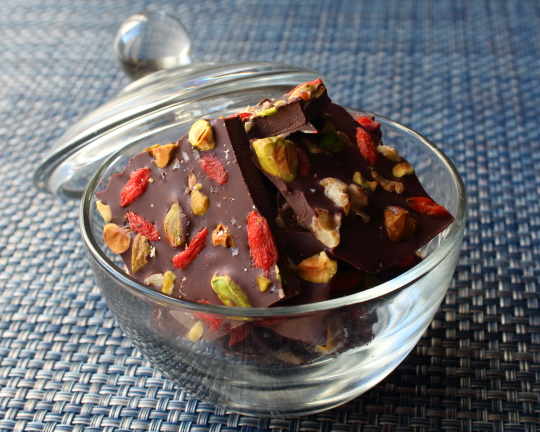
In addition to sharing an easy, and beautiful edible holiday gift idea, I wanted to make this chocolate bark so I could test a simplified technique for tempering chocolate without a thermometer. It sounded too good to be true, but worked fairly well, which is the problem. Is fairly good, okay? 

Properly tempered chocolate will snap when broken, and retain that gorgeous glossy sheen. Poorly tempered chocolate is sort of dull grey, and the texture is soft, and waxy. This was somewhere in the middle.

Using this method, you will get close to properly tempered chocolate, and you might get lucky, and actually end up with perfectly tempered chocolate, but in hindsight, since using a thermometer isn’t really hard, and the extra steps required not that strenuous, I’ll probably just do it the right way next time.

In fact, I may do a future chocolate truffle video as an excuse to show you the “professional” method, but in the meantime, check out this great article I found on Allrecipes, as well as this video from Monarch Media that does a good job of explaining the steps. There are also hundreds of other videos online that take you through the procedure. Regardless of which method you go with, quick and imprecise, or deliberate and exact, I stand by my assertion that this would make a great holiday gift. I hope you give it a try soon. Enjoy!


Ingredients for about 36 pieces of Chocolate Bark
1 1/2 pounds dark chocolate (70% cacao)
1 cup toasted walnuts, chopped
1 cup shelled, roasted, salted pistachios
1/2 cup dried gogi berries
about 1/2 teaspoon coarse sea salt

Chocolate Soufflé – Perfect for Your Valentine (Unless I’m Your Valentine)

With everybody’s favorite made-up holiday right around the corner, I thought I would finally post a chocolate soufflé. I’m not sure what took so long, other than the fact that soufflés have never been my favorite delivery system for chocolate.

Sure, they’re visually impressive, which is key for a special occasion dessert, but the chocolate does get a bit diluted by all those air bubbles. Also, I’ve always been much more of a cold, or room-temp chocolate dessert guy, and never gone nuts for things like lava cakes, and baked puddings.

Having said that, I’m sure I’m in the minority, and you and your special someone will enjoy these just fine. I developed this recipe for two, since that makes a lot of sense, but it should scale up without issue. If you want to add some type of liquor to this, you can add it to the milk and flour mixture after you turn off the heat.

Rum works beautiful, as does coffee, orange, or raspberry liqueur.  Above and beyond that, if you really want to impress your date, you could also whip up a sauce to serve along side. I’m thinking either a berry puree, or maybe a coffee crème anglaise would pair perfectly. Either way, sauced or not, I really hope you give this a try soon, and it gets you lots of compliments. Enjoy!


Chocolate soufflé for two 5-oz ramekins):
melted butter and sugar to prep ramekins
1 tablespoon butter  
1 tablespoon flour
1/4 cup plus 1 teaspoon cold milk
pinch salt
pinch cayenne
2 ounces dark chocolate (I like something around 70%)
1 large egg yolk
2 large egg whites
pinch cream of tartar (you can use a few drops of lemon juice or vinegar instead)
1 tablespoon white sugar, added in 3 additions

Chocolate Soufflé – Perfect for Your Valentine (Unless I’m Your Valentine)

With everybody’s favorite made-up holiday right around the corner, I thought I would finally post a chocolate soufflé. I’m not sure what took so long, other than the fact that soufflés have never been my favorite delivery system for chocolate.

Sure, they’re visually impressive, which is key for a special occasion dessert, but the chocolate does get a bit diluted by all those air bubbles. Also, I’ve always been much more of a cold, or room-temp chocolate dessert guy, and never gone nuts for things like lava cakes, and baked puddings.

Having said that, I’m sure I’m in the minority, and you and your special someone will enjoy these just fine. I developed this recipe for two, since that makes a lot of sense, but it should scale up without issue. If you want to add some type of liquor to this, you can add it to the milk and flour mixture after you turn off the heat.

Rum works beautiful, as does coffee, orange, or raspberry liqueur.  Above and beyond that, if you really want to impress your date, you could also whip up a sauce to serve along side. I’m thinking either a berry puree, or maybe a coffee crème anglaise would pair perfectly. Either way, sauced or not, I really hope you give this a try soon, and it gets you lots of compliments. Enjoy!


Chocolate soufflé for two 5-oz ramekins):
melted butter and sugar to prep ramekins
1 tablespoon butter  
1 tablespoon flour
1/4 cup plus 1 teaspoon cold milk
pinch salt
pinch cayenne
2 ounces dark chocolate (I like something around 70%)
1 large egg yolk
2 large egg whites
pinch cream of tartar (you can use a few drops of lemon juice or vinegar instead)
1 tablespoon white sugar, added in 3 additions

My Dream Vanilla Bean Pastry Cream

And by dream, I mean nightmare. I don’t test recipes. There is nothing in my contract that requires me to only post successful videos, and as you longtime viewers know, I do enjoy sharing the occasional flop, but this new and improved, vanilla bean pastry cream was not a one-take affair.

I’ve wanted to update our old crème patisserie recipe for a while, and long story short, I became obsessed, and ended up suffering through seven non-perfect versions before I was finally satisfied. The key to a great pastry cream is using the minimum of starch. You need enough so the cream holds a shape, but not so much it interferes with the flavor.

I found flour-based pastry creams easy to work with, but they have more of a pasty mouthfeel that gets in the way of the vanilla. That’s why this version is all corn starch, which we need less of to do the same job. Just be careful not to keep cooking it once it has thickened, otherwise you may compromise its thickening powers.

With the holidays, and their associated fancy desserts, right around the corner, what better time to work on your pastry cream game? So whether it’s for Napoleons, pies, tarts, or cakes, I really hope you give this a try soon. Enjoy!


Makes about 3 cups:
1 large whole egg
2 large egg yolks
1 teaspoon kosher salt (1/2 teaspoon fine table salt)
1/2 cup granulated white sugar
1/4 cup corn starch
2 cups whole milk
1 vanilla bean, seeded, plus pure vanilla extract if needed
Tip: Save the scraped pods, and stick them in your sugar container for lovely, vanilla-scented sugar!
4 tablespoons cold butter, cubed

Tiramisu – It Will Pick You Up and Not Let You Down

In addition to being an incredible tasting dessert, Tiramisu also offers the perfect segue when you’re trying to steer the Valentine’s dinner conversation towards spicier subjects. Please feel free to embellish the following history to further enhance the version your sweetheart hears.

Tiramisu was invented in an Italian brothel, where it was a popular snack with customers looking for a little restorative treat after certain strenuous activities. Tiramisu actually means “pick-me-up,” which of course makes it the best culinary double entendre in history.

Besides the great story, it really is the perfect romantic occasion dessert. This heady, mood-elevating concoction is a rich and deeply satisfying, yet remarkably light in texture. I know someone will ask, so yes you can use regular cream cheese, but mascarpone is far superior, and it is Valentine’s Day after all.

As far as the booze goes, I used Marsala, but it also works beautifully with amoretti, rum, brandy, or even Bailey’s. The other key liquid in this is the espresso, and I highly recommend that’s what you use. Regular coffee doesn’t have the same punch. You can use instant, but the last time I checked there was literally a café on every corner of every city.

I did these as two, rather large individual portions, but this could be easily stretched into four cups, or layered in a square baking dish, as is more traditional. Don’t over-think it; no matter what you use, it’s basically three layers of mascarpone mixture around two layers of coffee-dipped ladyfingers. 

They say you can tell how good your Valentine's dessert was, by whether or not you end up also having to cook breakfast. Which reminds me, if you make this, be sure to not use up the last of the eggs. I really hope you give this tiramisu a try soon. Enjoy!


Ingredients for 2 large or 4 small portions:
1/2 cup espresso with 2 tbsp Marsala wine for dipping cookies
10 or 12 ladyfinger cookies, broken in half if making cups
2 large egg yolks
2 tablespoons plus one teaspoon white sugar
1/2 tsp vanilla
pinch of salt
3/4 cup mascarpone cheese (6 oz)
2 large egg whites
cocoa for dusting
dark chocolate for shaving

Edible Holiday Gift Special: Vegan Miracle Fudge!

I’m calling this “miracle fudge” for several reasons. First of all, the odds of me seeing a vegan fudge link on Twitter, and actually clicking on it, are roughly zero. That alone makes this video miraculous, but that cocoa, maple syrup, and coconut oil can combine to create something so pleasurable and fudge-like, also makes it worthy of the title.

Michele actually discovered the link on Twitter, and called my attention to it since she recognized the Tweeter as my friend, Stephanie Stiavetti aka @sstiavetti. Nothing against Ms. Stiavetti, but this still usually wouldn’t have been enough to tempt me, except that I heard mention of coconut oil.

This was significant because another friend, Ariyele Ressler, posted something called a "The Triple Luxe" on her YouTube channel(pictured here), which featured this fascinating fat. I was captivated by her delicious looking creation, and the coconut oil's butter-like properties, and told myself that I needed pick some up for experimentation.

Anyway, as a result of this perfect storm of social media synchronicity, I decided to check out her recipe, and it rocked. I did a bunch of tests, and even though you’re forfeiting some health benefits, I found the refined coconut oil worked better than the raw, extra-virgin style, if you want something closer to real chocolate fudge. The other key is to keep these in the freezer. They work at room temp, but the texture is much better cold.

The extra-virgin oil has a very pronounced coconut flavor, and seemed to not provide quite as firm a bite. Of course, I expect you to experiment and report back. As advertised, I think this would make a fun, and unique edible gift for the foodies on your holiday gift list. I hope you give this fudge recipe a try soon. Enjoy!

Bonus Holiday Gift Idea: 

Not only does Stephanie have great taste in vegan fudge recipes, she also writes cookbooks! I just received a copy of Melt: The Art of Macaroni and Cheese, which she co-authored with Garrett McCord, and it’s very well done. It’s getting rave reviews on Amazon, so if you’re still in shopping mode, go check it out.


Ingredients for about 2 dozen squares of Miracle Fudge:
1/2 cup really good unsweetened cocoa (I used this one)
1/2 cup real maple syrup
1/2 cup melted coconut oil
1/2 cup walnuts, chopped and lightly toasted
few drops of vanilla
pinch of salt

Notes:
- You can make this without the nuts, but make sure your oil is nice and warm, so the mixture is liquid enough to pour.
-  If the mixture gets too firm to work with, just place over a bowl of hot water until it melts.

Chocolate Snowcaps – There’s Snow on Them There Cookies

I don’t think I’ve ever been involved in a holiday cookies swap (apparently you need to have like-minded friends), but if I were, I’d bring these chocolate snowcap cookies. They just look so wintry, with their powdery-white tops, contrasted against those deep, dark cracks.

They’re so captivating, that I find myself daydreaming about tiny Christmas elves skiing down them when no one is looking. I really should see someone about that. Anyway, the point is, if you’re looking for a holiday cookie so seasonally appropriate it hurts, this is the one for you.

As I stated in the video, the only way to mess these up is to not use enough powdered sugar. The first batch I made looked like they had plenty, but that little bit I shook off before placing them on the pan made all the difference. You want to coat them, roll them, coat them again, and then, coat them again. You can’t put too much on.

Also, the batch I made after letting the dough sit overnight didn’t spread out as much, which I thought looked better, and much more mini mountain-like. As far as baking time goes, mine took about 12 minutes, but that depends on exactly how large you roll your dough balls.

To be safe, you should probably do five or six practice batches to get this time dialed in [wink]. Once you do, you’ll be rewarded with a classic Christmas cookie that tastes as good as it looks. I think I speak for tiny, imaginary elves everywhere, when I say we hope you give these a try soon. Enjoy!


Ingredients for about 2 dozen Chocolate Snowcap Cookies:
Recipe found here on Foodess.com
6 ounces dark chocolate, broken in small pieces, melted over hot water
3/4 cup AP flour
1/3 cup cocoa (I used Guittard’s Cocoa Rouge)
1 1/2 tsp baking powder
1/4 tsp fine salt
1/2 cup room temp butter
1 cup packed brown sugar
2 large eggs
1 cup powdered sugar, or as needed

*Bake at 350 degrees F.  for about 12 minutes, depending on size

Dark Chocolate Macarons – Better Three Years Late Than Never

I did it. I made macarons. Finally, I can apply for my food blogger merit badge! Hold on, I’m being told I still need to make mini-cupcakes and a quinoa salad to qualify. Oh well, I’ve waited this long.

Anyway, this was my first attempt at macarons, and for not having any clue what I was doing, I was quite happy with the results. They looked fine, and the texture was almost identical to the ones sold at Chantal Guillon, a famous macaron bar here in San Francisco.

So, was it beginners luck? Yes. You would think since I waited three years to make these, I would have done more research, but I did almost none. In fact, I literally used the first chocolate macaron recipe I found, which happened to be from David Lebovitz. He’s an American, but he lives in Paris, so I figured I was okay.

I watched a few videos, read a few articles, had a couple drinks, looked at a few step-by-steps, and off I went.  One thing I did notice was every single resource used a different recipe, as well as different times, temperatures, and techniques. So, I figured I would just use my instincts and try the most straightforward method possible.

I didn’t do any high-heat/low-heat tricks; no waiting for the tops to dry; no sugar syrups, etc. I just made the batter, piped it out, baked them off, and as you can see, they were not bad at all. One thing I did figure out all by myself was to use the ugly ones as the bottoms. By the way, there’s a very inappropriate metaphor there, if you’re looking.

So, here’s the deal; if you’ve never made these before, I hope this inspires you to give them a go. Believe me, if I can do these anyone can. However, if you’re an experienced macaron maker, we’d love to have you chime in. I can’t wait for this comment section to fill up with invaluable tips and tricks for what I should have done, and how I should have done it.

I know I piped them wrong. You’re not supposed to make a swirl, but keep the tip pressed in the center as you squeeze. I also heard that I should have cooked one pan at a time, because the bottom pan is more likely to crack. What else? Don’t worry about my feelings…after four years of posting videos on YouTube, I don’t have any left…so let me have it. And, as always, enjoy!


Basic Chocolate Macaron Batter (I found this recipe on davidlebovitz.com):
Makes about 18 finished cookies
*Weighing the ingredients is critical. Do not make these unless you have a digital kitchen scale!
100 gram powdered sugar
50 grams almond meal aka almond flour (the finer the better)
25 grams unsweetened cocoa powder
2 large room temperature egg whites
65 grams granulated sugar

For chocolate ganache:
1/3 cup hot heavy cream
4 ounces dark chocolate, chopped
pinch of salt
*pour hot cream over chocolate, and stir until smooth. Allow to cool slightly before filling cooled cookies.

Bonus Coverage: For more chocolate macaron information, my friend Denise from ChezUs makes some amazing ones, and knows WAY more about these than I do, so you can bug her with your questions too! ;-)

Easy Homemade Chocolate Sauce – I Really Wanted To Call This Hot Fudge

I would have gotten more search engine juice had I named this, “Hot Fudge Sauce,” but it wouldn’t have been technically correct, and you know what a stickler I am for using precise terminology (if you’re new to the blog, that was an attempt at self-effacing humor). 

So, while it’s true I generally play fast and loose with recipe titles, when they really do mean different things, I try to come correct.

What makes this a chocolate sauce, and not hot fudge, is the fact that it doesn’t firm up when it hits the ice cream. True hot fudge sauce is actually melted, liquefied fudge, and by the time it finishes its slow slalom down the side of your sundae, it will resemble its namesake.

Hot fudge requires the sauce to be cooked to a specific temperature, for a certain time, and is generally a trickier operation than the simple sauce you see here. Like I said in the video, I’m sure we will eventually do a hot fudge video, but in the meantime, this ultra easy chocolate sauce should work fine.

Unlike hot fudge, chocolate sauce (aka chocolate syrup) will stay in liquid form even after it hits the cold, creamy stuff. Of course it gets a bit thicker as it cools, but it will not harden into actual fudge. If you are looking for comparisons, this may remind you of a thicker version of a certain canned chocolate syrup from Pennsylvania.

Anyway, if you are a regular buyer of store-bought chocolate sauce, and didn’t realize how easy it is to make your own at home, then I hope you give this recipe a try. Enjoy!


Makes about 1 1/2 cups of Chocolate Sauce
3/4 cup sugar
1 1/2 tablespoons flour
1/2 cup high-quality, unsweetened cocoa powder
1 1/4 cups milk
2 tablespoons butter
1/2 teaspoon vanilla, or to taste
tiny pinch of salt

View the complete recipe

Chocolate Soufflés with Nougat Whip (Warning: Intended for Mature Audiences)

Chocolate Soufflés with Nougat Whip Photo (c) SmithBites.com
My friend, Linda from Salty Seattle, called this Chocolate Soufflés with Nougat Whip video, “porn without people,” and I couldn’t agree more. The term “food porn” gets thrown around way too easily these days. Sorry, that picture of your red velvet cupcakes was nice, but it wasn’t really pornographic. This, however, could make you blush. By the way, the surface temperature of a blushing face is the exact temperature at which chocolate melts. Coincidence?

This semi-sweet tour-de-force is from Debra and Rod “The Professor” Smith, from SmithBites.com. I’m relatively new to their work, but quite impressed to say the least. I’m very proud Food Wishes helped pioneer the chef-less recipe video, but this is taking that idea to a whole other place – surreal and viscerally sensual, yet still comforting and familiar. Please follow this link to check out the original post, and see more of their fine work. Enjoy!

Tiramisu Chocolate Mousse – Pick’em Up and Lay’em Down

Most foodies know that Tiramisu is a decadent dessert featuring coffee soaked ladyfingers layered with a zabaione and mascarpone, but what many people don’t know is that the recipe’s name is one of the best culinary double entendres ever.

“Tiramisu” translates to "pick me up." Considering that this popular Italian dessert is spiked with proven mood-elevators such as coffee, cocoa, sugar, and alcohol, the name seems to fit perfectly. But wait, there’s more.

As legend has it, tiramisu was a popular snack with the “working girls” of northern Italy, where the dessert originated. So, not only does "pick me up" refer metaphorically to the obvious restorative effects of the dessert, but also more literally to the solicitation of another customer.

Which brings us to this upcoming Valentine’s Day. Not only would this make for a very happy ending for your V-Day meal, but think about the stimulating conversation that could follow when you recount this racy tale.

Anyway, even if you don’t end up talking about Italian prostitutes over dessert, if you’re a fan of chocolate mousse, and you enjoy a good "pick me up," you can’t go wrong with this deliciously decadent, yet still fairly light dessert. Enjoy!


Ingredients for 4 portions:
3.5 oz dark chocolate, broken into small pieces
2 tbsp espresso coffee, or strong regular coffee
1 tbsp unsalted butter
2 tbsp Marsala wine (may sub with rum, or omit)
2 egg yolks
4 tsp sugar
2 tbsp mascarpone cheese
3/4 cup heavy cream, whipped

A Banana Bread That’s Okay to Make Early

Banana bread is one of those things people rarely make on purpose. Even though you know you’re not going to eat seven bananas in a week, you buy the big bunch anyway, because, “it’s kind of green.” Now, those last three bananas are almost black and you’re feeling like a bad person.

Then you remember banana bread, and long story short, you realize you’re not a bad person…in fact, you kind of rock. While that’s the most common scenario, this scrumptious banana walnut loaf, spiked with dark chocolate chips, is so good you’ll want to make it well before the bananas get to that condition. Yes, it does come out better with extra ripe bananas, but if you can’t wait (like I couldn’t), you’re still in for a treat.

The chocolate chips are sparse here, but make a big difference in the overall flavor. This is a case where more wouldn’t necessarily make it better. This should be more of a snack, not a super-sweet dessert. When Michele makes this, she actually grates unsweetened baking chocolate instead, and it’s amazingly like that also. And, don’t even get me started on how good this is toasted.

The recipe is adapted from one by Mary Sue Milliken and Susan Feniger, from their cookbook, City Cuisine. It’s one of the oldest cookbooks we have, and has tons of great recipes, so check the link if you’re interested. Enjoy!


Banana Bread Ingredients:
3 ripe bananas
2 cups all-purpose flour
1 tsp salt
1 tsp baking powder
1 tsp baking soda
1/2 cup soft butter
1 cup sugar
2 large eggs
1/4 tsp vanilla
1 tbsp milk
1 cup chopped walnuts
1/3 cup dark chocolate chips
*Bake in a 9x4 loaf pan at 325 degrees F. for about 1 hour 10 minutes.

Easy as Chocolate Pecan Pie

Despite the colloquial idiom, pies are not that easy, and in my opinion, it’s not the dough that separates the good from the great, it’s the fillings. With fresh fruit pies, you have to worry about too much or too little liquid. Custard-based fillings are texturally tricky; and don’t even get me started on lemon meringue.

However, there’s one category of pie whose fillings are so easy, they’re nearly impossible to mess up. That would be the seasonally appropriate nut pie. If you can work a whisk, and set a timer, you have what it takes to excel in this genre.

We added a handful of chocolate chips, but the recipe is based on this one from Allrecipes.com, which I came across looking for corn syrup free versions. By the way, it’s not that I think corn syrup is a “bad” ingredient, I just know that most people don’t have it on hand, and I’d hate for them to buy a whole bottle when a perfectly wonderful pie can be made without it.

In fact, the filling is so deliciously decadent the crust is almost an afterthought. If you ever want to rationalize buying a frozen pie shell, this is your chance. Of course, if you want real “homemade,” you can check out this video recipe for making pie dough, but the point is, either way your chocolate pecan pie is going to rock. Enjoy!


Ingredients:
1 9-inch pie shell
2 eggs
1 cup light brown sugar
1/4 cup white sugar
1/2 cup butter
1 tablespoon all-purpose flour (I didn't add in this recipe, but suggest you do. Add with the sugars.)
1 tablespoon milk
1 teaspoon vanilla extract
1/3 cup chocolate chips
1 1/2 cup chopped pecans

Easy as Chocolate Pecan Pie

Despite the colloquial idiom, pies are not that easy, and in my opinion, it’s not the dough that separates the good from the great, it’s the fillings. With fresh fruit pies, you have to worry about too much or too little liquid. Custard-based fillings are texturally tricky; and don’t even get me started on lemon meringue.

However, there’s one category of pie whose fillings are so easy, they’re nearly impossible to mess up. That would be the seasonally appropriate nut pie. If you can work a whisk, and set a timer, you have what it takes to excel in this genre.

We added a handful of chocolate chips, but the recipe is based on this one from Allrecipes.com, which I came across looking for corn syrup free versions. By the way, it’s not that I think corn syrup is a “bad” ingredient, I just know that most people don’t have it on hand, and I’d hate for them to buy a whole bottle when a perfectly wonderful pie can be made without it.

In fact, the filling is so deliciously decadent the crust is almost an afterthought. If you ever want to rationalize buying a frozen pie shell, this is your chance. Of course, if you want real “homemade,” you can check out this video recipe for making pie dough, but the point is, either way your chocolate pecan pie is going to rock. Enjoy!


Ingredients:
1 9-inch pie shell
2 eggs
1 cup light brown sugar
1/4 cup white sugar
1/2 cup butter
1 tablespoon all-purpose flour (I didn't add in this recipe, but suggest you do. Add with the sugars.)
1 tablespoon milk
1 teaspoon vanilla extract
1/3 cup chocolate chips
1 1/2 cup chopped pecans

Red Velvet Cupcakes and My Big Moment on Just Desserts

I don’t make a lot of cupcakes, but since I’ve always been fascinated by the red velvet cake, I decided to try a version based on this venerable American classic. 

I’ve gotten so many requests for cupcakes and red velvet cakes that I figured I’d kill two food wishes with one video. They came out really well, and as I tasted, I actually caught myself daydreaming about being on Top Chef Just Desserts.

I imagined I’d furiously finished frosting these red velvet cupcakes just as time expired (I think the faux-hawked prima donna with the Jacques Torres tattoo next to me hid the cream cheese to screw me over). I bring them up to the judge’s table, and watch as the lovely Gail Simmons takes a big bite. She swallows, smiles, and then says, “Really not that bad for a food blogger.” Okay, so she’s too classy to ever say that, but still, it would be pretty cool.

Anyway, back to reality. I will also post the cream cheese frosting recipe next week, just in case you’re wondering. I joke about the red food coloring in the clip, and it does give the cake such a unique look, but feel free to leave it out if that’s not your thing.

Party season is upon us, and what holiday dessert table wouldn’t benefit from a plate of these classic cupcakes? It would be like Johnny Iuzzini's face without the side burns. In other words, just not as good. I hope you give these a try soon. Enjoy!


Ingredients for 12 Red Velvet Cupcakes:
Dry:
1 1/3 cups all-purpose flour
3 tablespoons cocoa powder
1/4 teaspoon baking soda
1/2 teaspoon fine salt
1 teaspoon baking powder
Wet:
4 tablespoons softened butter
1 cup white sugar
2 large eggs
3/4 cup buttermilk
2 teaspoons white vinegar
1 teaspoon vanilla extract
1 tablespoon red food coloring
Bake at 350 for about 22 minutes