Tampilkan postingan dengan label Rice. Tampilkan semua postingan

Green Biryani


I had this craving for eating something delicious that was bothering me. But when you return home after a long time and don't have the time to do groceries you try to be resourceful with what is left in the freezer and on the grocery shelf in your home. That's exactly what I did for the whole week and exhausted all the resources except for some frozen shrimp, a couple of onions, green chillies and a can of coconut milk. I had no mood to eat the same shrimp dishes once again. This need compelled me to make something different and unique with the ingredients I had. As they say "necessity is the mother of invention, lo and behold, I made this green biryani with shrimp and coconut milk. I call it green biryani because I used green masala with no turmeric, tomatoes or red chilli powder etc.

It was so flavourful, tasty and delicious!! And the best thing of all is I made it in instant pot, it was pretty quick and easy.

Ingredients:
25 Jumbo Tiger Shrimp  
2 Cups Basumathi Rice
1 Cup Coconut Milk
1/2 Cup Olive Oil
2 Onions (medium size)
11/2 TBS Ginger Garlic Paste
1 Black Cardamom
2 inch stick Cinnamon 

For the Green Masala Paste
4-6 Green chillies 
1 Cup Fresh Mint Leaves
1/2 Cup Cilantro
1/2 Tsp Cumin Seeds
1/2 Tsp Black Pepper Corns
4 Cloves
4 green Cardamoms
a pinch of Saffron
Salt as required.


Method: 

1. Wash the rice and soak it in water for at least half an hour

2. Peel, devein, wash and clean the shrimp and keep aside.

3. Slice the onions, grind the ginger garlic paste. Reserve some mint and cilantro for steaming the rice and grind together the rest with 2 green chillies, cumin seeds, black pepper corns, cloves, green cardamom and a little water to a fine paste. First grind the dry spices then add the mint, cilantro and green chillies. This is the green masala.

4. Heat oil in the instant pot, (set it on sauté mode) lightly fry the shrimp quickly, remove and keep aside.

5. In the same oil in the instant pot fry the onions till golden brown. Add the ginger garlic paste, green masala, lightly stir, add 1/2 cup coconut milk, a little water mix well and switch off the instant pot. Soak the saffron threads in 1 tbs hot water and set aside.

6. Meanwhile steam the rice by cooking it in boiling salted water till 70% done. Drain it. Switch on the instant pot to sauté mode low and when the green masala comes to a boil, pour the rice over the masala curry.

7. Throw in the reserved mint and chopped cilantro, saffron water and the remaining 1/2 cup coconut milk. Add 3- 4 drops of green food colouring to 1tbs of the cooked rice. Mix well and sprinkle this coloured rice on the top layer of rice.

8. Close the instant pot lid. Switch it on and set it to pressure cook on low for 5 mins.  Keep the valve in the venting position.

9. After 5 mins open the instant pot lid. Then gently slide a flat spatula from the sides to the bottom and slowly lift the rice and fluff it. Repeat gently and carefully from all sides till rice is mixed well with the sauce taking care not to break the long basumathi grains.

10. Serve hot and enjoy with onion yoghurt or tomato chutney. 

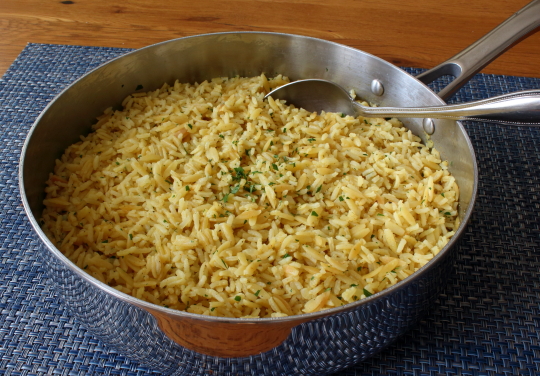
Rice-Ah-Roni – The San Francisco Treat?

While it’s true this great side dish was invented in The City, to call it “the San Francisco treat” is a bit of a stretch. Like I said in the video, the next time I see this served around here, will be the first. I’d say a Mission-style burrito is the real San Francisco treat. Which reminds me, I seriously need to do that video.

Regardless, if you like the stuff from the box, I think you’ll enjoy this, although without all that MSG, it will not be quite as savory. I guess we’re sacrificing a little less flavor for something that’s more healthful, at least according to me. I’ve stopped trying to convince people that eating lots of MSG is not a great idea; but as far as how it impacts one’s diet and carb cravings, I think the research is clear. In fact, forget the research, and just ask yourself why so many people are addicted to fast food.

It’s certainly not the quality, or appearance. Having said that, if you do want to get closer to the original, simply use a cheap, powdered chicken base to make your broth. That stuff is loaded with MSG, among other things, and may be preferable to many of you drive-thru junkies, he said judgmentally. Either way, I really do hope you give this a try soon. Enjoy!


Ingredients
3 tablespoons unsalted butter
1/2 cup finely diced onions
2/3 cup orzo pasta, or spaghetti broken into small pieces
1 1/3 cup white long grain rice
3 cups high-quality chicken broth
Spice blend:
1 1/2 teaspoon kosher salt, plus more if needed
1/8 teaspoon freshly ground black pepper
1/8 teaspoon coriander
1/8 teaspoon mustard powder
1/8 teaspoon celery salt
1/8 teaspoon paprika
1/8 teaspoon turmeric
1/8 teaspoon cayenne
1 tablespoon freshly chopped parsley

Savory Coconut Rice – Sugar-Free and Easy

I love coconut rice, especially as a side for spicy, grilled meats, but when I order it out, it’s usually too sweet for my tastes, and more closely resembles dessert than a side dish. So, I decided to create a more savory version at home, which I eventually did, after a few short decades of testing.

Turns out that cooking rice in water is way easier than it is in the much thicker coconut milk, and that’s just one of the issues. We also have to account for the fat being introduced, which is why I suffered through countless failed attempts, before finally nailing this formula. For me this features a great balance between stickiness and separation.

As far as the taste goes, the only sweetness here comes from the coconut milk, and some toasted coconut on top. If you want it sweeter, which apparently lots of chefs do, you can add a spoon of sugar, but that’s not what I’m into. I’m going to be serving mine with rich, fatty, often sweet-glazed meats, so I want a fairly simple, savory rice, that’s just subtly scented with coconut.

Having said that, there are lots of things you can add, like herbs, fresh vegetables, and/or sliced spring onions, so personal adaptation is very much encouraged. So, whether you wait for the grilled hoisin beef teased herein, or you already have something in mind, I really hope you give this coconut rice a try soon. Enjoy!


Ingredients for 4 servings:
1 1/2 cups jasmine or long-grain rice
1 rounded teaspoon finely grated ginger
1⁄2 teaspoon red chili flakes
1⁄4 teaspoon turmeric
1 teaspoon kosher salt
1 cup water
1 (14-ounce) can coconut milk (not coconut cream)
1 bay leaf
1/4 cup toasted coconut to garnish
- Bring to a simmer, cover, cook on low for 18 minutes. Turn off heat, leave covered 5 more minutes, then fluff and serve.

Rice Kheer (Porridge)


Ingredients:

1 1/2 Litres Whole Milk
1/4 Cup Basumathi Rice
3/4 - 1 Cup White Sugar
15 Almonds for garnish
4 - 5 Drops Rose Essence
1 Tsp Ghee (Clarified Butter)
2 Green Cardamoms


Method: 

1. Boil milk and leave on simmer to thicken for 10 minutes till it reduces a bit.  Wash the basumathi rice 3 or 4 times till the water runs out clear and leave it to soak in water for 15 minutes.

2. In another pot on medium heat add ghee. Crack the cardamoms a bit to release the flavour then add to the pot followed by the soaked basumathi rice.

3. Sauté the basumathi rice in the ghee till it dries up a bit, then add 3 - 4 cups of water and let it cook till it becomes mushy on low medium heat. Keep an eye on it so it does not burn after all the water gets absorbed.

4. Add sugar and the reduced whole milk, cook for some more time on simmer while stirring continuously. When it is of porridge consistency remove and leave it to cool.

5. Meanwhile microwave almonds soaked in water for 40 seconds on high. When cool peel, cut into thin slivers and set aside for garnish.

6. Add 4 to 5 drops of rose essence to the kheer, mix well, transfer to a serving bowl, garnish with almonds, chill in the fridge and serve. Chilled Kheer tastes better. Enjoy as it is for dessert or with Halwa pies.


Classic Rice Pudding – Word on the Street Is

It’s not every day you find yourself walking next to someone on the street, who’s eating from a ridiculously large tub of rice pudding. Well, that’s exactly what happened to me the other day, and it served as a reminder for what a great, and comforting dessert rice pudding really is. 

For whatever reason, it’s usually not near the top when people list their favorite desserts, but despite that, it’s a proven crowd-pleaser, and quite easy to make, especially using this simplified, one-pot method.

Most recipes have you make the pudding in a clean pot, since, I’m assuming, they’re afraid the starch at the bottom of the pan used to cook the rice will burn. And, it probably would, unless you deglaze the bottom with cold milk before turning the heat back on. Not only will this simple step prevent the pudding from scorching, but also I think we get a little bit of extra toasted rice flavor. I also prefer an egg yolk to a whole egg, but regardless, be sure to whisk it in fast and furious, or they might scramble.

If you’re scared, you can temper the egg by mixing in a few spoons of the hot rice mixture, before blending in, but as I’ve said before, there’s nothing wrong with a little adrenalin-inducing danger in the kitchen. So, no matter what you garnish it with, or whether you eat it inside, or crossing Dolores Street, I really hope you give this a try soon.  Enjoy!  
   

Makes 4 Portions Rice Puddings:
1/2 cup uncooked white long-grain rice
1/4 teaspoon kosher salt
1 cup water
1/4 cup white sugar
1 1/3 cups milk
1/8 teaspoon cinnamon
1/2 teaspoon vanilla extract
1 large egg yolk
1 tablespoon cold butter
2 tablespoons dried cherries, chopped

Saffron Rice


Ingredients: 

1 Cup Basumathi Rice
A pinch of Saffron
Salt to taste
4 tbs milk


Method: 

1. Wash the rice 3 or 4 times or till the water is no longer murky. Then soak the rice for half an hour.

2. Boil at least 2 litres of water in a pot. When the water is boiling put the rice in it. Add 1 tsp of salt or a little more. The water should taste like sea water not too salty. Give it a stir and let it cook.

3. Check the grains to see if they are done. Take one grain of rice and press it between your thumb and index finger. It should be just a little gritty inside but soft outside. So it is time to stop cooking.

4. Drain the rice immediately in a colander.

5. Soak the saffron in 1 tbs hot milk in a mortar and pestle and crush the saffron threads till they soften and dissolve. Add the remaining milk and pour it in the rice pot. Throw in some mint leaves and close the lid, leave it to simmer for 2-3 minutes. Then switch off the stove.

6. Serve hot with any curry of your choice. You could serve the Saffron Rice  with the following Curries:

Green Masala Chicken Khorma
White Chicken Khorma
Butter Chicken 
White Methi Chicken


There's one more way of making saffron rice. Dissolve the saffron in hot water instead of milk. To this add a blob of unsalted butter. Let it rest for sometime till the saffron softens and leaves out color. Take a bowl of rice and add the saffron solution to it. Mix well. The rice gets saffron colored. You could sprinkle this rice on top of the white rice as garnish with some toasted nuts or mix this with the white rice and serve.

Spanish Farro – An Ancient Recipe for an Ancient Grain

Spanish rice was one of the first recipes I made for my parents after returning home from my first semester at culinary school. Ironically, I didn’t learn the recipe in class, but rather at a Mexican restaurant I worked at part-time.

I don’t remember much from that job, or decade, but I’ll never forget how that rice was put together, and that’s exactly how we’re doing it here – except for one minor detail. We’re not using rice.  

I really love farro, and have used it in various rice preparations, always with great results. This was no exception, and maybe my favorite so far. This larger, meatier, “ancient” grain pairs perfect with the spices, and I find it even easier to cook perfectly than rice.

If you don’t have a pan like the one used in the video, simply prepare everything in a skillet. Once your broth starts to boil, transfer it into a 2-quart casserole dish, wrap with foil, and proceed as directed. Either way, I really hope you give this a try soon. Enjoy!  


Ingredients for 6 portions:
2 tablespoons butter
1/2 cup finely diced onions
1 1/2 teaspoons kosher salt, or to taste
2 teaspoons cumin
2 teaspoons ancho chili powder, or other dried, ground chili
1 teaspoon chipotle
1/4 teaspoon dried oregano
3 tablespoons tomato paste
1 cup “pearled” farro, rinsed, drained well
2 cups chicken broth

- Bake at 350 F for 50-60 minutes, or until farro is just tender

Layered Idly Sandwich


When ever we eat Idli we dip a piece of it in a chutney and then try another bite with a different one - it is always one chutney at a time. And if you dip the same piece in all the chutneys it becomes messy. So I thought why not build an idli layer by layer like a cake and fill each layer with a different chutney, like icing. I had been toying with this idea so much to the extent of checking with manufacturers if they could make a square idli mould for me. That seemed like a lengthy process for which I had no time. But I had to satisfy my craving to taste the idli and my favourite chutneys together - all in one bite. There was a shortcut which was tempting enough. I used the round steel plates from my Dhokla maker (I could have used a cake pan too) to steam my idli rounds and voila made my idli sandwich with different chutney layers. I had chutney powder (mologai podi), coconut and mint chutney which I used for each layer. It tasted just yummy as I had expected. Plus it looked so beautiful!


Here's the recipe:

Ingredients: 
Idli batter
Mint chutney 
Coconut Chutney
Chutney Powder (Mologai Podi)
Clarified butter 
Round cake dish or Dhokla Maker plates
Parchment Paper


Method: 
1. Grease the cake pan/plate and line it with parchment paper cut in a circle, the same size as the base.  Pour in the Idli batter to your desired thickness. I keep it 1/2 " thick.

2. Place the cake pan in a steamer and steam for exactly 10 minutes. Remove and keep aside to cool.

3. When cooled, pass a knife around the sides of the pan/plate then overturn the plate carefully after topping it with another plate to unmould the idli cake. 

4. Cut the idli round into 4 quarters. Take one quarter and spread coconut chutney on it, then top it with another and spread with mint chutney, then alternate again with coconut chutney.  I had made only 2 chutneys this time so I had to repeat the layer. But you could use another different chutney instead. Then for the topmost layer I sprinkled with MTR's chutney powder and a few droplets of melted ghee (clarified butter) and brushed it evenly to coat. You could use as many layers as you want with different chutneys of your choice.  Enjoy!


Notes:

1. You can get ready made refrigerated idli batter from indian stores. The other option is to make your own. I will be soon posting a recipe for making traditional recipes.

2. The chutney powder is available in indian stores as well, but MTR is a good brand.


How to Make Sushi Rice That Even Works for Sushi

I don’t make sushi at home very often, or ever, since we’re surrounded by top-notch sushi chefs here in San Francisco, but that doesn’t mean I don’t make sushi rice. I think sushi rice makes a perfect side dish for just about any grilled meat, and since it’s perfectly fine at room temperature, it’s great for picnics.

You can even turn it into some quick tortilla-less tacos using nori seaweed wraps, as seen in the video. They make for such a unique summer meal – the perfect delivery system for any and all leftovers. I even seen it rolled into balls, and tossed in toasted sesame seeds, or seaweed, and served like truffles.

What I’m trying to say is, you can do a lot with this stuff. Including sushi. There are thousands of videos on YouTube showing how to make literally every type of sushi in existence, so check those out if you’re so inclined. Maybe one of these days I’ll even give it a go, if only for the “constructive criticism.”  I really hope you give this sushi rice technique a try soon.  Enjoy!


2 cups sushi rice, rinsed well, and left to dry for one hour
2 1/4 cups water
1/4 to 1/3 cup seasoned *rice vinegar, or to taste

* I buy mine already seasoned, but to make your own seasoned rice vinegar; combine:
1 cup rice vinegar, or cider vinegar
1/2 cup white sugar
4 teaspoons kosher salt

Black Rice Porridge


I had this porridge for my breakfast this morning instead of oats. I made it with the left over cooked black rice that I had in the fridge. It tasted nutty and delicious and I enjoyed eating it and wished there was more.... 

The health benefits of Black rice are amazing. It is a naturally gluten free grain, a super food that can keep you healthy. You will be surprised to know that it is packed with 18 amino acids and loaded with vitamins (a good source of vitamin B and E), minerals, is rich in iron and full of antioxidants. A spoonful of black rice has more antioxidants than a spoonful of blue berries. It is called a super food because of its high nutritive content and is known to prevent major diseases like cancer, Alzeimer's, diabetes, and lowers the risk of heart attack, also helps reduce levels of bad cholesterol (LDL). Studies show that Black rice contains a large amount of anthocyanin, an ingredient capable of controlling cholestrol levels than any other supplement available today. Read more about black rice on http://www.blackrice.com. 

I had also posted a black rice recipe earlier and it was a black rice salad. You can view the recipe here: http://www.superfoodnotes.blogspot.ca/2011/09/black-rice-salad.html

For best results in cooking Black rice, it has to be soaked overnight. Otherwise it takes longer to cook. It is better to cook it in the water it has been soaking in as its nutrients would be lost. 


Ingredients: 

1 Cup Black rice 
1.5 litres (6 cups) of Water 
1 Small Sliced Onion 
1Tsp Butter / Olive oil
1/4 Tsp Ginger garlic paste 
1/2 Tbs Salt
1 Tsp Chopped Cilantro 


Method: 

1. Wash the rice 2 or 3 times and soak it in water overnight. There should be at least 2 inches of water above the rice.

2. Bring to boil 1.5 litres of water in a pot. Add the black rice and 1/2 tbs of salt. 

3. Turn down the heat and let it simmer for 30 minutes. Stir one or two times just to prevent the rice from sticking to the bottom of the pot. 

4. Check to see if the rice is soft  and cooked, but not mushy.  If not, then add a little more water and simmer for some more time. 

5. To a sauce pan on medium heat add the butter or olive oil and fry the sliced onion till soft and golden. 

6. Add the ginger garlic paste and fry with the onions.

7. To this add the cooked black rice and 1 cup of water. Let it simmer till the water evaporates and starts thickening. When it attains porridge consistency, remove from heat. 

8. Garnish with a little chopped cilantro and serve warm. Good as a breakfast cereal. Very tasty and delicious.  

Chicken Maqlooba


This is Chicken Maqluba - a popular Palestinian Arab dish which I made for dinner. Most people also think of it as the national dish of Palestine. It is made with lamb or chicken with vegetables and rice. It is basically a one pot dish of meat, vegetables and rice all layered and cooked together. Then the pot is flipped over on the serving platter to display the maqluba which is a sight to behold! I followed a recipe from You tube which I just tweaked a bit by using italian rice instead of falak basumati. Italian rice has that firm texture and nutty flavour which I thought would go well with the maqluba. Here's the recipe: 

Ingredients:
Chicken - 1 Whole (1.5kgs)
Potatoes - 3-4 medium size
Egg plant - one large
Onion - 1 big
Butter - 1 tbs
Olive oil - 2 tbs
Vegetable oil for frying 
Italian Rice - 3 cups
ghee (clarified butter) 2 tbs

Spices for the chicken:
Cinnamon powder - 1/2 tsp
Cardamom powder - 1/4 tsp
Coriander powder - 1 tsp
Cumin powder - 1 tsp
Turmeric powder - 1 tsp
All spice -1 tsp
Seven spice -1 tsp

Spices for the rice: Salt and pepper- 1/2 tsp each; All spice - 1/2 tsp; turmeric - 1 tsp.

Method: 
1. De-skin the chicken, cut into 12 pieces at the joints, clean, wash, drain and keep aside. 

2. Heat a tbs of butter in a big pot and add the diced onion to it. 

3. When the onions sweat a little add the chicken to the pan followed by the spices and mix well. Keep turning over and brown the chicken in the pan. 

3. Add 3 - 4 cups of water and let it cook for sometime till the chicken is done.

4.Slice the egg plants and potatoes separately. Rub a little salt and keep them aside for sometime. The egg plants sweat a little on rubbing salt. Press them gently to drain the water and wipe with paper towels. This way they don't absorb oil when frying.  

5. Deep fry them separately. Drain on paper towels.

6. Boil water in another pot. Add the rice. When the rice is 80% cooked, drain well, then add the spices to the rice, mix well and set aside.

7. Take a small round roaster and grease it with some clarified butter (1tsp) on the inside. Then sprinkle a little of the spiced rice at the bottom.

8. Now spread a layer of the chicken pieces (reserve the broth) on top of the sprinkled rice.

9. Then spread a layer of baked/fried egg plant on top of the chicken. Then a layer of potatoes on top of the egg plant or you can layer both together - one eggplant and one potato slice, all stacked together.

10. Finally add the spiced rice on top. Pour the reserved broth on top of the rice. Cover the roaster with the lid and place it in the pre-heated oven (at 350 degrees fahrenheit) for 15 mins till you see the steam gushing out as soon as you open the lid. Take care not to keep your face close to the roaster when you are uncovering the roaster. It is better to open it little by little. 

11. Keep a round serving platter ready. Remove roaster lid and close it with the serving platter.

12. Put your oven gloves on (thick insulated ones) and holding the roaster bottom with one hand and the top of the closed serving platter with the other, overturn the roaster carefully on to the serving platter and slowly rest the serving platter on the counter top. Remember it is very hot so you have to do it very carefully and tactfully balancing it really well. Otherwise ask someone to help you.

13. Let this rest for 2 mins. Take a serving spoon and tap the roaster's overturned  bottom and all the sides slowly to release the maqlooba from sticking to it.

14. Lift the roaster up slowly to display the maqluba sitting majestically on the serving platter like a queen. The chicken is crisp and golden which was steaming at the bottom of the pot now crowns the dish on the top.The fried egg plant and potato slices like hidden gems add more to the glory. It is a dish beautiful to behold and delicious to eat. There is aroma in the air and many hungry stomachs to feed. Serve hot with yoghurt and salad on the side.  Enjoy.


Salmon Biryani

Yesterday I made Salmon biryani for Ifthaar. I had such a craving for fish biryani as I hadn't made it  in a long time. Unlike me, nobody loves fish in my family. It turned out delicious - just the way I imagined it! I did not touch any of the ifthaar snacks as I could not wait to enjoy it.  The mint and the yoghurt chutneys I made with it added the zing to it.

But one thing about fish biryani is that it has to be eaten fresh. Even a day old fish biryani does not taste the same as the fish smell becomes kind of over powering. So enjoy it fresh as it is delicious.


Ingredients:
Salmon - 6-8 medium size pieces (1 lb)
Onions - 3 medium size
Tomatoes - 2 medium size
Green chillies - 4-6 small
Ginger garlic paste - 1 tblspn
Thick Yoghurt - 1/2 a cup
Mint leaves (Fresh) - a few
Cilantro - 1/2 cup chopped
Cinnamon stick - 1 inch
Cloves - 5
Green cardamom - 5
Red chilly Powder - 2 tspns
Turmeric - 1 1/2 tspns
Cumin - 1/2 tspn
Lemon juice - 1 tblspn
Salt
Saffron - a pinch
Warm milk - 2 tblspns
Basumati Rice - 1 1/2 cups
Vegetable oil - 1/4 cup + 2-3 tblspns for frying salmon.

Method:
1.Slice the onions and cut the tomatoes into quarters. Make fresh ginger garlic paste and set aside.

2.Wash the basumati rice and let it soak for 20 - 30 mins.

3. Rub the salmon pieces with salt, lemon juice, 1 1/2 tsp red chilly powder, 1 tsp turmeric and 1/2 tsp cumin. Marinate for half an hour and set aside.

4.  Fry the salmon in the vegetable oil for 2 or 3 mins on each side by turning over only once.

5. Heat the oil in a pot. add the whole spices - cinnamon, cloves and green cardamoms. Immediately add the   sliced onions to it and fry till golden brown.

6.Add the ginger garlic paste, turmeric powder, 1/2 tspn red chilly powder and tomatoes and simmer till the tomatoes turn soft. Mix well.

7. Add the yoghurt followed by green chillies, mint and cilantro. Put the sauce in a roasting dish, then add  the fried salmon pieces to it and simmer for around 10 mins.

8. Meanwhile bring to boil 4 to 5 litres of water in a big pot. Add 2 tblspns of salt. Add rice and cook till half  done. The rice should be a little soft on the outside but still gritty on the inside. Drain well.

9. Preheat oven to 375 degrees fahrenheit.


10. Now remove the fried salmon pieces from the sauce and set aside. Put the cooked rice into the roasting pan, add fresh mint leaves, cilantro, then saffron solution (saffron dissolved in warm milk). And layer the top with the fried salmon pieces that we removed from the sauce.

11. Close the lid and steam it in the oven for 10 mins.

12. Remove while it is steaming hot and serve with Mint chutney and Yoghurt chutney. Enjoy!

Peas Pulao


Ingredients: 
Basumati Rice - 2 cups 
Green Peas - 1 cup
Ginger garlic paste - 2 tspns
Cloves- 4
Green Cardamoms-4
Cinnamon sticks - 1 inch
Turmeric - 1 tspn
Red chilly powder - 1/2 tspn
Onions - 1 slightly large 
Green chillies - 4 small
Tomato - 1 med size
Yoghurt - 1/2 a cup
Fresh Mint - a few leaves
Cilantro - 1/4 cup chopped
Vegetable/Canola Oil- 1/4 cup

Method: 
Wash and soak the rice in water for at least 1/2 an hr.  Heat the oil, add sliced onion and fry till golden brown. Add the ginger garlic paste, turmeric, red chilly powder followed by chopped tomato, whole green chillies and yoghurt. Stir and mix till it turns into a nice masala paste. Add the green peas (fresh or frozen) and let it simmer for a while. Then add the soaked rice, and gently turn over from all sides till it mixes well with the masala. Now add 4 cups of water, 2 tspns salt, chopped cilantro and a few mint leaves. Close the pot with a lid and cook on high heat till the water starts boiling.Turn the heat to medium and cook till the water gets absorbed. Give it a stir and put it on simmer for 5 mins. The Peas Pulao is ready to be served. Enjoy the Peas Pulao with Mint chutney, Raita and roasted chicken. 

Italian Rice Croquettes aka Rice Balls aka Arancini – Back by Popular Demand… Aunt Angela and Uncle Bill D’Arduini!

I just flew back from New York, and boy, are my jokes tired (as you’ll hear). So is everything else, and there’s no rest for the weary as I pack for a quick trip to see the team at Allrecipes.com in Seattle. So, time is short, and I’m posting this incredibly delicious Italian rice croquette recipe, sans extra wordy article.

There isn’t much to add anyway; what you see is what you get. This great appetizer was filmed at a recent family dinner at my Aunt Angela and Uncle Billy D’Arduini’s, and if they sound familiar, they should! They’ve been featured on the blog numerous times; in such smash hit recipes as, Cabbage Rolls, Chicken D’Arduini, and Homemade Pasta.

You can definitely do this recipe completely vegetarian, by skipping the giblets, or switch those out for almost any other cooked meat. Sausage, prosciutto, or ham are just a few of the many options.

When it comes to the rice, we used a standard long rain, and went with a 2 parts water to 1 part rice ratio. You want fully hydrated and completely cooked grain. Al dente rice is not going to work here. Slightly overcooked is not a problem.

Anyway, I'd like to thank Aunt Angela and Uncle Bill for sharing their recipe, and I hope you can give it a try soon. It would be a great addition to any party menu. Enjoy!


Ingredients:
*Sorry, I never found out how many this makes, but I’m guessing about 70-80
2 pounds cooked chicken giblets (gizzards and hearts)
2 cups rice cooked in 4 cups salted water
2 cups grated Parmesan cheese
2 tbsp parsley, optional
1/4 cup breadcrumbs
2 large eggs
1/2 cup marinara sauce
salt and pepper to taste
plain breadcrumbs, as needed
vegetable oil for frying
lemon wedges

Italian Rice Croquettes aka Rice Balls aka Arancini – Back by Popular Demand… Aunt Angela and Uncle Bill D’Arduini!

I just flew back from New York, and boy, are my jokes tired (as you’ll hear). So is everything else, and there’s no rest for the weary as I pack for a quick trip to see the team at Allrecipes.com in Seattle. So, time is short, and I’m posting this incredibly delicious Italian rice croquette recipe, sans extra wordy article.

There isn’t much to add anyway; what you see is what you get. This great appetizer was filmed at a recent family dinner at my Aunt Angela and Uncle Billy D’Arduini’s, and if they sound familiar, they should! They’ve been featured on the blog numerous times; in such smash hit recipes as, Cabbage Rolls, Chicken D’Arduini, and Homemade Pasta.

You can definitely do this recipe completely vegetarian, by skipping the giblets, or switch those out for almost any other cooked meat. Sausage, prosciutto, or ham are just a few of the many options.

When it comes to the rice, we used a standard long rain, and went with a 2 parts water to 1 part rice ratio. You want fully hydrated and completely cooked grain. Al dente rice is not going to work here. Slightly overcooked is not a problem.

Anyway, I'd like to thank Aunt Angela and Uncle Bill for sharing their recipe, and I hope you can give it a try soon. It would be a great addition to any party menu. Enjoy!


Ingredients:
*Sorry, I never found out how many this makes, but I’m guessing about 70-80
2 pounds cooked chicken giblets (gizzards and hearts)
2 cups rice cooked in 4 cups salted water
2 cups grated Parmesan cheese
2 tbsp parsley, optional
1/4 cup breadcrumbs
2 large eggs
1/2 cup marinara sauce
salt and pepper to taste
plain breadcrumbs, as needed
vegetable oil for frying
lemon wedges

Gumbo a Go Go – Duck, Andouille Sausage, Smoked Pork Hock, Gulf Shrimp and Langoustine Gumbo

It’s not easy to pry gumbo-making secrets from a cook in New Orleans, but you should have better luck if you slip them some truth serum, in the form of several well-made sazeracs. 

This particular gumbo, featuring duck, andouille sausage, smoked pork hock, gulf shrimp, and langoustine, was inspired by my recent trip to New Orleans, where I sampled a half-dozen varieties.

One rye whiskey-induced tip was to cook the famous Cajun roux in some duck fat instead of the more common and mundane vegetable oil. The roux is the soul of the gumbo and one of the challenges of this recipe is giving the fat and flour enough time to turn into that deep brick red-brown color.

My little trick here is to add a couple extra spoons of flour after the roux is browned. The dark roux gives the gumbo its signature flavor, but it doesn’t have much thickening power. I just cooked it a couple minutes, and then stirred in the stock.

Another tweak is using pickled okra instead of fresh or frozen. This particular perversion was born out of necessity rather than some brilliant thought on my part. Of course, if this technique catches on, that story will change. The pickled okra gave the gumbo a great flavor and added a little bit of acidity, which is always welcome in something this substantial.

This can be made with hundreds of different combinations of smoked meats, game, poultry, and seafood; and in my opinion, the more the merrier. As usual, I’d love to hear about any variations you may come up with. As you’ll see, the procedure is pretty straightforward, although you’re talking about a full day’s project. This is a dish that takes time, but I still hope you give it a try. Enjoy!


2 duck legs
1 tbsp vegetable oil, more as needed
1 cup flour, plus 2 tbsp for second addition
6 cups chicken broth
1 pound andouille sausage
1 large onion, chopped
4 green onions chopped
1 cup celery, chopped
1 cup diced peppers (any combination of sweet and hot)
1 cup diced tomatoes
1/2 tsp dried thyme
1 bay leaf
1 tsp black pepper
1/4 tsp cayenne pepper, or to taste
1 smoked pork hock
2 cups water, or as needed
1 cup sliced okra, fresh, frozen or pickled
1 pound gulf shrimp
1 pound crawfish tail meat or langoustine
rice to garnish

Traditional Madrasi Chicken Biryani

The traditional madrasi biryani is very popular in South India especially in Chennai where not a single muslim function or event is complete without this being served. Its aroma fills the air and you can smell the biryani at least 5 houses down the street. It is so insanely delicious! 

The art of the traditional madrasi biryani lies in its technique and the few tips and tricks which add to its flavour and taste.  The flavour is enhanced by adding selected whole garam masala spices. Adding too many garam masala spices or garam masala powders mars its flavour and adding cashew or almond paste makes the rice grains sticky.  

What is important in a delicious biryani is a combination of  flavour, texture and taste and this is achieved by adding the right spices, the right quality and the right proportions of all the  ingredients and at the right time using the right technique. It is like a marriage which comes together when everything is in perfect harmony.  


Here's the recipe:


Ingredients:

Chicken - 1 whole + 1/2 a breast (2kgs)
Onions - 6 medium size
Tomatoes - 5 medium size (preferably plum)
Cloves - 10
Green cardamoms - 8
Cinnamon sticks - 2- 3 (2 " inch sticks)
Vegetable oil - 1 cup
Ginger garlic paste - 1/2 cup
Thick yoghurt - 1 cup
Green chillies - 10 -12 small size
Mint leaves - a handful
Cilantro chopped - 1 cup
Saffron - 1 generous pinch
Milk   - 1/2 a cup
Turmeric- 1/2 a tspn
Red chilly powder- 1tspn
Basumati Rice - 5 cups (Long grain rice )

*Some of the good brands of regular basumati rice are  817, Lal Qila, Tilda etc.


Method:

Peel, wash and slice the onions. You could use a food processor as it is much easier. Grind the ginger garlic paste. Wash and cut tomatoes into quarters, remove the stems from the green chillies, wash and chop coriander, wash mint leaves and keep aside.                                          
                                          

Heat 1 cup of oil in a big pot. Add the whole cinnamon sticks, cloves and cardamoms.  


Add the sliced onions and fry them on medium heat stirring on and off taking care not to burn them. The onions first turn translucent and then start turning golden brown. This takes atleast 10 to 15 mins. 


The onions should be evenly brown as in the picture.

Stir in the ginger garlic paste, turmeric and red chilly powder. When it leaves an aroma add the tomatoes and green chillies.

Let the tomatoes soften a bit, then add the chicken pieces. 


Roast the chicken in the masala by turning it over gently taking good care not to break the pieces. This should be done on medium to high heat.  


Add the yoghurt followed by mint leaves and chopped coriander. 


Let the chicken cook for sometime on medium heat till the broth thickens a bit and a whiff of the aroma comes out when you open the lid. At this stage the chicken yakhni (biryani curry) is ready. Squeeze in the juiice of half a lime and adjust the  salt. 


Now transfer the chicken to a roaster. Preheat the oven to 350 degrees fahrenheit. Boil the soaked basumati rice (regular rice should be washed and soaked for 1/2 an hr and the golden sela basumati for 2 - 4 hrs) till it is half cooked. The grains should be soft outside but still brittle inside. 


Drain the rice and pour it over the yakhni (the prepared chicken biryani curry) in the roaster. Top it with chopped coriander and  mint leaves. Dissolve saffron in 1/2 a cup of milk and sprinkle the half the saffron milk on the rice. Add the food coloring to a few grains of cooked rice and sprinkle the colored rice on top.

Close the lid well as firm but not brittle inside. If you find it gritty then bake it for 5 more minutes. Once it is done,  remove from the oven, add the remaining saffron milk, close the lid and let the roaster rest for 5 more minutes. The saffron flavour comes out.and bake in the preheated oven for 15-20 mins.

With the help of a flat round spatula gently turn over and mix the biryani from the bottom to the top little by little taking care not to break the chicken pieces.  And as you mix, keep transferring the biryani to the serving platter a little at a time. Do not mix the biryani all at once as this will not only break the chicken pieces but also he rice grains. You have to slowly and gently mix it little by little with all patience.The steaming hot biryani is now ready. Enjoy the chicken biryani with onion raita and egg plant chutney. 


Cooking Tips:


1. When you soak the basumati rice the water should be atleast 4 inches above the rice. If there is less  water the rice would tend to break and become sticky.
2. Boil the rice in a big colander or pot which can hold atleast 2 litres of water. If you boil 1 kg of rice in a 1 litre pot then the rice woud become sticky and mushy.
3. To test the rice for doneness, take a grain of rice and press it between your index finger and thumb. It should leave 3 small brittle grains on your finger. If the rice is not done yet then you wouldn't be able to press the rice. Therefore it should be just a little soft on the outside but still gritty inside. .
4. For extra flavour,smash 3-4 green cardamoms just to open them a little and add them to the yakni when it is simmering in the roaster just before adding the rice. 
5. Adding saffron milk right at the end brings out the extra flavour.
6. I also add a little ghee on top of the rice before steaming it in the roaster at the final stage  for added flavour . 
7. Instead of pouring the saffron milk on the biryani,, you can melt butter in the saffron solution, add some of the boiled basumati rice to it and then sprinkle the butter flavoured saffron rice on top. This also enhances the flavour. 
8. Use preferably plum tomatoes or vine tomatoes as they are not very tangy. 
9. Choose medium sized freshly slaughtered yellow grain fed chicken.
10. Yoghurt should be thick, creamy and sour. I prefer balkan style astro yoghurt or the 3.5% plain astro yoghurt. 
11. Use the darker variety of cinnamon not the lighter ceylon cinnamon which is used in mostly desserts. 
12. For food coloring use the natural food coloring such as cochineal. the other dyes (red no.1 and red no.40) carry great health risks as they come from petroleum byproducts.


.