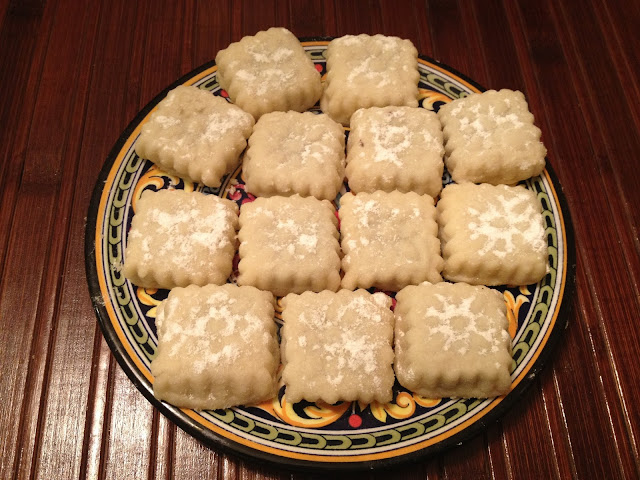
Bottle gourd (Kaddu/Lauki) Barfi


As a child I loved the kaddu (bottle gourd) ki mithai (as we called it) that my mom used to make. She would first cook it in the pan on the stove and then bake it in a huge silver plated brass pie plate with a heavy lid. As we had no gas or electric oven she used her primitive baking technique of placing it over a layer of burning coals and then adding another layer of burning coals on the lid. It was amazing to watch her bake using this technique whenever she made traditional sweets or indian pies and cookies like baked halwa pooris, nan khatai etc. 

I made this recipe based on estimates by tasting as my mom used to do, but I kept a tab on what and how much I was adding each time. My mom would dissolve the saffron in milk and add it to the mixture while cooking. But I decided to use it more as a garnish. I also added pistachios to complement the green color of the bottle gourd. The result was fabulous!  The intense sweet milky taste combined with the juicy and chewy texture of the gourd kicked up a notch. Indeed, it did taste like my mom's kaddu ki mithai that I used to enjoy. 

Here's the recipe: 

Ingredients:
Bottle gourd    - 1 cup  after squeezing out the water
Khoya            - 350 gms (dried milk)
Ghee               - 2 tbs
Sugar               - 1 1/2 - 2 cups
Milk                 - 2 tbs 
Saffron             - a pinch
Pistachios         - 2 tbs
Green liquid food coloring - a few drops

Method: 
1. Peel the bottle gourd cut off the stem, trim the bottom and cut it into two halves vertically.
2. Scoop out the pulp and seeds in the center with a teaspoon and discard them.
3. Grate the gourd finely, squeeze out the juice by hanging it in a cheese cloth overnight or for a few hours. 
4. Melt 2 tbs ghee in a non-stick sauce pan on medium heat and lightly fry the grated gourd till it turns translucent. 
5. Add 1 1/2 cups sugar, mix well. 
6. Grind the khoya to a fine powder and add to the pan. Add 2 tbs milk, green food coloring and mix well. Add more sugar if needed according to how much sweeter you want it.
7. Cook on low or medium low heat only while stirring continuously. 
8. Allow the gourd mixture to thicken and when it starts leaving the sides of the pan, remove and put it in a baking dish greased with ghee at the bottom as well as on all the sides. 

9. Sprinkle the saffron threads and halved pistachios on top, cover with tin foil and bake in an oven pre-heated to 350 degrees fahrenheit for 20-25 mins or till lightly golden at the bottom. 
10. Remove from the oven, allow it to cool down, then chill it in the refrigerator, cut into diamond shapes and serve chilled. The bottle gourd burfi is ready to enjoy. 

Tips: 
1. Cook very gently with patience on low and medium low heat only.
2. Take care not to over brown or burn the grated gourd shreds while cooking or baking. 


Paneer Pepper Melange


This is a quick and simple paneer dish very easy to make but so tasty to eat! 


Ingredients: 
Paneer - cut into small cubes (1/2 of 340gm pack)
Red bell pepper - 1
Green bell peppers - 1
Tomato - 1 medium size
Green chillies - 2 small 
Cilantro for garnish
Cumin seeds - 1/2 tsp
Dried red chillies - 2 medium size
Fresh garlic clove - 1 chopped
Coriander powder - 1 tsp
Cumin powder - 1/2 tsp
Turmeric powder - 1/2 tsp
Red chilly powder - 1/2 tsp
Garam masala powder - 1/2 tsp
Black Pepper - 1/4 tsp
Vegetable oil - 2 tbs
Salt to taste

Method: 
1. Heat 2 tablespoons of vegetable oil in a non-stick saucepan. 
2. Add dried red chillies, cumin seeds, followed by chopped garlic. 
3. Stir in diced green and red bell peppers and fry them for 2 mins. 
4. Throw in the diced tomato, give it a good stir and quickly add the paneer cubes and green chillies.
5. Sprinkle salt, pepper and blend in all the masalas (coriander, cumin, turmeric and red chilly powders) with the paneer.
6. Turn over gently and cook till the paneer pieces are well coated with the masala and are soft and golden. 
7. Sprinkle garam masala powder, mix well, garnish with chopped cilantro and serve hot with chappatis, paranatas or puris. 


Minty Kebabs


My failed attempts to make kebabs like the ones we used to enjoy at the Kareem's restaurant in Old Delhi left me frustrated. I still dream about their taste - so flavourful, juicy and spicy too.

My kebabs were always dry no matter what I did and when I tried to make them moist they would crumble and fall while they were being grilled. I always used extra lean meat to keep them healthy. But my husband would argue and justify saying: "It is the fat that keeps the kebabs moist. All the restaurants use some fat in their kebabs and all that fat drips off when you grill them", which took me a while to digest. Anyway, I decided to try them out with medium beef at his request, thinking, I am not going to make them often. Well I have an alternative for healthy eaters:  you could try my koubideh which are made with extra lean ground beef.

 The medium ground beef did do the trick and my kebabs did turn out well this time and did not fall off when I grilled them. Not only this, the Shaan's Chapli Kebab spices combined with fresh mint and cilantro enhanced their flavour.  I rarely use store bought spice mixes in my cooking except for a few selected dishes like Haleem, Nihari and Chapli kebabs as it turns out easy instead of an elaborate preparation.  The chapli kebab spices have whole coriander, cumin and garam masala spices in them with white flour. So I decided to grind them fine. Then I added the fresh mint and cilantro.  And I was very happy with the end result. They turned out not only juicy and flavourful but were very close to the ones we ate at Kareem's restaurant in Old Delhi.

My family loved them so much. I forgot all about the fat and enjoyed every bite of them.

Here's the recipe!

Ingredients:
Medium ground beef - 350gms
Shaan's Chapli kebab Masala - 1/2 pack
Cilantro - 1/2 cup
Mint - 1/4 cup
Vegetable oil - 1 tbs
Veg oil for basting - 1tbs
 Flat metal skewers

Method:
1. Rinse the ground beef quickly in running water in a strainer without making it soggy. Let it drain a bit so that it is not watery. You don't need to rinse it if the beef was washed before grinding.

2. Take half of the Shaan's chapli kebab masala from the pack, place it in a dry grinder and grind it fine.

3. Wash the fresh mint and cilantro and towel dry them, then add to the grinder and grind them all together.


4. Mix together the ground beef, the ground masala and one teaspoon of vegetable oil.

5. Brush the skewers with oil as this makes it easier to slide off the kebab when it is done. With clean wet hands take a golf size ball of the prepared ground beef and wrap it around the skewer till it holds together. Clean and wet your hands again and shape it into a nice, long, smooth and round sausage then with your index and middle finger mimicking scissors pinch the kebab from one end to the other alongside to form ridges. Smoothen the edges.

6. Repeat the steps for all of them. Leave enough room on either side of the skewers so as to rest them on the grill.


7. Set your oven to broil on high (or 550 degrees fahrenheit).

8. Take an old cookie sheet and cover it with tin foil. Place the skewers on the cookie sheet. Then place it under the grill in the top position of the oven.

9. Broil for 3 mins on each side. Do not over cook as they would harden. When you see them turning golden brown turn over and cook for another 3 mins till they are just done. Keep some tin foil ready. Remove them from the oven. Discard the fat/oil drippings. Wait for sometime till they cool off a bit. Slide them off with your hands (wearing clean oven proof gloves) into the tin foil and wrap them up immediately.  This helps in retaining the moisture and heat till you serve them. You have to be very careful and use oven gloves while handling the skewers as they are very hot.

10. Serve them hot with rumali roti (thin flat bread like a hand kerchief) or naan and yoghurt mint chutney which you can make by grinding together 1/2cup each of fresh mint and cilantro, 1 small green chilly, 1/2 an inch ginger, salt and pepper. Then add this to 1/2 a cup of whisked sour yoghurt.

11. You can spread the yoghurt chutney on the Naan or rumali roti, place a long kebab inside, top with sliced red onions sprinkled with lemon juice and chaat masala, roll it into a wrap and enjoy!

Maamoul Cookies

Maamouls are what I would call, cookies from Heaven!! They melt in the mouth and make you feel like you are in the seventh heaven. These little goodies, packed with rich nuts, scented with orange blossom water and sweetened with honey are so addicting that you would never want to stop eating them.


Here's the recipe.

Ingredients:
White flour - 4 cups - 6 cups
Unsalted butter - 1lb chilled
Sugar - 1/2 cup
Salt - 1/4 tsp
Chilled water - 1/4 cup
Orange blossom water - 2 tbs
Maamoul mold

Method:
1. Cut the chilled butter into cubes.

2. Place the flour, salt and sugar in the food processor and pulse 2 or 3 times.

3. Add the butter and pulse again  3 or 4 times, till the mixture resembles coarse bread crumbs.

4. At this stage add the orange blossom water followed by chilled water little by little with each pulse till it forms into a soft dough. Squeeze the dough to check. It should  be soft but not sticky.

5. Pound the nuts coarsely. You can use different fillings with mixed nuts (almonds, pistachios and walnuts) or just pistachios or just almonds in combination with honey/icing sugar and orange blossom water. You can also use just date paste mixed with orange blossom water. Or dates and mixed nuts with orange blossom water. For the maamoul fillings recipe click here.

6. Make small round balls of the dough. Make slightly bigger balls of the filling. You can use different moulds for different fillings.

7. Make a depression in the small rounds of the dough then shape them like a bowl by swirling around with your fingers . Place the ball of the filling in the bowl, close the circle over the filling and smoothen it like a ball. Please note that there should be a considerably thin layer of dough around the filling (not so thin that the filling comes out on baking and not so thick that there's hardly any filling inside). Keep a paper towel handy to wipe your hands each time you touch the filling otherwise the dough would get discolored with your sticky fingers and it would be hard to give shape.


8. Roll the filled rounds in the flour, dust the mold too with a little flour then overturn it and tap to shake off the excess flour.

9. Place the filled maamoul in the selected shape in the maamoul mold and press it with your palm.

10. Line a cookie sheet with parchment paper.

11. Now tap the mold on the edge of the cookie sheet so that the maamoul stuck in the mould falls off on to the cookie sheet. Repeat with the rest of the maamouls.

12. Pre-heat the oven to 350 degrees fahrenheit. Bake the maamouls for around 10 -12 minutes till the base of the maamoul is lightly golden brown. After 12 mins take a flat thin spatula and lift the base of a maamoul to see if it is done. Switch off the oven and leave them inside for 3-4 minutes.  Remove when they look firm at the top and lightly golden brown at the base.


13. Cool on wire wrack for one hour. Dust them with icing sugar after they cool down completely and enjoy.

Tips: 

Do not store these cookies in the fridge. Store them in a cool dry place in an air tight container or cookie jar. They stay fresh outside for 2 - 4 weeks. You may freeze them if you want to store for longer periods of time. But bring them to room temperature before serving them.